> ## Documentation Index
> Fetch the complete documentation index at: https://docs.carousify.com/llms.txt
> Use this file to discover all available pages before exploring further.
# Whitelabel overview
> Run Carousify under your own brand — your logo, name, colors, domain, and email — so clients and your team never see Carousify.
Whitelabeling replaces Carousify's branding with yours everywhere your account is used — the app header, the browser tab, transactional emails, the sign-in screen, and the domain it all loads from. Your clients and team members see *your* product, not Carousify.
Agencies and teams use it to put their own brand in front of clients — when someone you work with opens the platform, everything they see is yours. It looks and feels like a tool you built, not one you signed up for.
Whitelabel is **branding only**. It controls how the platform *looks* — logo, name, colors, domain, and emails — so your clients experience it as yours. It doesn't change billing or invoicing in any way.
## Account-wide, not per workspace
Most Carousify settings — brand kits, integrations, members — are scoped to a single workspace. **Whitelabel is the exception.** It applies at the account level, across *every* workspace you own.
Turning whitelabel on rebrands the app for everyone with access to your account, in all workspaces, at once. There's no per-workspace whitelabel — set it up once, and it's the experience all your clients and teammates get.
## Where to find it
In the left sidebar, open **Settings › Whitelabeling**.
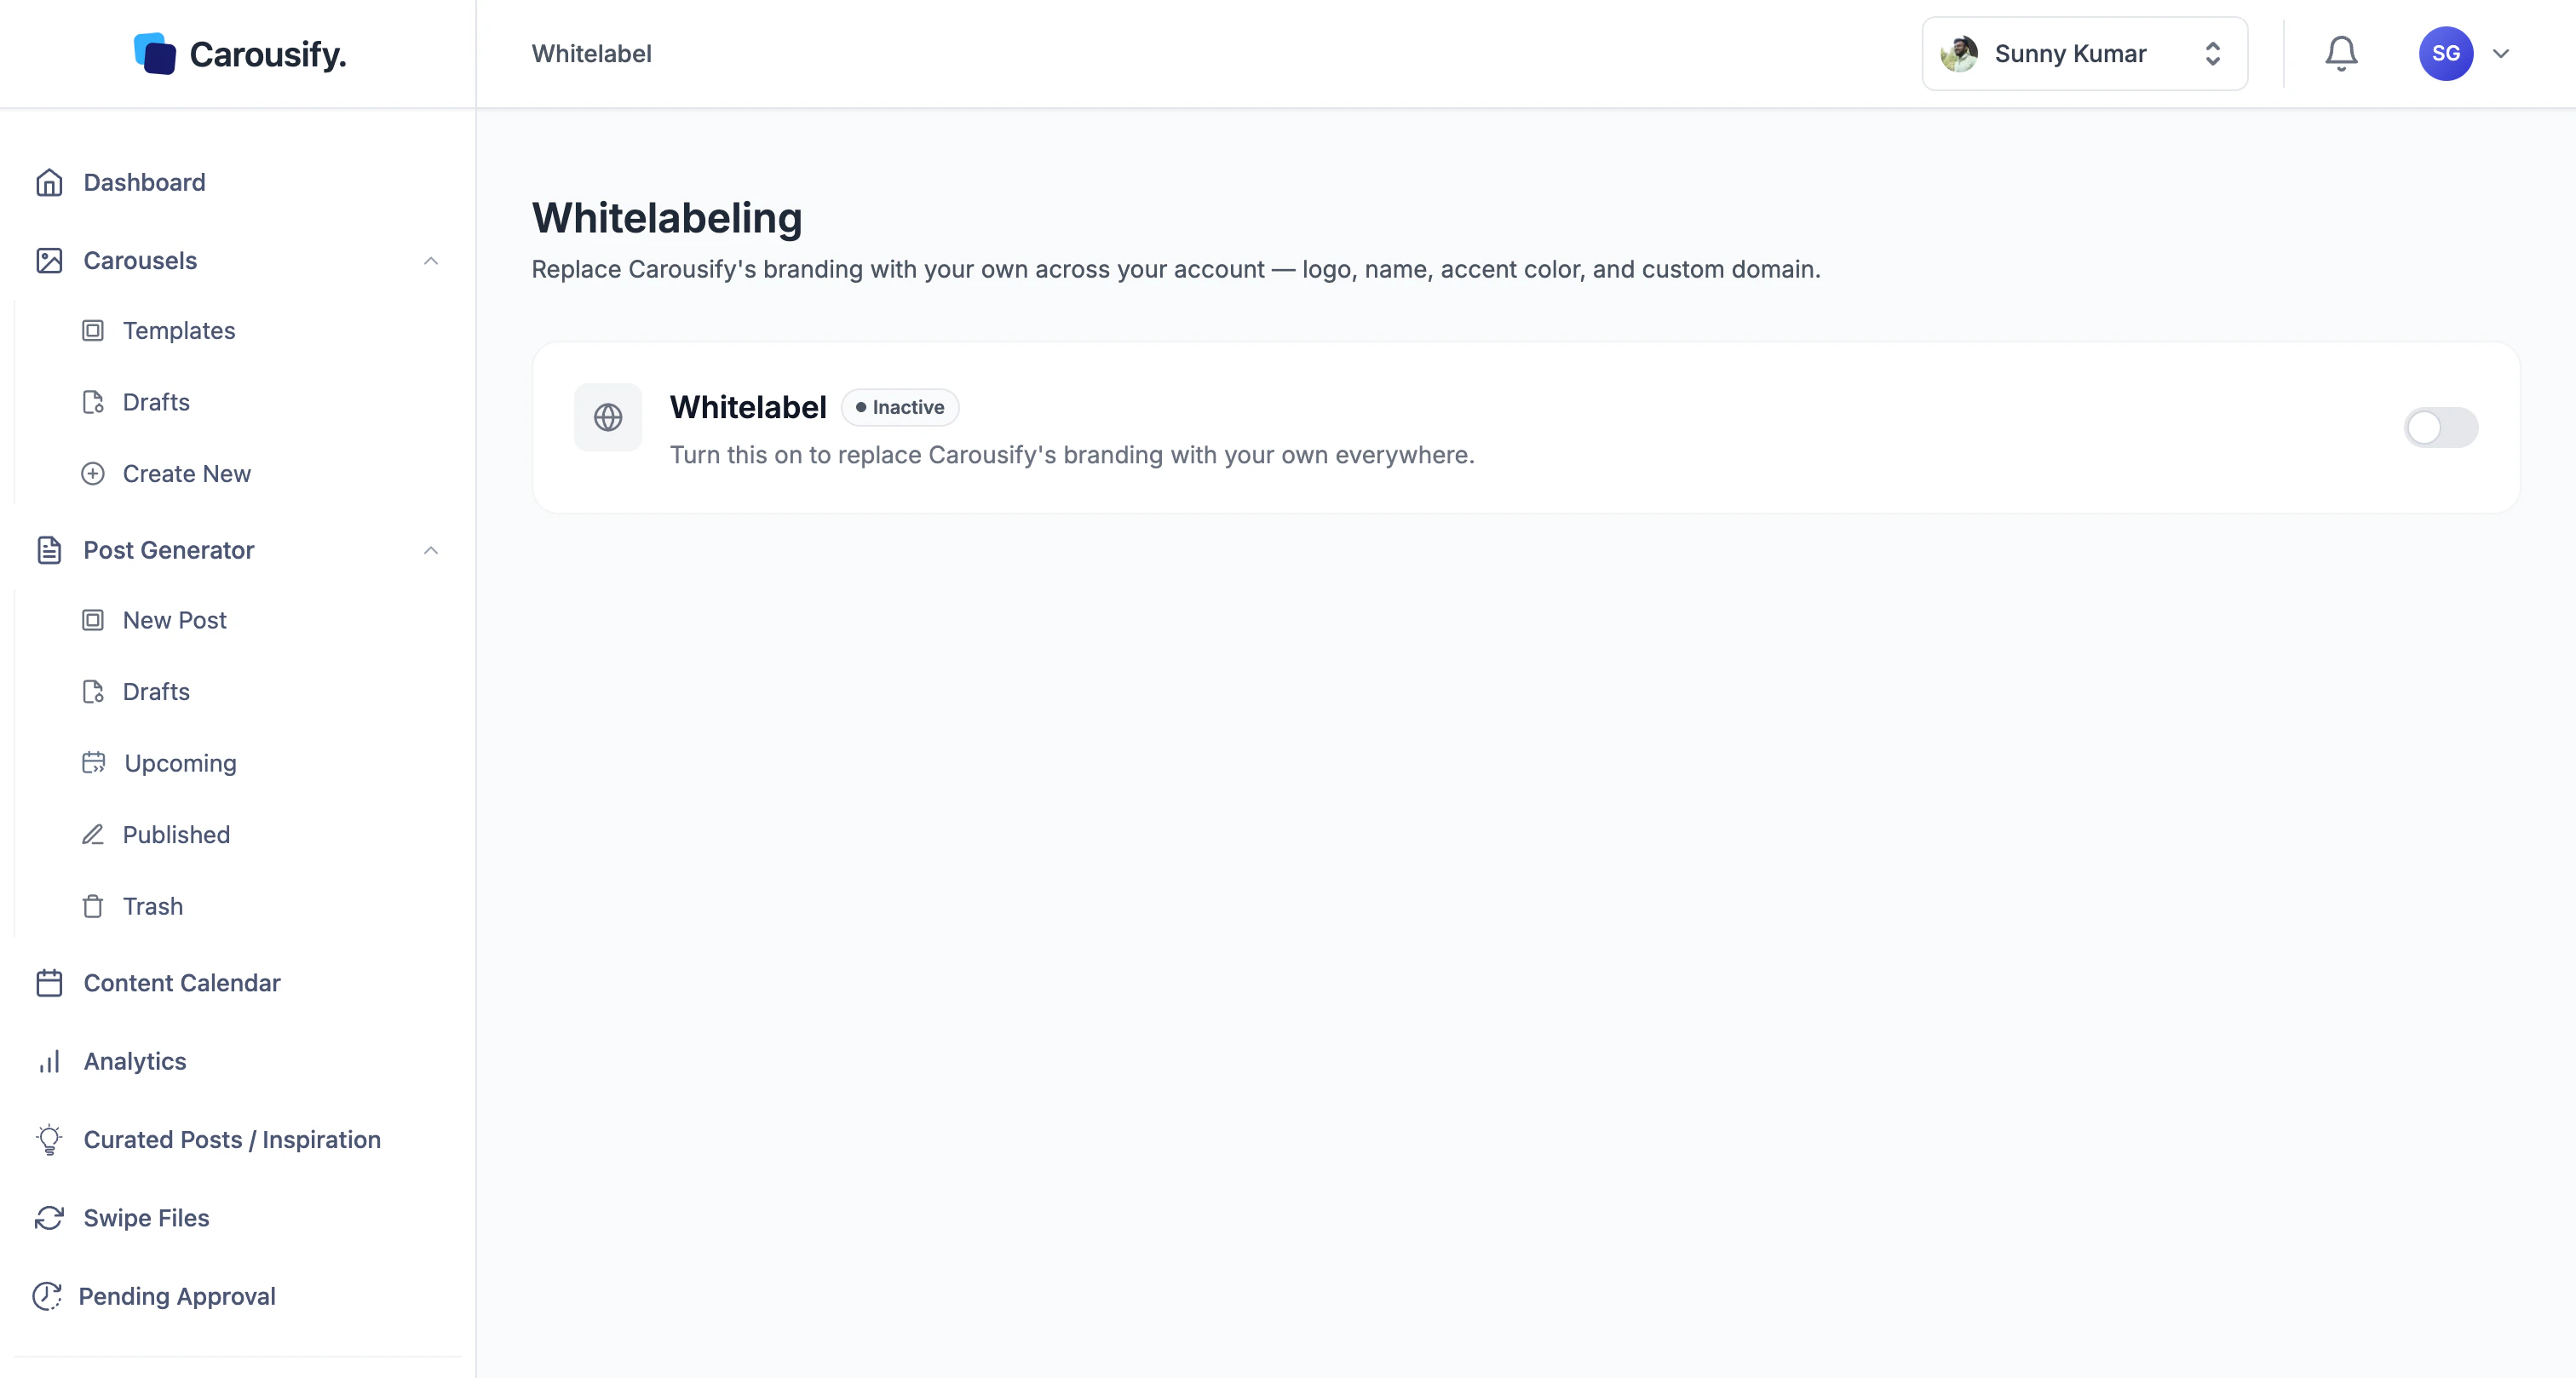 The page opens with a single master switch. While it's **Inactive**, your account uses Carousify's default branding and domain. Flipping it to **Active** reveals the full configuration surface and starts applying your branding everywhere.
## Turn whitelabeling on
The status pill changes from **Inactive** to **Active** and the configuration sections appear below.
Every section marked with a `*` needs a value before your branding renders cleanly — brand logo, favicon, name, support email, and accent color at minimum.
**Save Changes** sits at both the top and bottom of the page. Nothing applies until you save — toggling the switch alone doesn't persist anything.
The page opens with a single master switch. While it's **Inactive**, your account uses Carousify's default branding and domain. Flipping it to **Active** reveals the full configuration surface and starts applying your branding everywhere.
## Turn whitelabeling on
The status pill changes from **Inactive** to **Active** and the configuration sections appear below.
Every section marked with a `*` needs a value before your branding renders cleanly — brand logo, favicon, name, support email, and accent color at minimum.
**Save Changes** sits at both the top and bottom of the page. Nothing applies until you save — toggling the switch alone doesn't persist anything.
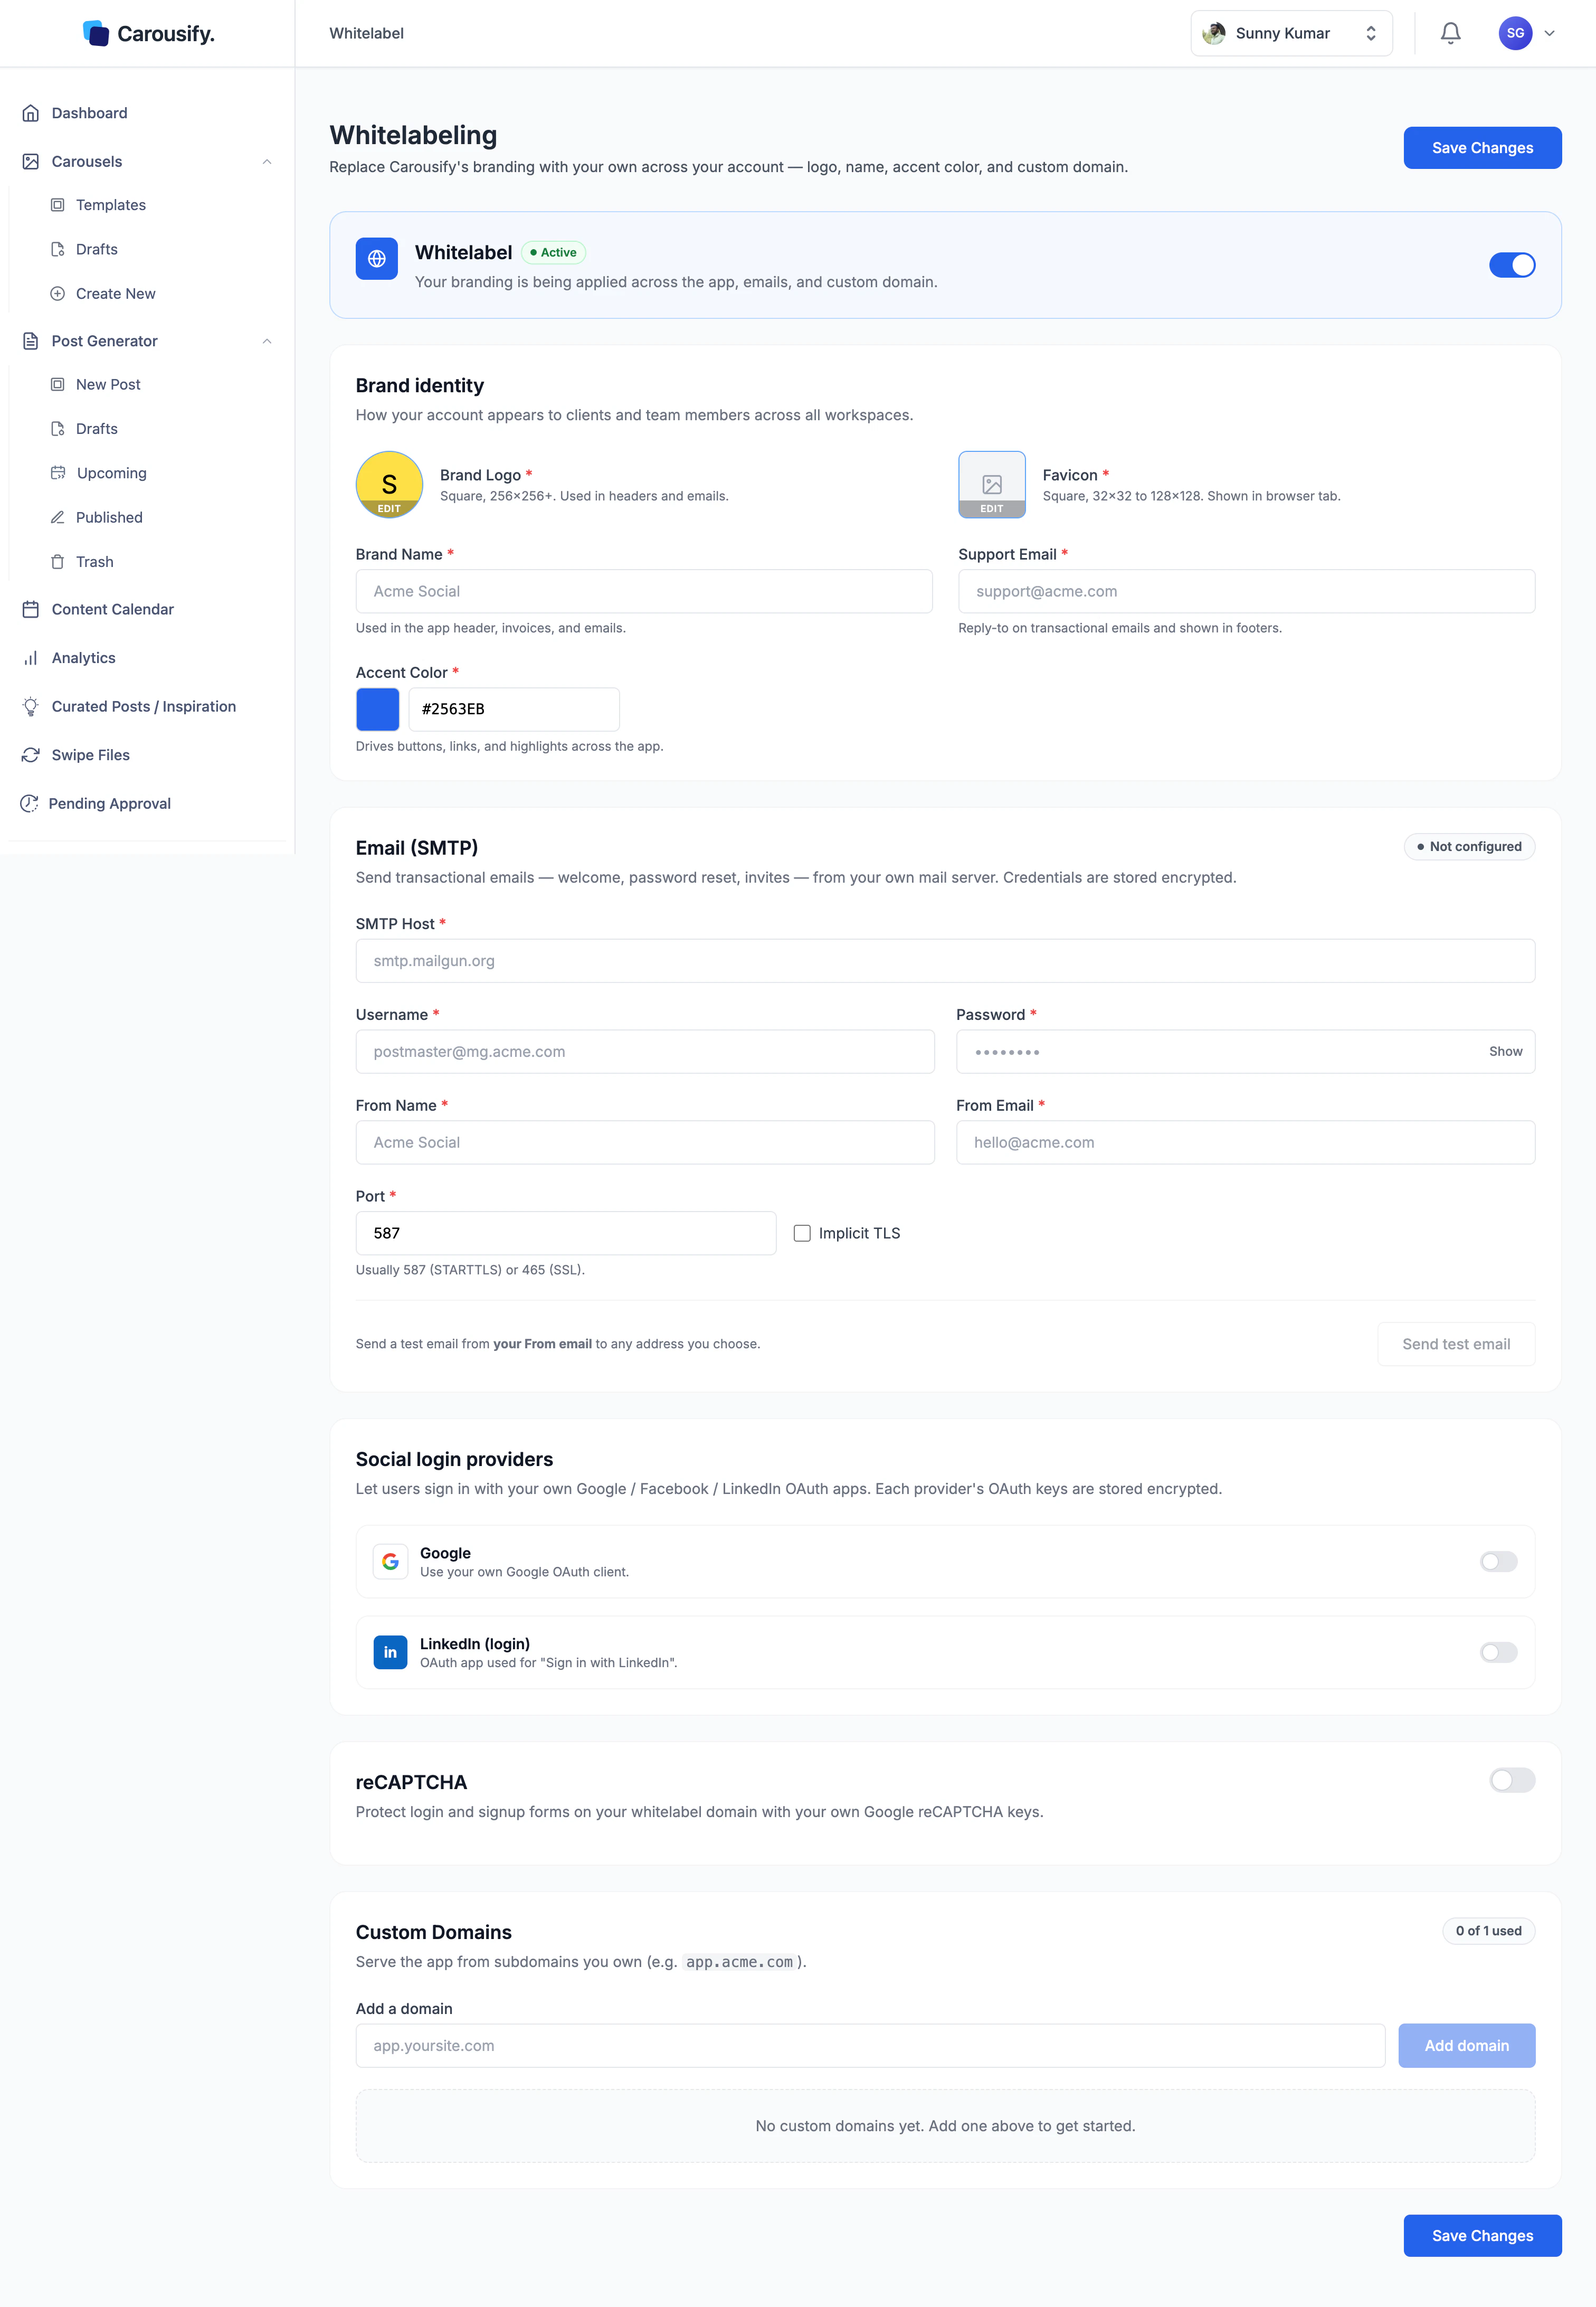 ## What you can configure
Whitelabel is grouped into five sections on this one page.
Logo, favicon, brand name, support email, and accent color — what shows in headers, the browser tab, and emails.
Send welcome, password-reset, and invite emails from your own mail server instead of Carousify's.
Serve the whole app from a subdomain you own, like `app.yourbrand.com`.
Your own Google and LinkedIn OAuth apps for sign-in, plus your own reCAPTCHA keys.
### Brand identity
The **Brand identity** section sets how your account looks to anyone who opens it:
| Field | Where it shows |
| ----------------- | -------------------------------------------------------------- |
| **Brand Logo** | App headers and emails. Square, 256×256 px or larger. |
| **Favicon** | The browser tab. Square, 32×32 to 128×128 px. |
| **Brand Name** | App header and emails. |
| **Support Email** | Reply-to address on transactional emails and shown in footers. |
| **Accent Color** | Buttons, links, and highlights across the app. |
Full walkthrough on [Branding](/whitelabel/branding).
### Email and domain
Two sections turn Carousify into something that *is* your product rather than something that emails and links back to ours:
* **Email (SMTP)** — point Carousify at your own mail server so transactional emails come from your domain, not Carousify's. Credentials are stored encrypted. See [SMTP](/whitelabel/smtp).
* **Custom Domains** — add one subdomain you own (e.g. `app.acme.com`) and the entire app loads from it. See [Custom domain](/whitelabel/custom-domain) for the DNS steps.
### Social sign-in and reCAPTCHA
Two more sections live on the same page and don't have separate guides — configure them here:
* **Social login providers** — by default, "Sign in with Google" and "Sign in with LinkedIn" run through Carousify's OAuth apps, which means the consent screen says *Carousify*. Add your own Google and LinkedIn OAuth client credentials and the consent screen shows *your* brand instead. Each provider's keys are stored encrypted.
* **reCAPTCHA** — protect the login and signup forms on your whitelabel domain with your own Google reCAPTCHA keys, so bot protection runs under your account, not Carousify's.
Social login and reCAPTCHA are optional. If you skip them, sign-in still works — the OAuth consent screen and CAPTCHA just reference Carousify instead of your brand. Set them up when the goal is a fully unbranded experience end to end.
## Saving and applying changes
**Save Changes** persists everything on the page in one go. Branding, colors, and email take effect immediately after saving. A custom domain only goes live once its DNS records resolve and the certificate is issued — that part is covered in [Custom domain](/whitelabel/custom-domain).
Turning the master switch back to **Inactive** and saving reverts the account to Carousify's default branding and domain. Your configured values are kept, so you can switch whitelabel back on later without re-entering everything.
## What's next
Point a subdomain you own at Carousify and serve the app from it.
Logo, favicon, name, support email, and accent color, step by step.
Send transactional emails from your own mail server.
Combine whitelabel with client workspaces for a fully branded agency setup.
## What you can configure
Whitelabel is grouped into five sections on this one page.
Logo, favicon, brand name, support email, and accent color — what shows in headers, the browser tab, and emails.
Send welcome, password-reset, and invite emails from your own mail server instead of Carousify's.
Serve the whole app from a subdomain you own, like `app.yourbrand.com`.
Your own Google and LinkedIn OAuth apps for sign-in, plus your own reCAPTCHA keys.
### Brand identity
The **Brand identity** section sets how your account looks to anyone who opens it:
| Field | Where it shows |
| ----------------- | -------------------------------------------------------------- |
| **Brand Logo** | App headers and emails. Square, 256×256 px or larger. |
| **Favicon** | The browser tab. Square, 32×32 to 128×128 px. |
| **Brand Name** | App header and emails. |
| **Support Email** | Reply-to address on transactional emails and shown in footers. |
| **Accent Color** | Buttons, links, and highlights across the app. |
Full walkthrough on [Branding](/whitelabel/branding).
### Email and domain
Two sections turn Carousify into something that *is* your product rather than something that emails and links back to ours:
* **Email (SMTP)** — point Carousify at your own mail server so transactional emails come from your domain, not Carousify's. Credentials are stored encrypted. See [SMTP](/whitelabel/smtp).
* **Custom Domains** — add one subdomain you own (e.g. `app.acme.com`) and the entire app loads from it. See [Custom domain](/whitelabel/custom-domain) for the DNS steps.
### Social sign-in and reCAPTCHA
Two more sections live on the same page and don't have separate guides — configure them here:
* **Social login providers** — by default, "Sign in with Google" and "Sign in with LinkedIn" run through Carousify's OAuth apps, which means the consent screen says *Carousify*. Add your own Google and LinkedIn OAuth client credentials and the consent screen shows *your* brand instead. Each provider's keys are stored encrypted.
* **reCAPTCHA** — protect the login and signup forms on your whitelabel domain with your own Google reCAPTCHA keys, so bot protection runs under your account, not Carousify's.
Social login and reCAPTCHA are optional. If you skip them, sign-in still works — the OAuth consent screen and CAPTCHA just reference Carousify instead of your brand. Set them up when the goal is a fully unbranded experience end to end.
## Saving and applying changes
**Save Changes** persists everything on the page in one go. Branding, colors, and email take effect immediately after saving. A custom domain only goes live once its DNS records resolve and the certificate is issued — that part is covered in [Custom domain](/whitelabel/custom-domain).
Turning the master switch back to **Inactive** and saving reverts the account to Carousify's default branding and domain. Your configured values are kept, so you can switch whitelabel back on later without re-entering everything.
## What's next
Point a subdomain you own at Carousify and serve the app from it.
Logo, favicon, name, support email, and accent color, step by step.
Send transactional emails from your own mail server.
Combine whitelabel with client workspaces for a fully branded agency setup.