> ## Documentation Index
> Fetch the complete documentation index at: https://docs.carousify.com/llms.txt
> Use this file to discover all available pages before exploring further.
# Custom domain
> Serve the whole app from a domain you own — yourbrand.com or app.yourbrand.com — so clients only ever see your URL.
A custom domain serves the whole app from a domain you own. Instead of your clients loading `app.carousify.com`, the app runs at your address — your root domain (`yourbrand.com`) or a subdomain (`app.yourbrand.com`). Together with your [branding](/whitelabel/branding) and [SMTP](/whitelabel/smtp), the product is yours right down to the address bar.
This lives in the **Custom Domains** section of the [Whitelabel](/whitelabel/overview) page.
Custom domains are an **Enterprise** feature and need whitelabel switched **Active** (see [Whitelabel overview](/whitelabel/overview)). On other plans, contact [Support](https://carousify.com/contact-us/) to enable them at an additional charge.
## Before you start
You'll need:
* A **domain or subdomain** you control — your root domain (`yourbrand.com`) or a subdomain (`app.yourbrand.com`)
* Access to that domain's **DNS provider** (Cloudflare, Route 53, GoDaddy, Namecheap, etc.) so you can add records
* Whitelabel turned on in **Settings › Whitelabeling**
## Step 1 — Add your domain
In the left sidebar, open **Settings › Whitelabeling** and scroll to the **Custom Domains** section.
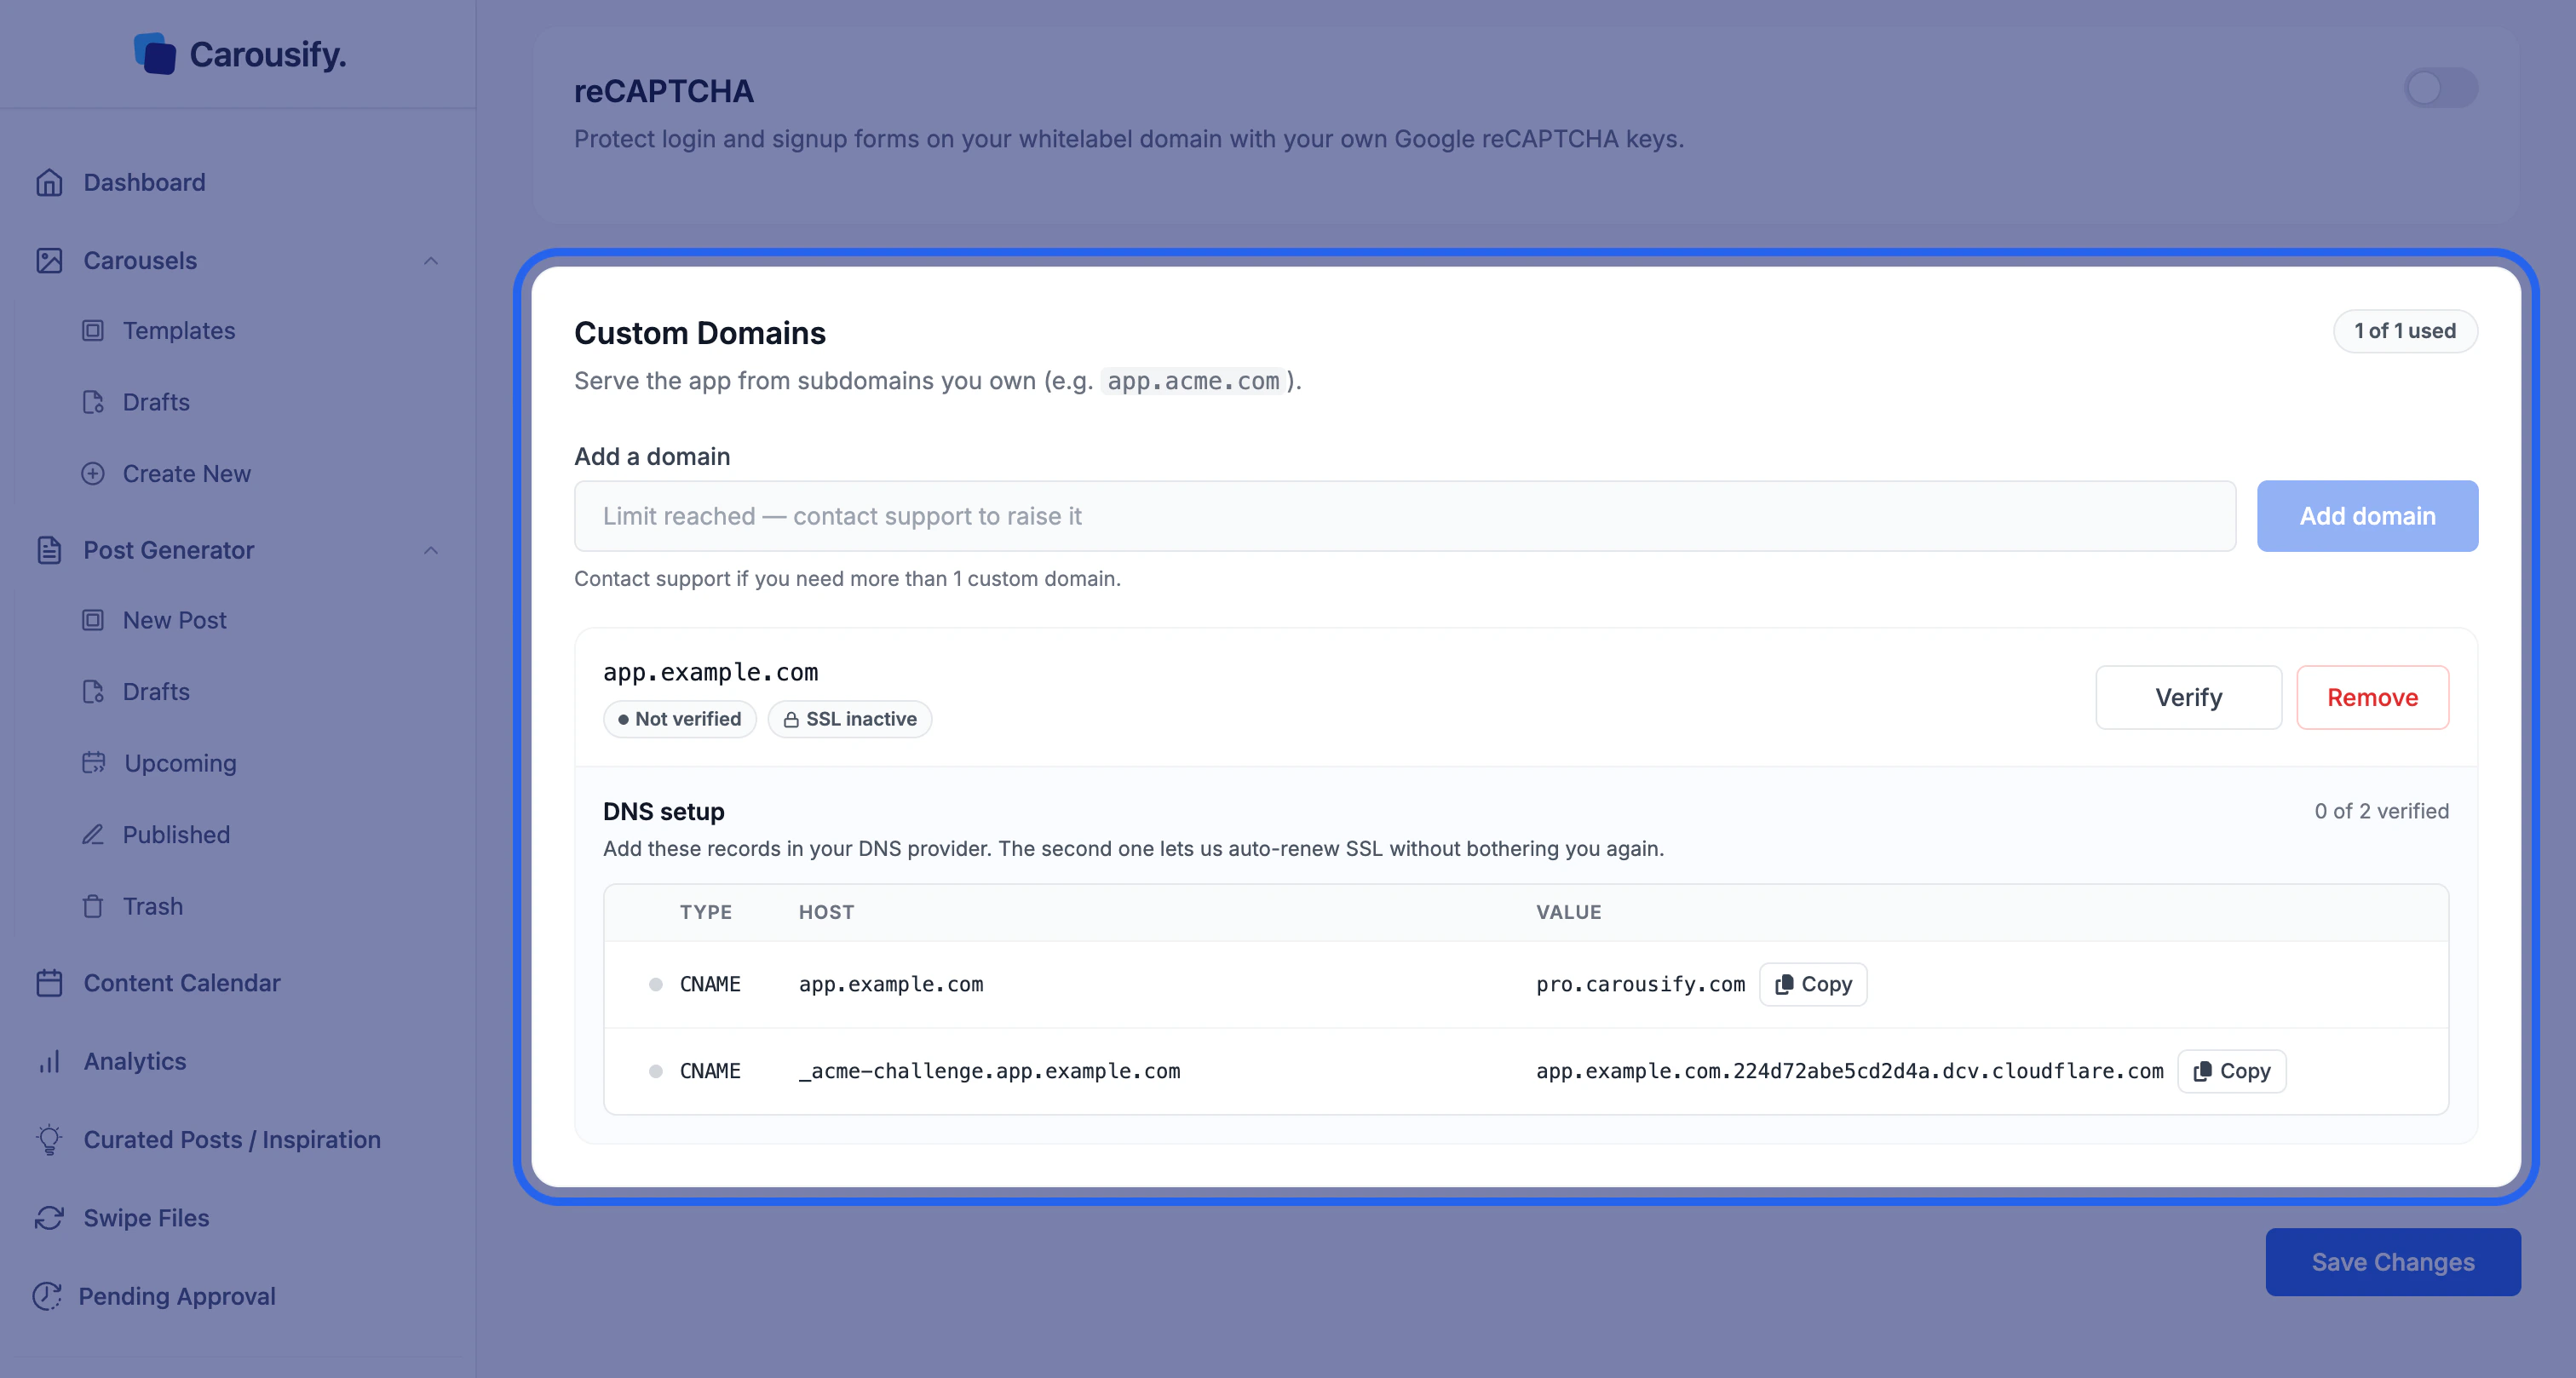 Type the domain you want to use into **Add a domain** — your root domain (`yourbrand.com`) or a subdomain (`app.yourbrand.com`) — and click **Add domain**.
The domain appears immediately with two status pills — **Not verified** and **SSL inactive** — plus **Verify** and **Remove** buttons. Nothing is live yet; you need to add the DNS records next.
## Step 2 — Add the DNS records
Adding the domain reveals a **DNS setup** block with two `CNAME` records and a `0 of 2 verified` counter. Add **both** records at your DNS provider.
Type the domain you want to use into **Add a domain** — your root domain (`yourbrand.com`) or a subdomain (`app.yourbrand.com`) — and click **Add domain**.
The domain appears immediately with two status pills — **Not verified** and **SSL inactive** — plus **Verify** and **Remove** buttons. Nothing is live yet; you need to add the DNS records next.
## Step 2 — Add the DNS records
Adding the domain reveals a **DNS setup** block with two `CNAME` records and a `0 of 2 verified` counter. Add **both** records at your DNS provider.
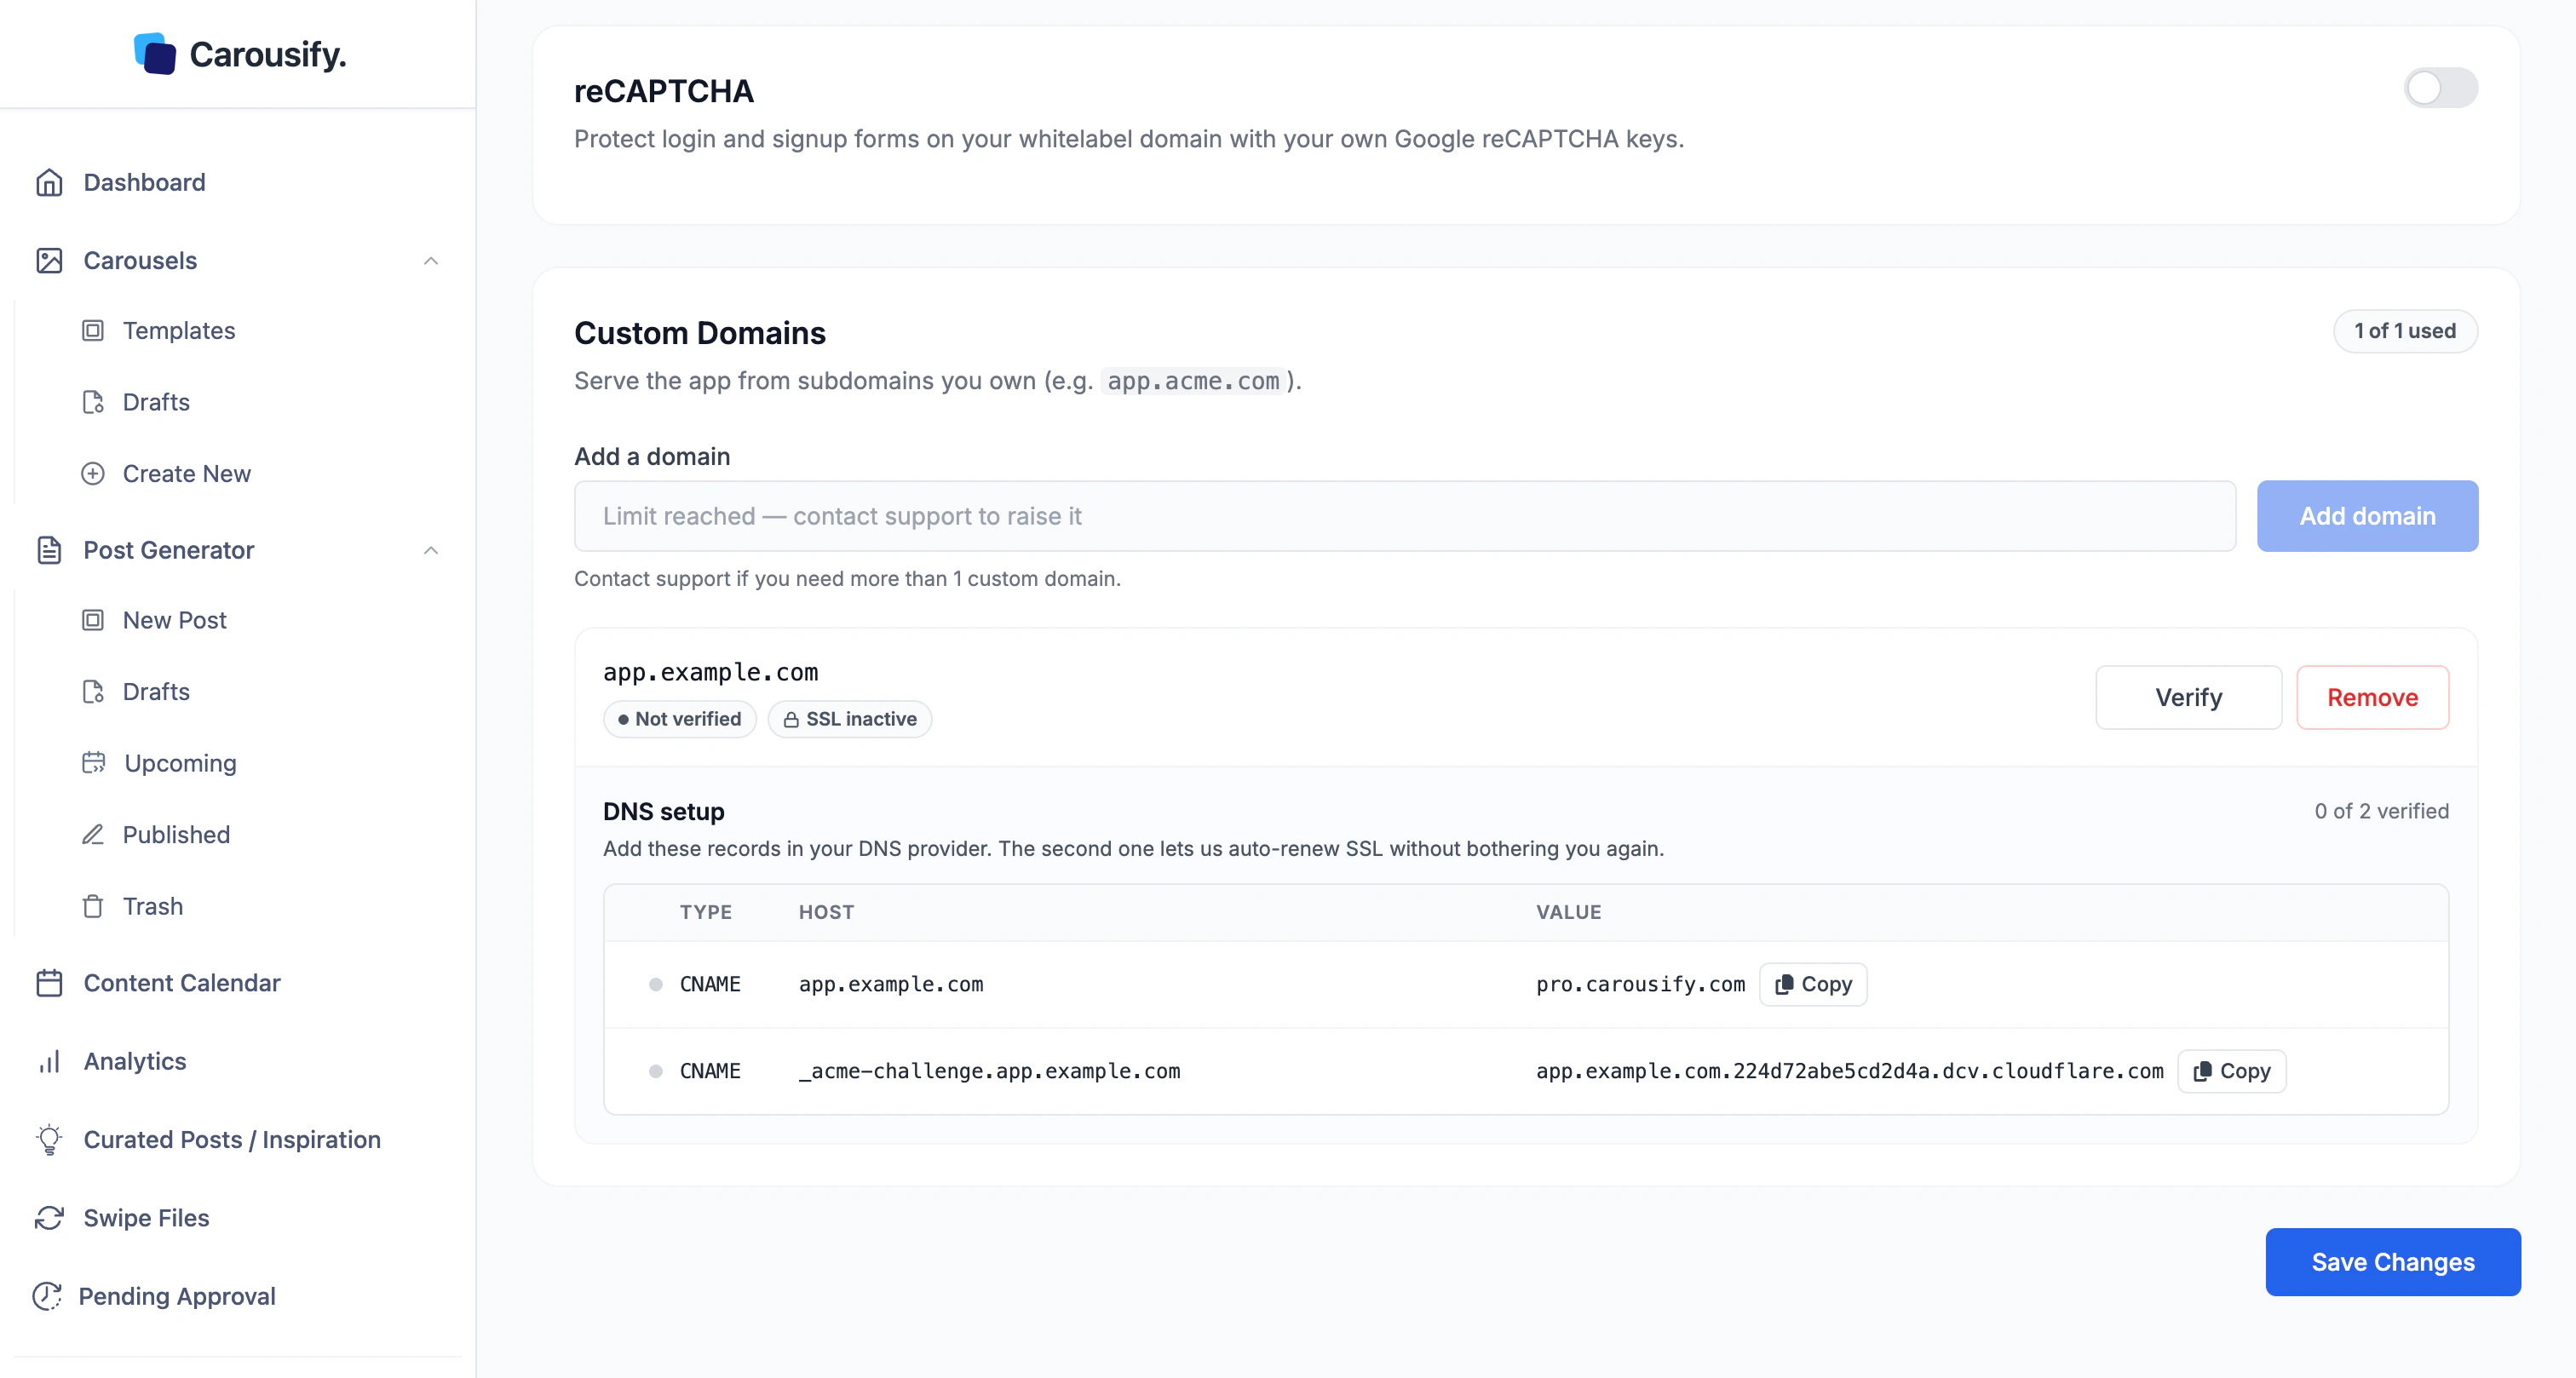 | # | Type | Host | Value |
| ----------- | ------- | ------------------------------------- | ------------------------------------------------ |
| 1 — routing | `CNAME` | your domain, e.g. `app.yourbrand.com` | `pro.carousify.com` |
| 2 — SSL | `CNAME` | `_acme-challenge.app.yourbrand.com` | the `dcv_delegation` value shown for your domain |
* **Record 1** points your domain at Carousify's infrastructure. The value is always `pro.carousify.com`.
* **Record 2** is the SSL record. Its value is **unique to your domain** (it looks like `your-domain..dcv.cloudflare.com`) — and as the app puts it, this one *"lets us auto-renew SSL without bothering you again."* Without it, your certificate won't renew automatically.
Use the **Copy** button next to each record (**Copy routing value** / **Copy dcv\_delegation value**) so you paste the exact value — the SSL value in particular is too long and too specific to retype.
Add the records exactly as shown — same type, same host, same value. The host for record 2 is prefixed with `_acme-challenge.`, not your bare domain — a typo here is the most common reason verification never completes.
On Cloudflare, set both records to **DNS only** (grey cloud, not the orange proxied cloud). Proxied records break verification and SSL issuance.
## Step 3 — Verify
Each record shows **Record not detected yet** until your DNS change propagates. Once you've added both at your provider, come back and click **Verify**.
Carousify checks DNS for both records. The counter moves toward `2 of 2 verified` as each one is detected.
DNS changes can take anywhere from a few minutes to a few hours depending on your provider and TTL. If **Verify** doesn't pick the records up, give it time and click **Verify** again — you don't need to re-enter anything.
When both records verify, the status flips from **Not verified** to verified and **SSL inactive** to active. The app now loads at your domain with a valid certificate.
Set the lowest TTL your DNS provider allows (300 seconds is common) *before* you add the records. Verification then succeeds on the first or second try instead of waiting out a long cache.
## After it's live
Your clients and team open the app at `app.yourbrand.com`. Pair it with the rest of whitelabel so nothing points back to Carousify:
* [Branding](/whitelabel/branding) — logo, favicon, name, and accent color
* [SMTP](/whitelabel/smtp) — transactional emails from your own mail server, so links in those emails match your domain
## Remove or replace a domain
Click **Remove** on the domain to delete it. The slot frees up immediately (`0 of 1 used`) and you can add a different domain. Because there's one slot per account, removing the current domain is how you switch to a new one.
Removing a domain stops the app from serving on it right away. Don't remove a domain your clients are actively using until you've pointed them at the replacement.
## What's next
Logo, favicon, name, support email, and accent color.
Send transactional emails from your own mail server.
How the domain fits with the rest of the whitelabel setup.
Run client workspaces inside your fully branded setup.
| # | Type | Host | Value |
| ----------- | ------- | ------------------------------------- | ------------------------------------------------ |
| 1 — routing | `CNAME` | your domain, e.g. `app.yourbrand.com` | `pro.carousify.com` |
| 2 — SSL | `CNAME` | `_acme-challenge.app.yourbrand.com` | the `dcv_delegation` value shown for your domain |
* **Record 1** points your domain at Carousify's infrastructure. The value is always `pro.carousify.com`.
* **Record 2** is the SSL record. Its value is **unique to your domain** (it looks like `your-domain..dcv.cloudflare.com`) — and as the app puts it, this one *"lets us auto-renew SSL without bothering you again."* Without it, your certificate won't renew automatically.
Use the **Copy** button next to each record (**Copy routing value** / **Copy dcv\_delegation value**) so you paste the exact value — the SSL value in particular is too long and too specific to retype.
Add the records exactly as shown — same type, same host, same value. The host for record 2 is prefixed with `_acme-challenge.`, not your bare domain — a typo here is the most common reason verification never completes.
On Cloudflare, set both records to **DNS only** (grey cloud, not the orange proxied cloud). Proxied records break verification and SSL issuance.
## Step 3 — Verify
Each record shows **Record not detected yet** until your DNS change propagates. Once you've added both at your provider, come back and click **Verify**.
Carousify checks DNS for both records. The counter moves toward `2 of 2 verified` as each one is detected.
DNS changes can take anywhere from a few minutes to a few hours depending on your provider and TTL. If **Verify** doesn't pick the records up, give it time and click **Verify** again — you don't need to re-enter anything.
When both records verify, the status flips from **Not verified** to verified and **SSL inactive** to active. The app now loads at your domain with a valid certificate.
Set the lowest TTL your DNS provider allows (300 seconds is common) *before* you add the records. Verification then succeeds on the first or second try instead of waiting out a long cache.
## After it's live
Your clients and team open the app at `app.yourbrand.com`. Pair it with the rest of whitelabel so nothing points back to Carousify:
* [Branding](/whitelabel/branding) — logo, favicon, name, and accent color
* [SMTP](/whitelabel/smtp) — transactional emails from your own mail server, so links in those emails match your domain
## Remove or replace a domain
Click **Remove** on the domain to delete it. The slot frees up immediately (`0 of 1 used`) and you can add a different domain. Because there's one slot per account, removing the current domain is how you switch to a new one.
Removing a domain stops the app from serving on it right away. Don't remove a domain your clients are actively using until you've pointed them at the replacement.
## What's next
Logo, favicon, name, support email, and accent color.
Send transactional emails from your own mail server.
How the domain fits with the rest of the whitelabel setup.
Run client workspaces inside your fully branded setup.