> ## Documentation Index
> Fetch the complete documentation index at: https://docs.carousify.com/llms.txt
> Use this file to discover all available pages before exploring further.
# Quickstart
> Get from sign-up to your first scheduled LinkedIn post in under 10 minutes.
This guide walks you through every screen of the Carousify onboarding so you know exactly what to expect.
You'll need a LinkedIn account and a credit or debit card. Carousify requires an active subscription to publish, schedule, or generate content — onboarding lets you skip plan selection, but the core features stay locked until you pick one.
## Before you start
Sign up at [carousify.com](https://carousify.com/) using your email, Google, or LinkedIn.
Click the verification link Carousify sends you. You'll land on the onboarding flow automatically after verifying.
## Step 1 — Tell us where you heard about us
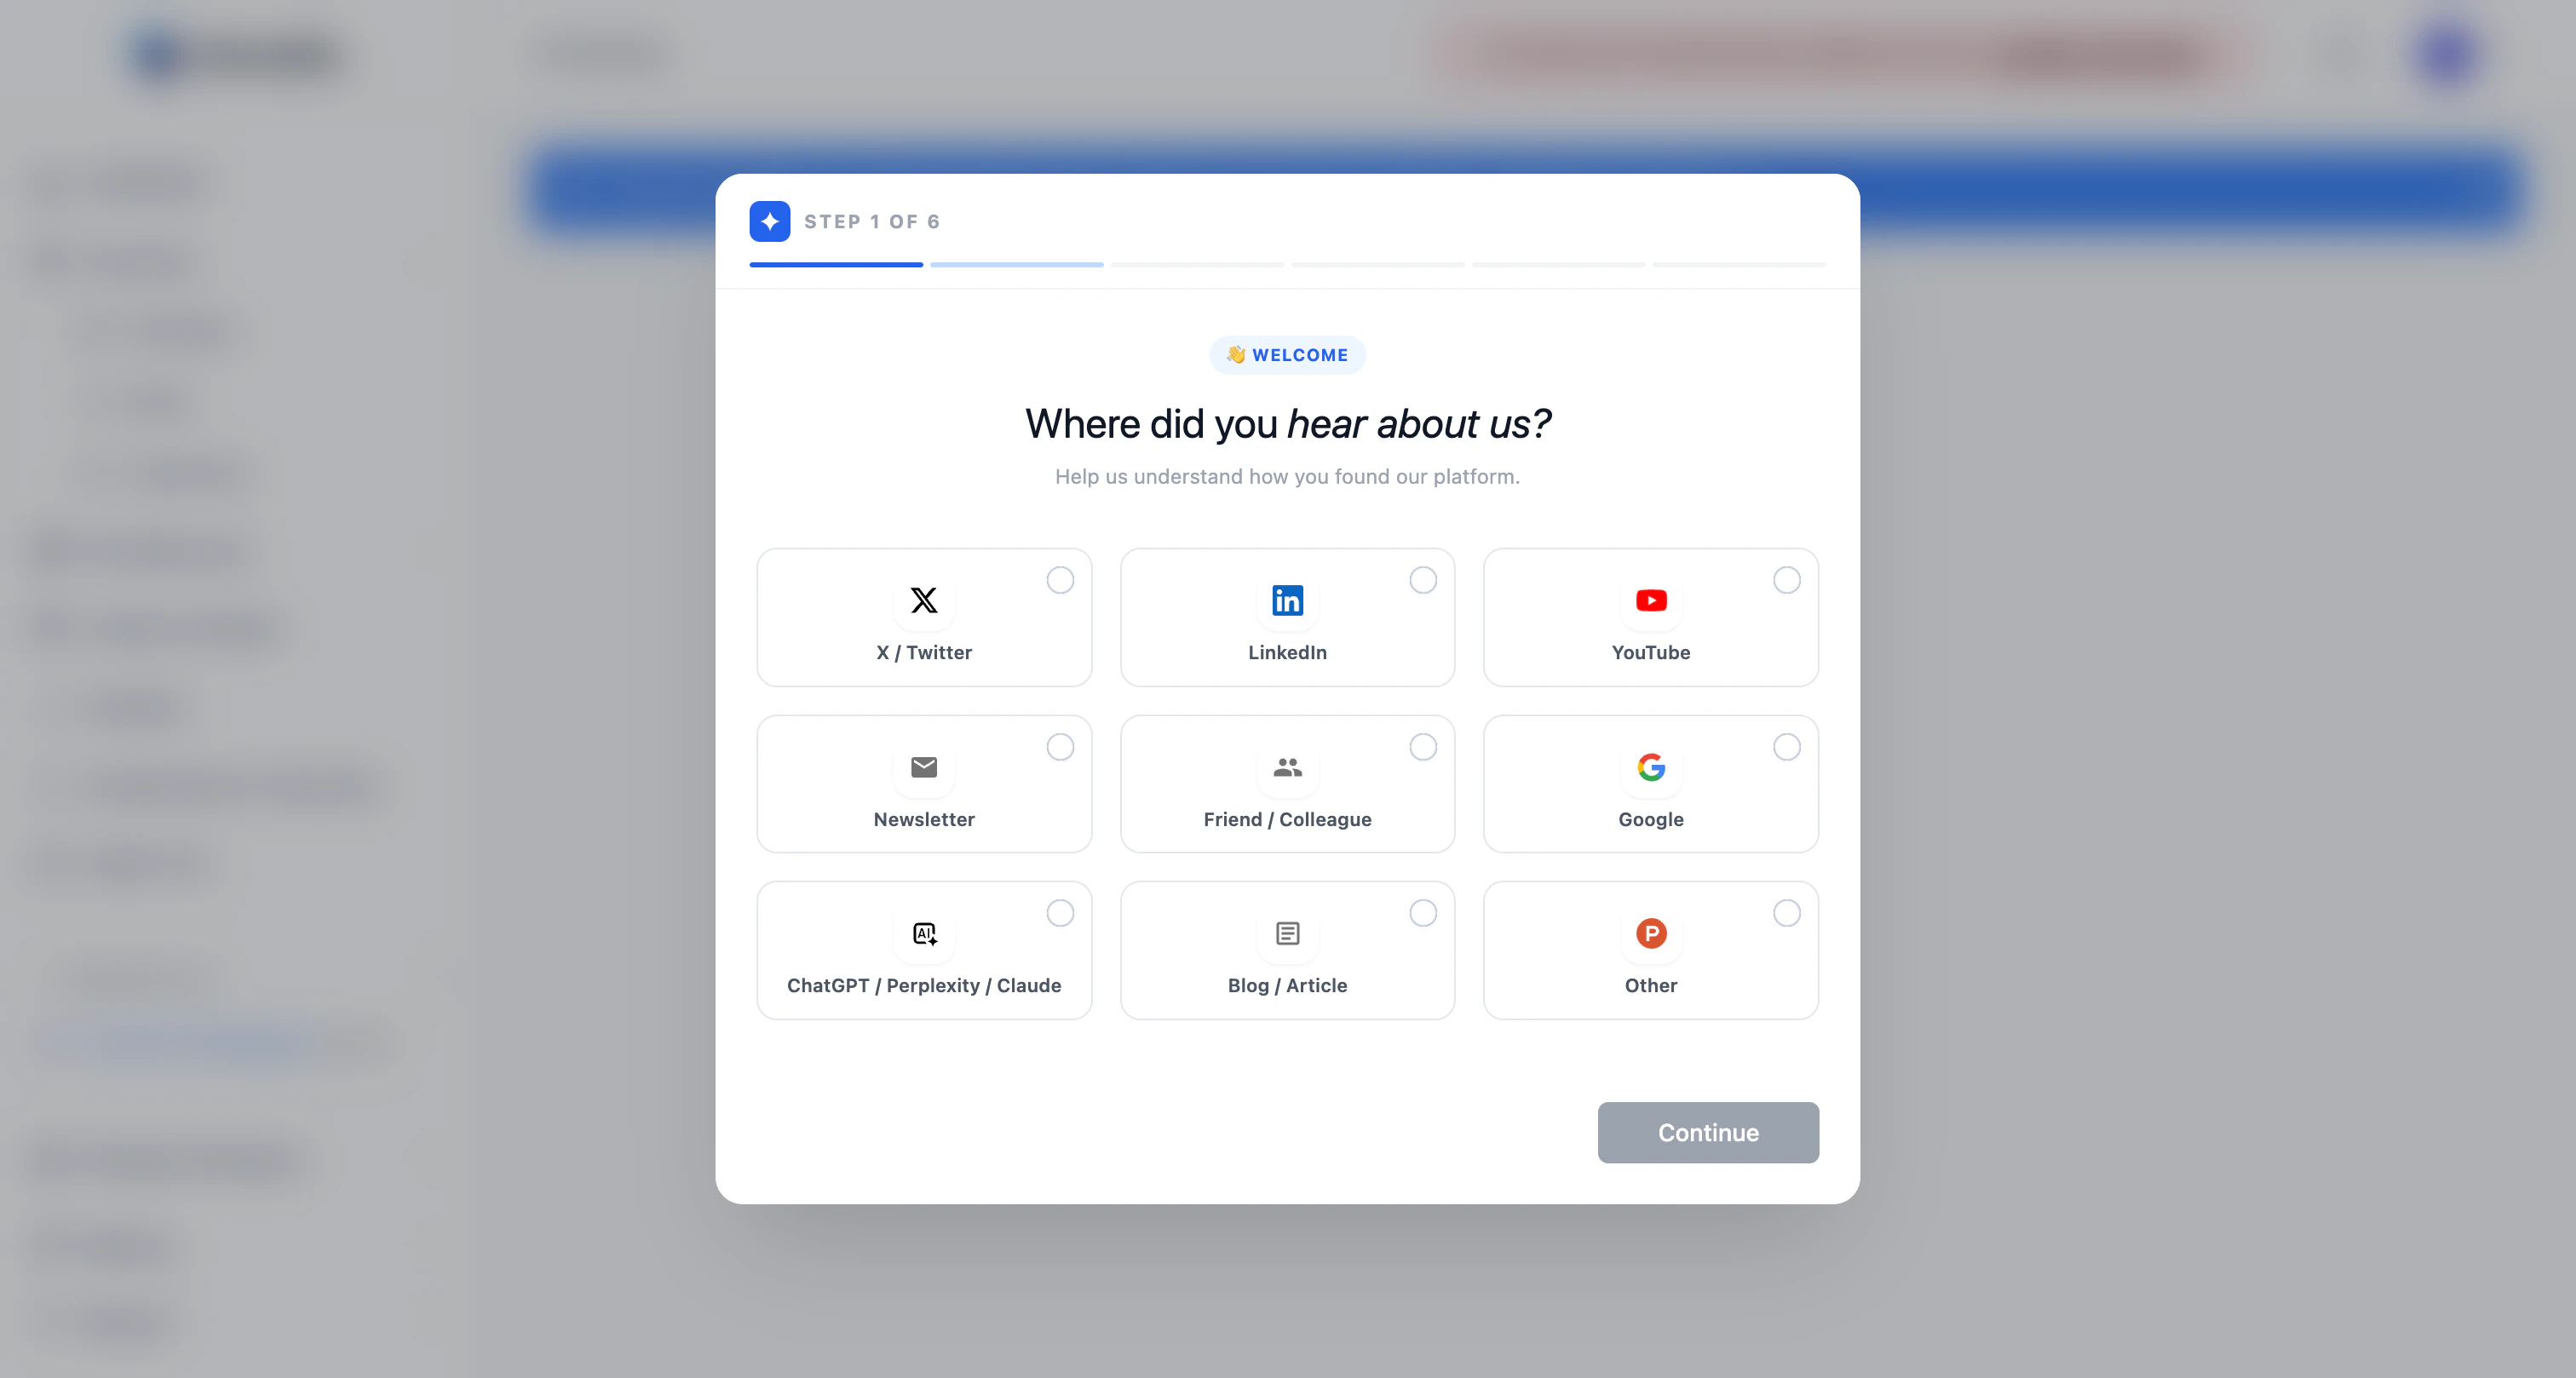 Pick the channel that brought you to Carousify (X, LinkedIn, YouTube, a friend, Google, ChatGPT, a blog, or Other). It's a single click — this only helps the team understand which channels work, and doesn't change your account in any way.
Click **Continue** to move on.
## Step 2 — Set up your workspace
Pick the channel that brought you to Carousify (X, LinkedIn, YouTube, a friend, Google, ChatGPT, a blog, or Other). It's a single click — this only helps the team understand which channels work, and doesn't change your account in any way.
Click **Continue** to move on.
## Step 2 — Set up your workspace
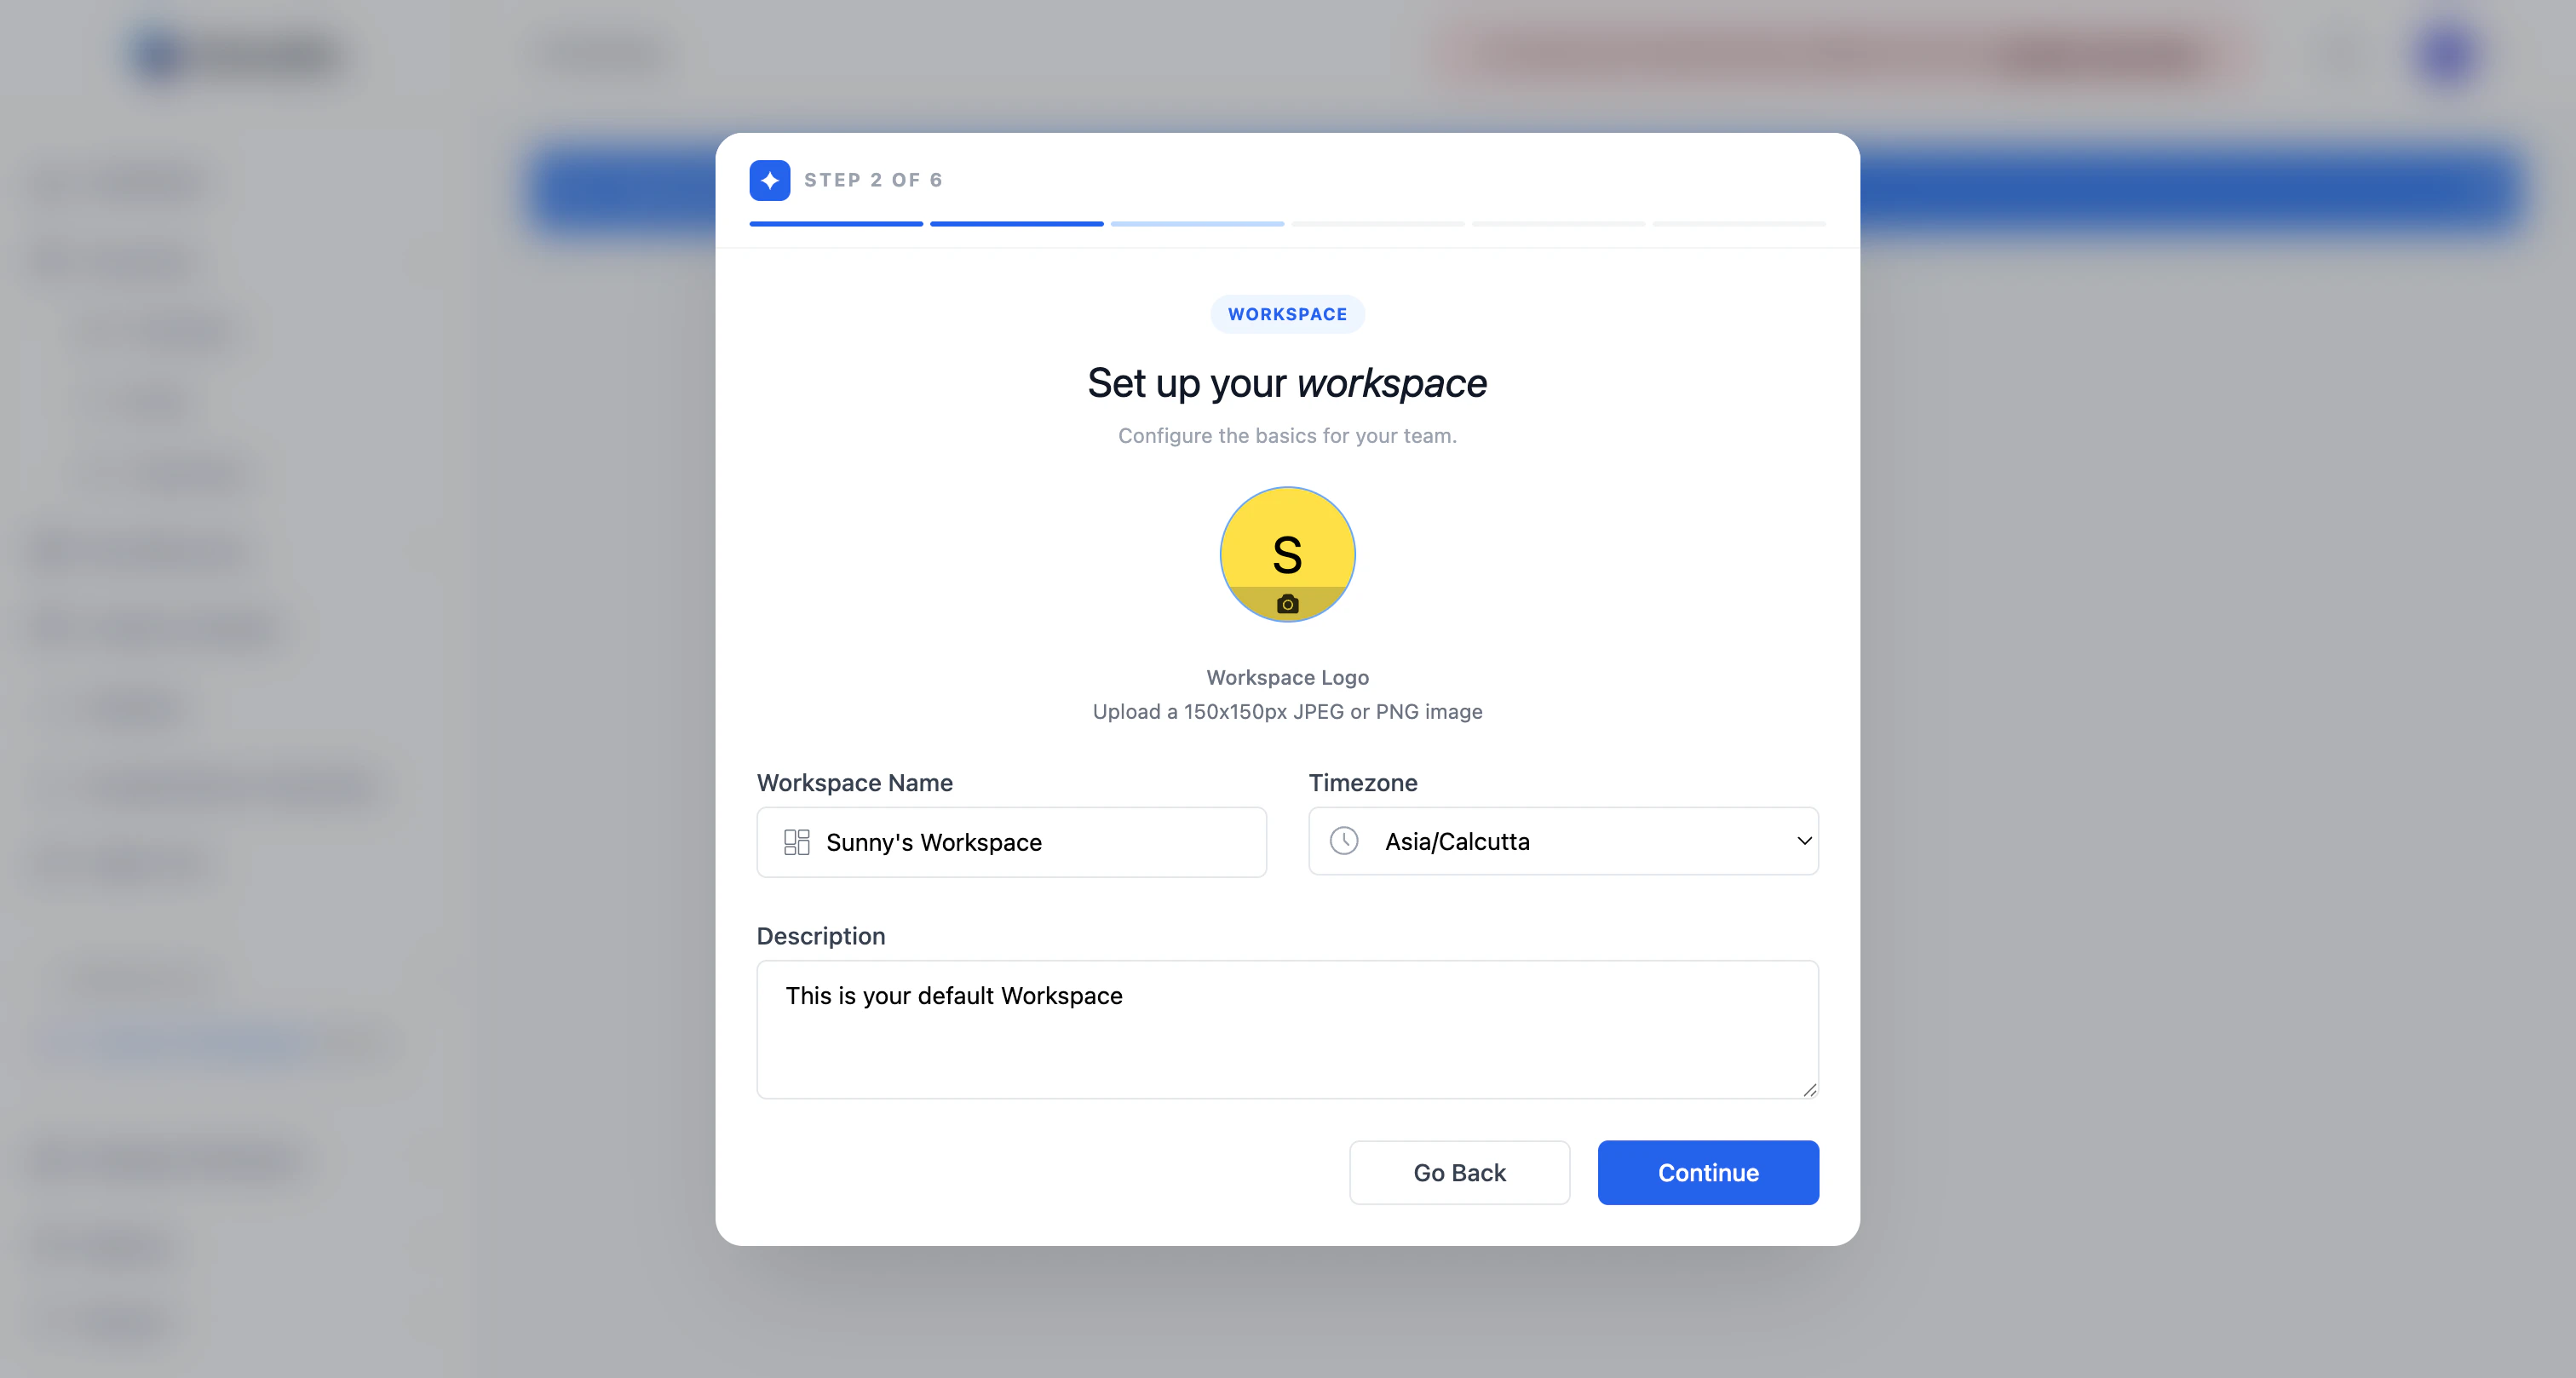 Your workspace is where every carousel, post, draft, and team member lives. Carousify pre-fills a default name based on your sign-up.
| Field | What to enter |
| -------------- | ---------------------------------------------------------------------------------------------- |
| Workspace logo | Optional. 150×150px JPEG or PNG. |
| Workspace name | The name your team will see in the sidebar. |
| Timezone | Used for scheduled posts and analytics. Set this to where you (or your audience) actually are. |
| Description | Optional one-liner describing the workspace. |
You can rename the workspace later from **Workspace › General**. Timezone is the one setting worth getting right now — it controls when scheduled posts go live.
Click **Continue**.
## Step 3 — Connect your LinkedIn account
Your workspace is where every carousel, post, draft, and team member lives. Carousify pre-fills a default name based on your sign-up.
| Field | What to enter |
| -------------- | ---------------------------------------------------------------------------------------------- |
| Workspace logo | Optional. 150×150px JPEG or PNG. |
| Workspace name | The name your team will see in the sidebar. |
| Timezone | Used for scheduled posts and analytics. Set this to where you (or your audience) actually are. |
| Description | Optional one-liner describing the workspace. |
You can rename the workspace later from **Workspace › General**. Timezone is the one setting worth getting right now — it controls when scheduled posts go live.
Click **Continue**.
## Step 3 — Connect your LinkedIn account
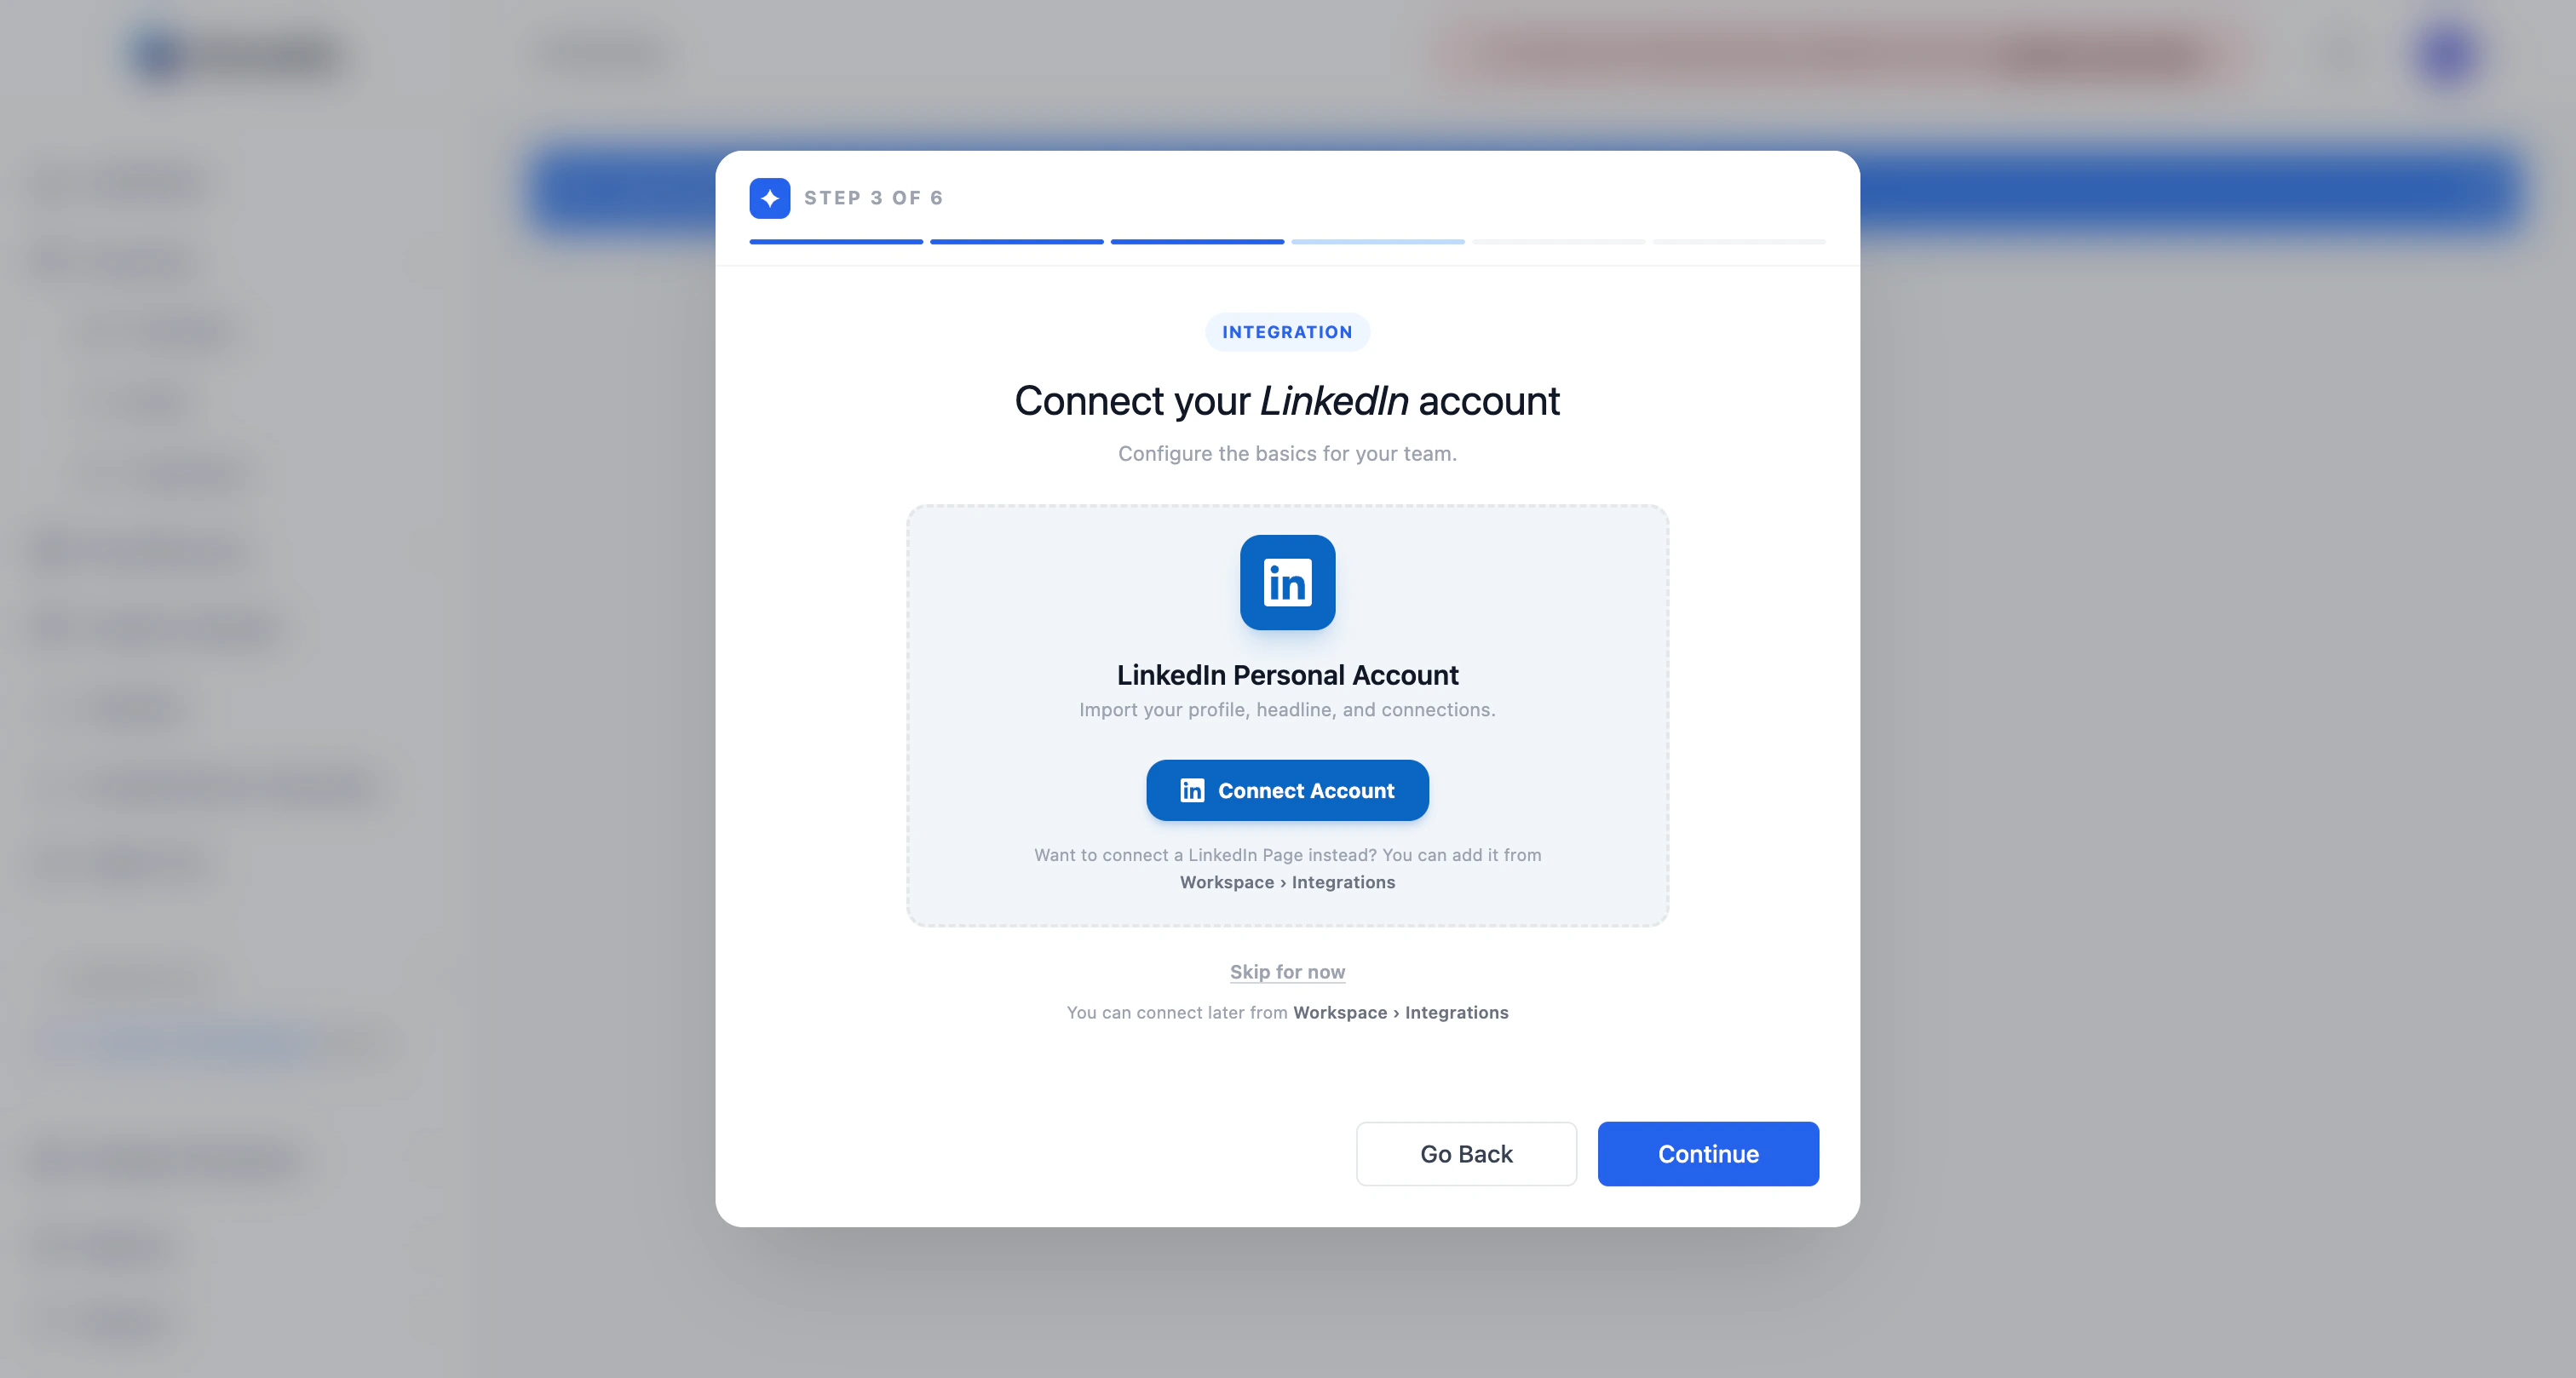 Click **Connect Account** to authorize Carousify through LinkedIn's official OAuth flow. You'll be redirected to LinkedIn, asked to confirm permissions, and sent back to onboarding once it's done.
Carousify only uses LinkedIn's official API. We never ask for your password and never automate actions that violate LinkedIn's terms.
Want to connect a LinkedIn **Page** instead of a personal profile? Skip this step and add the page later from **Manage Workspace › Social Integrations**. For more detail, see [Connect your LinkedIn account](/getting-started/connect-linkedin).
You can also click **Skip for now** and connect later — but you won't be able to publish until at least one account is linked.
## Step 4 — Set up your Brand Kit
Click **Connect Account** to authorize Carousify through LinkedIn's official OAuth flow. You'll be redirected to LinkedIn, asked to confirm permissions, and sent back to onboarding once it's done.
Carousify only uses LinkedIn's official API. We never ask for your password and never automate actions that violate LinkedIn's terms.
Want to connect a LinkedIn **Page** instead of a personal profile? Skip this step and add the page later from **Manage Workspace › Social Integrations**. For more detail, see [Connect your LinkedIn account](/getting-started/connect-linkedin).
You can also click **Skip for now** and connect later — but you won't be able to publish until at least one account is linked.
## Step 4 — Set up your Brand Kit
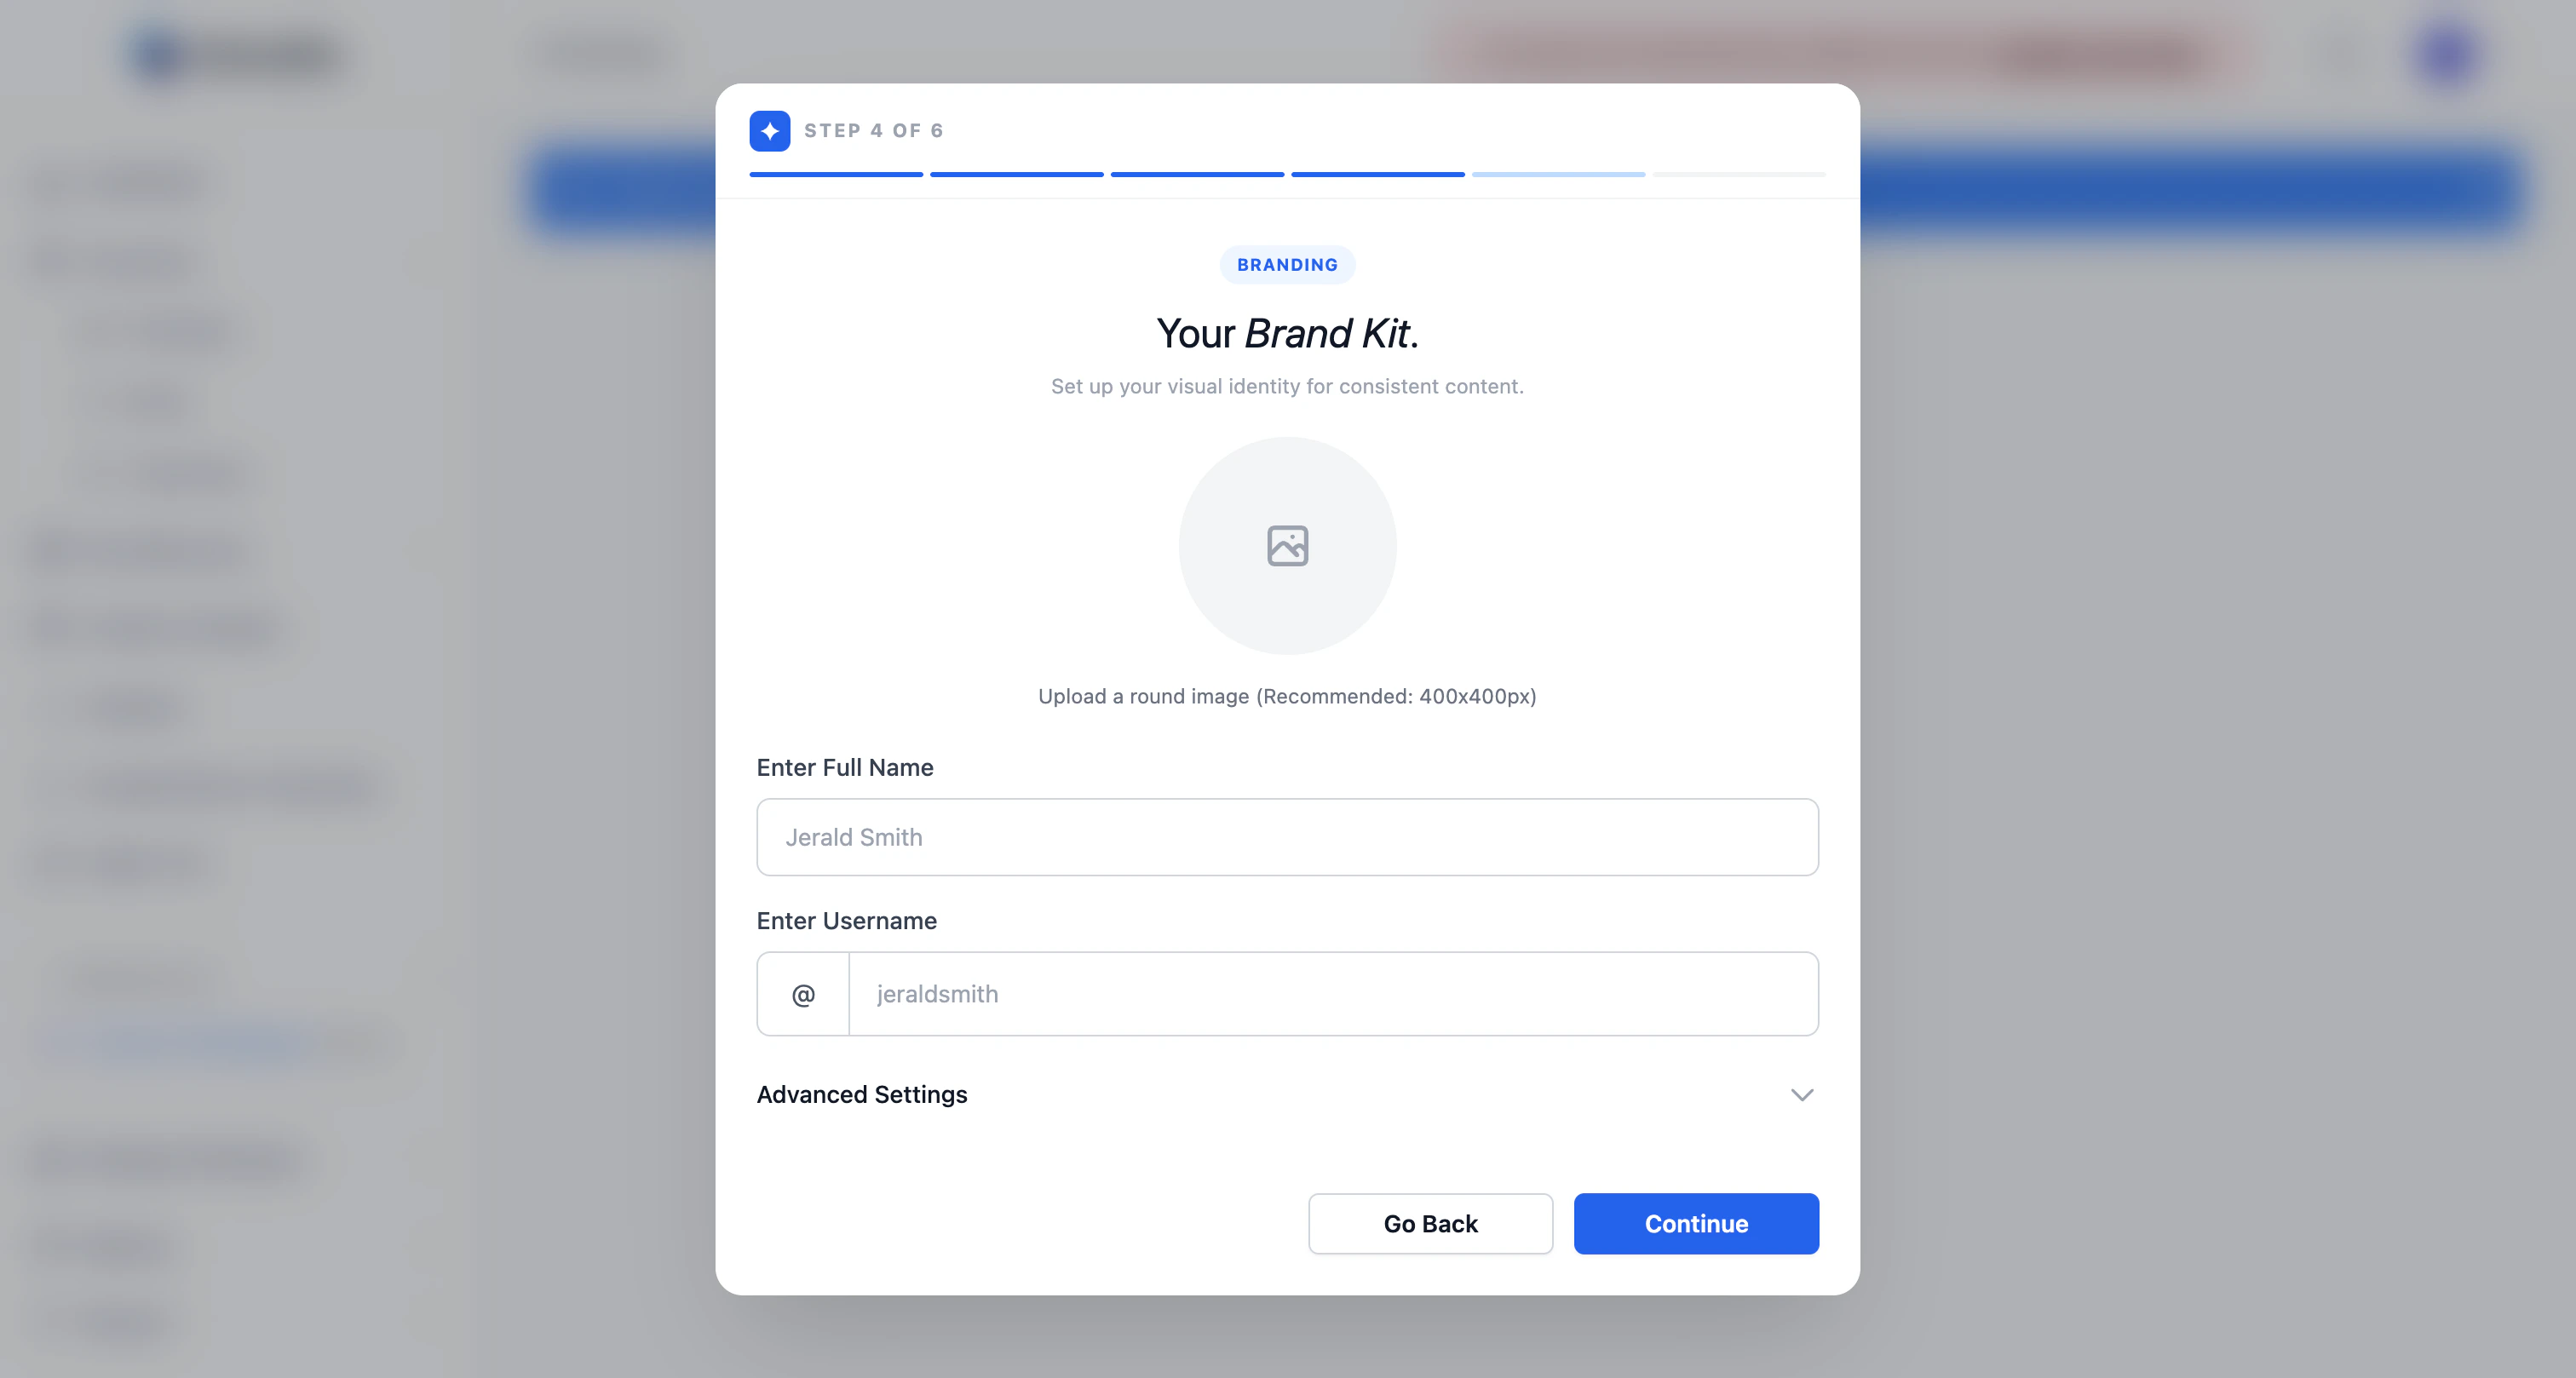 Your Brand Kit is the identity Carousify uses on every carousel slide — author photo, name, handle, fonts, and colors. Filling it in once means every template you use afterwards already looks like *your* brand.
| Field | What to enter |
| ------------- | ----------------------------------------------------------------- |
| Profile image | Round image, 400×400px recommended. Usually your LinkedIn avatar. |
| Full name | The name shown on the carousel as the author. |
| Username | Your @handle (no `@` needed; Carousify adds it). |
Open **Advanced Settings** to set the default heading, subheading, body, and background styles for every new carousel:
Your Brand Kit is the identity Carousify uses on every carousel slide — author photo, name, handle, fonts, and colors. Filling it in once means every template you use afterwards already looks like *your* brand.
| Field | What to enter |
| ------------- | ----------------------------------------------------------------- |
| Profile image | Round image, 400×400px recommended. Usually your LinkedIn avatar. |
| Full name | The name shown on the carousel as the author. |
| Username | Your @handle (no `@` needed; Carousify adds it). |
Open **Advanced Settings** to set the default heading, subheading, body, and background styles for every new carousel:
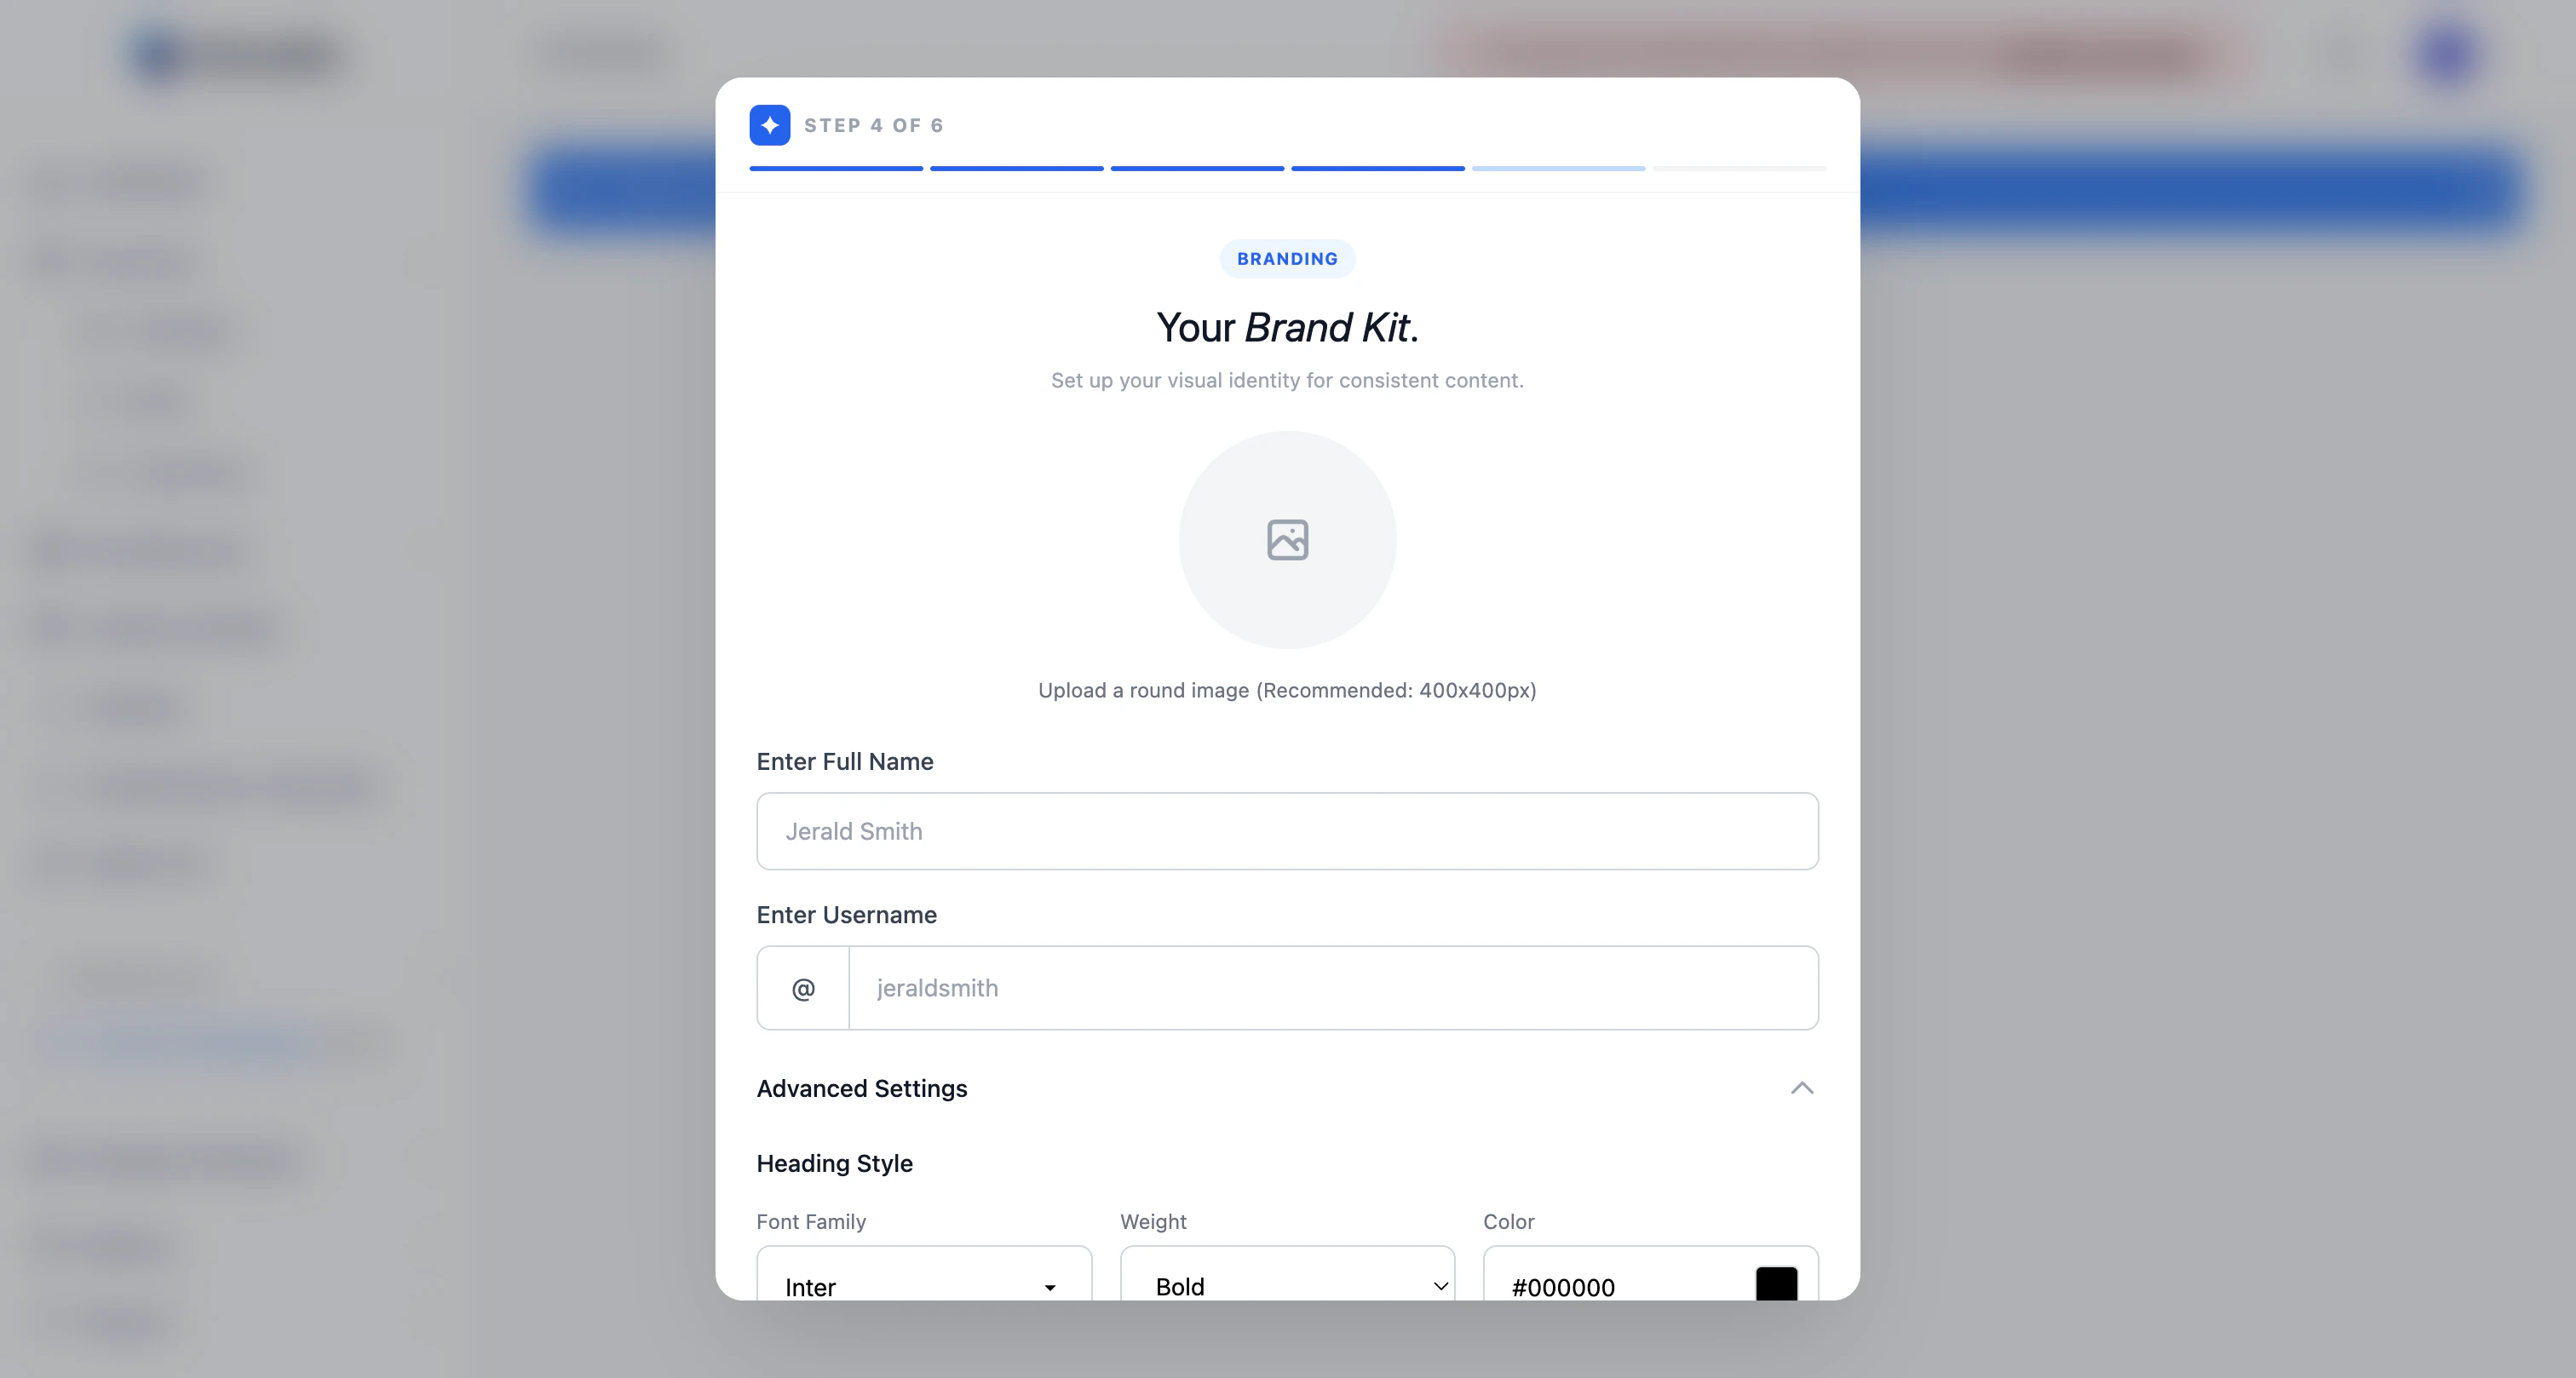 Pick a font family, weight, and color for each text level, plus a default slide background color.
Don't overthink this — defaults are fine, and you can edit any individual slide later. The point is to have *one* consistent look so you're not picking fonts every time.
Click **Continue**.
## Step 5 — Configure the AI assistant
Pick a font family, weight, and color for each text level, plus a default slide background color.
Don't overthink this — defaults are fine, and you can edit any individual slide later. The point is to have *one* consistent look so you're not picking fonts every time.
Click **Continue**.
## Step 5 — Configure the AI assistant
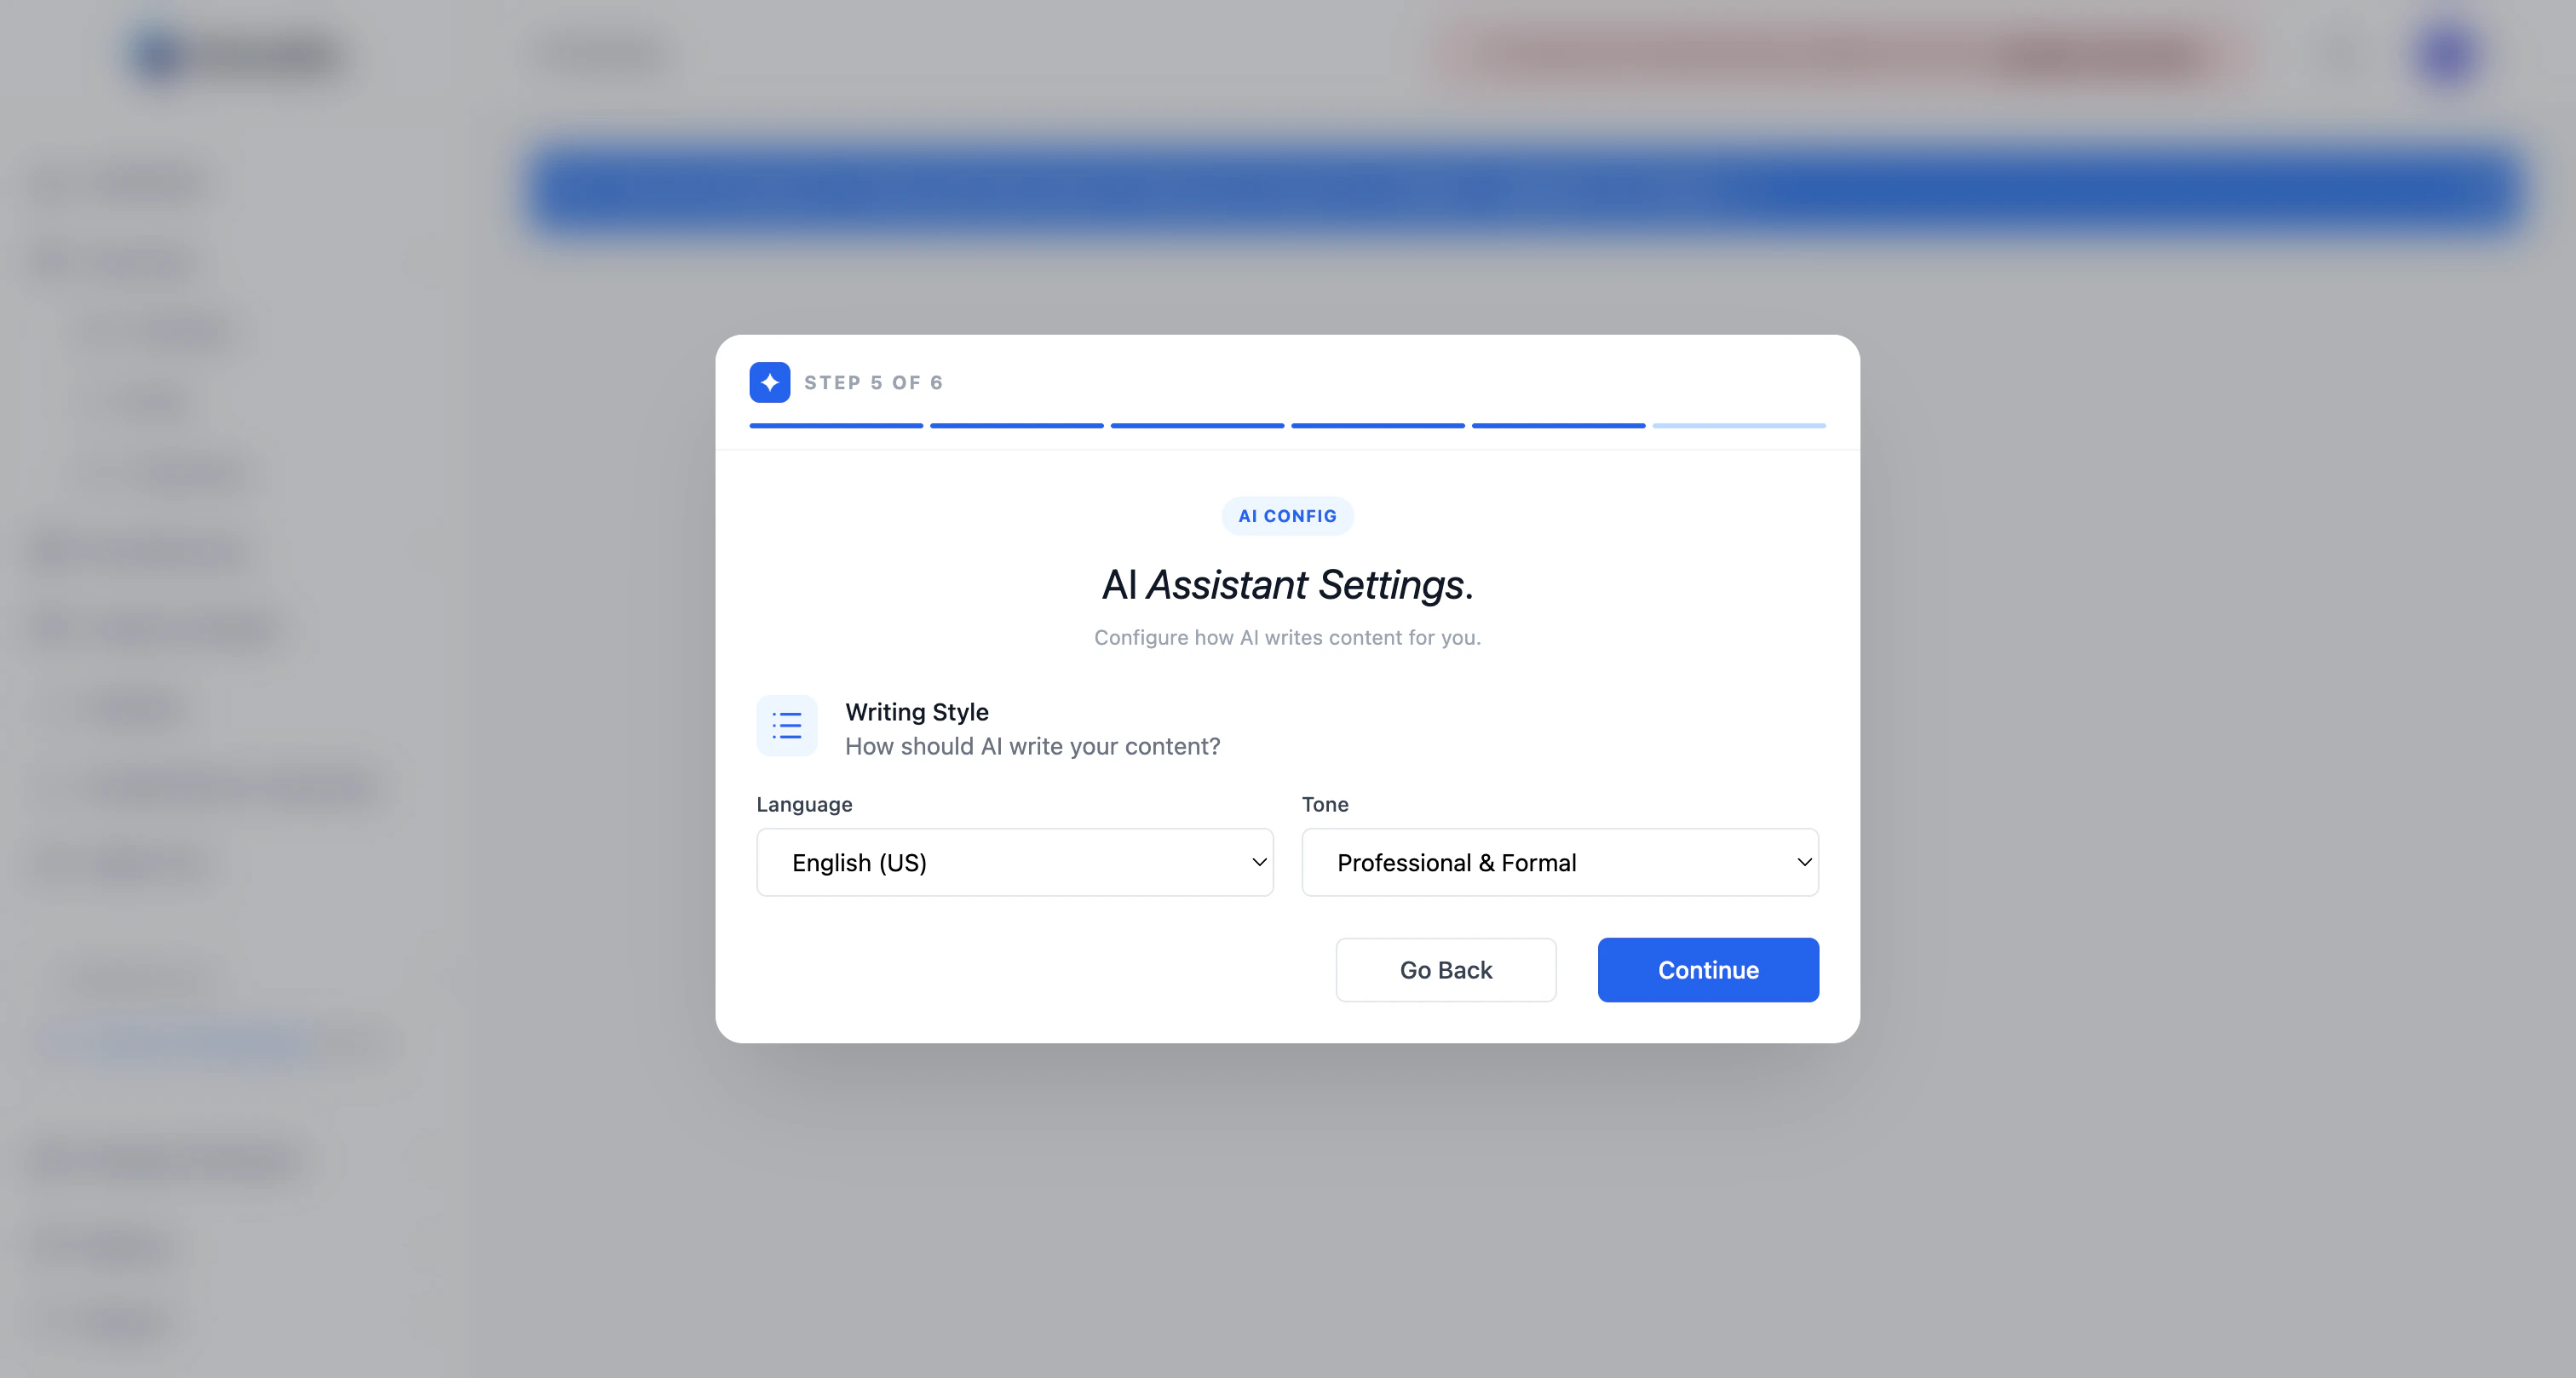 Set the defaults for AI-generated copy across the Post Generator, AI carousels, and the AI assistant inside the editor.
| Field | Options |
| -------- | ------------------------------------------------------------------------------------------------------ |
| Language | English (US/UK) plus 90+ other languages. |
| Tone | Professional & Formal, Conversational & Friendly, Technical & Detailed, or Inspirational & Motivating. |
You can override either of these per generation later — this is just the default.
Click **Continue**.
## Step 6 — Choose a plan
Set the defaults for AI-generated copy across the Post Generator, AI carousels, and the AI assistant inside the editor.
| Field | Options |
| -------- | ------------------------------------------------------------------------------------------------------ |
| Language | English (US/UK) plus 90+ other languages. |
| Tone | Professional & Formal, Conversational & Friendly, Technical & Detailed, or Inspirational & Motivating. |
You can override either of these per generation later — this is just the default.
Click **Continue**.
## Step 6 — Choose a plan
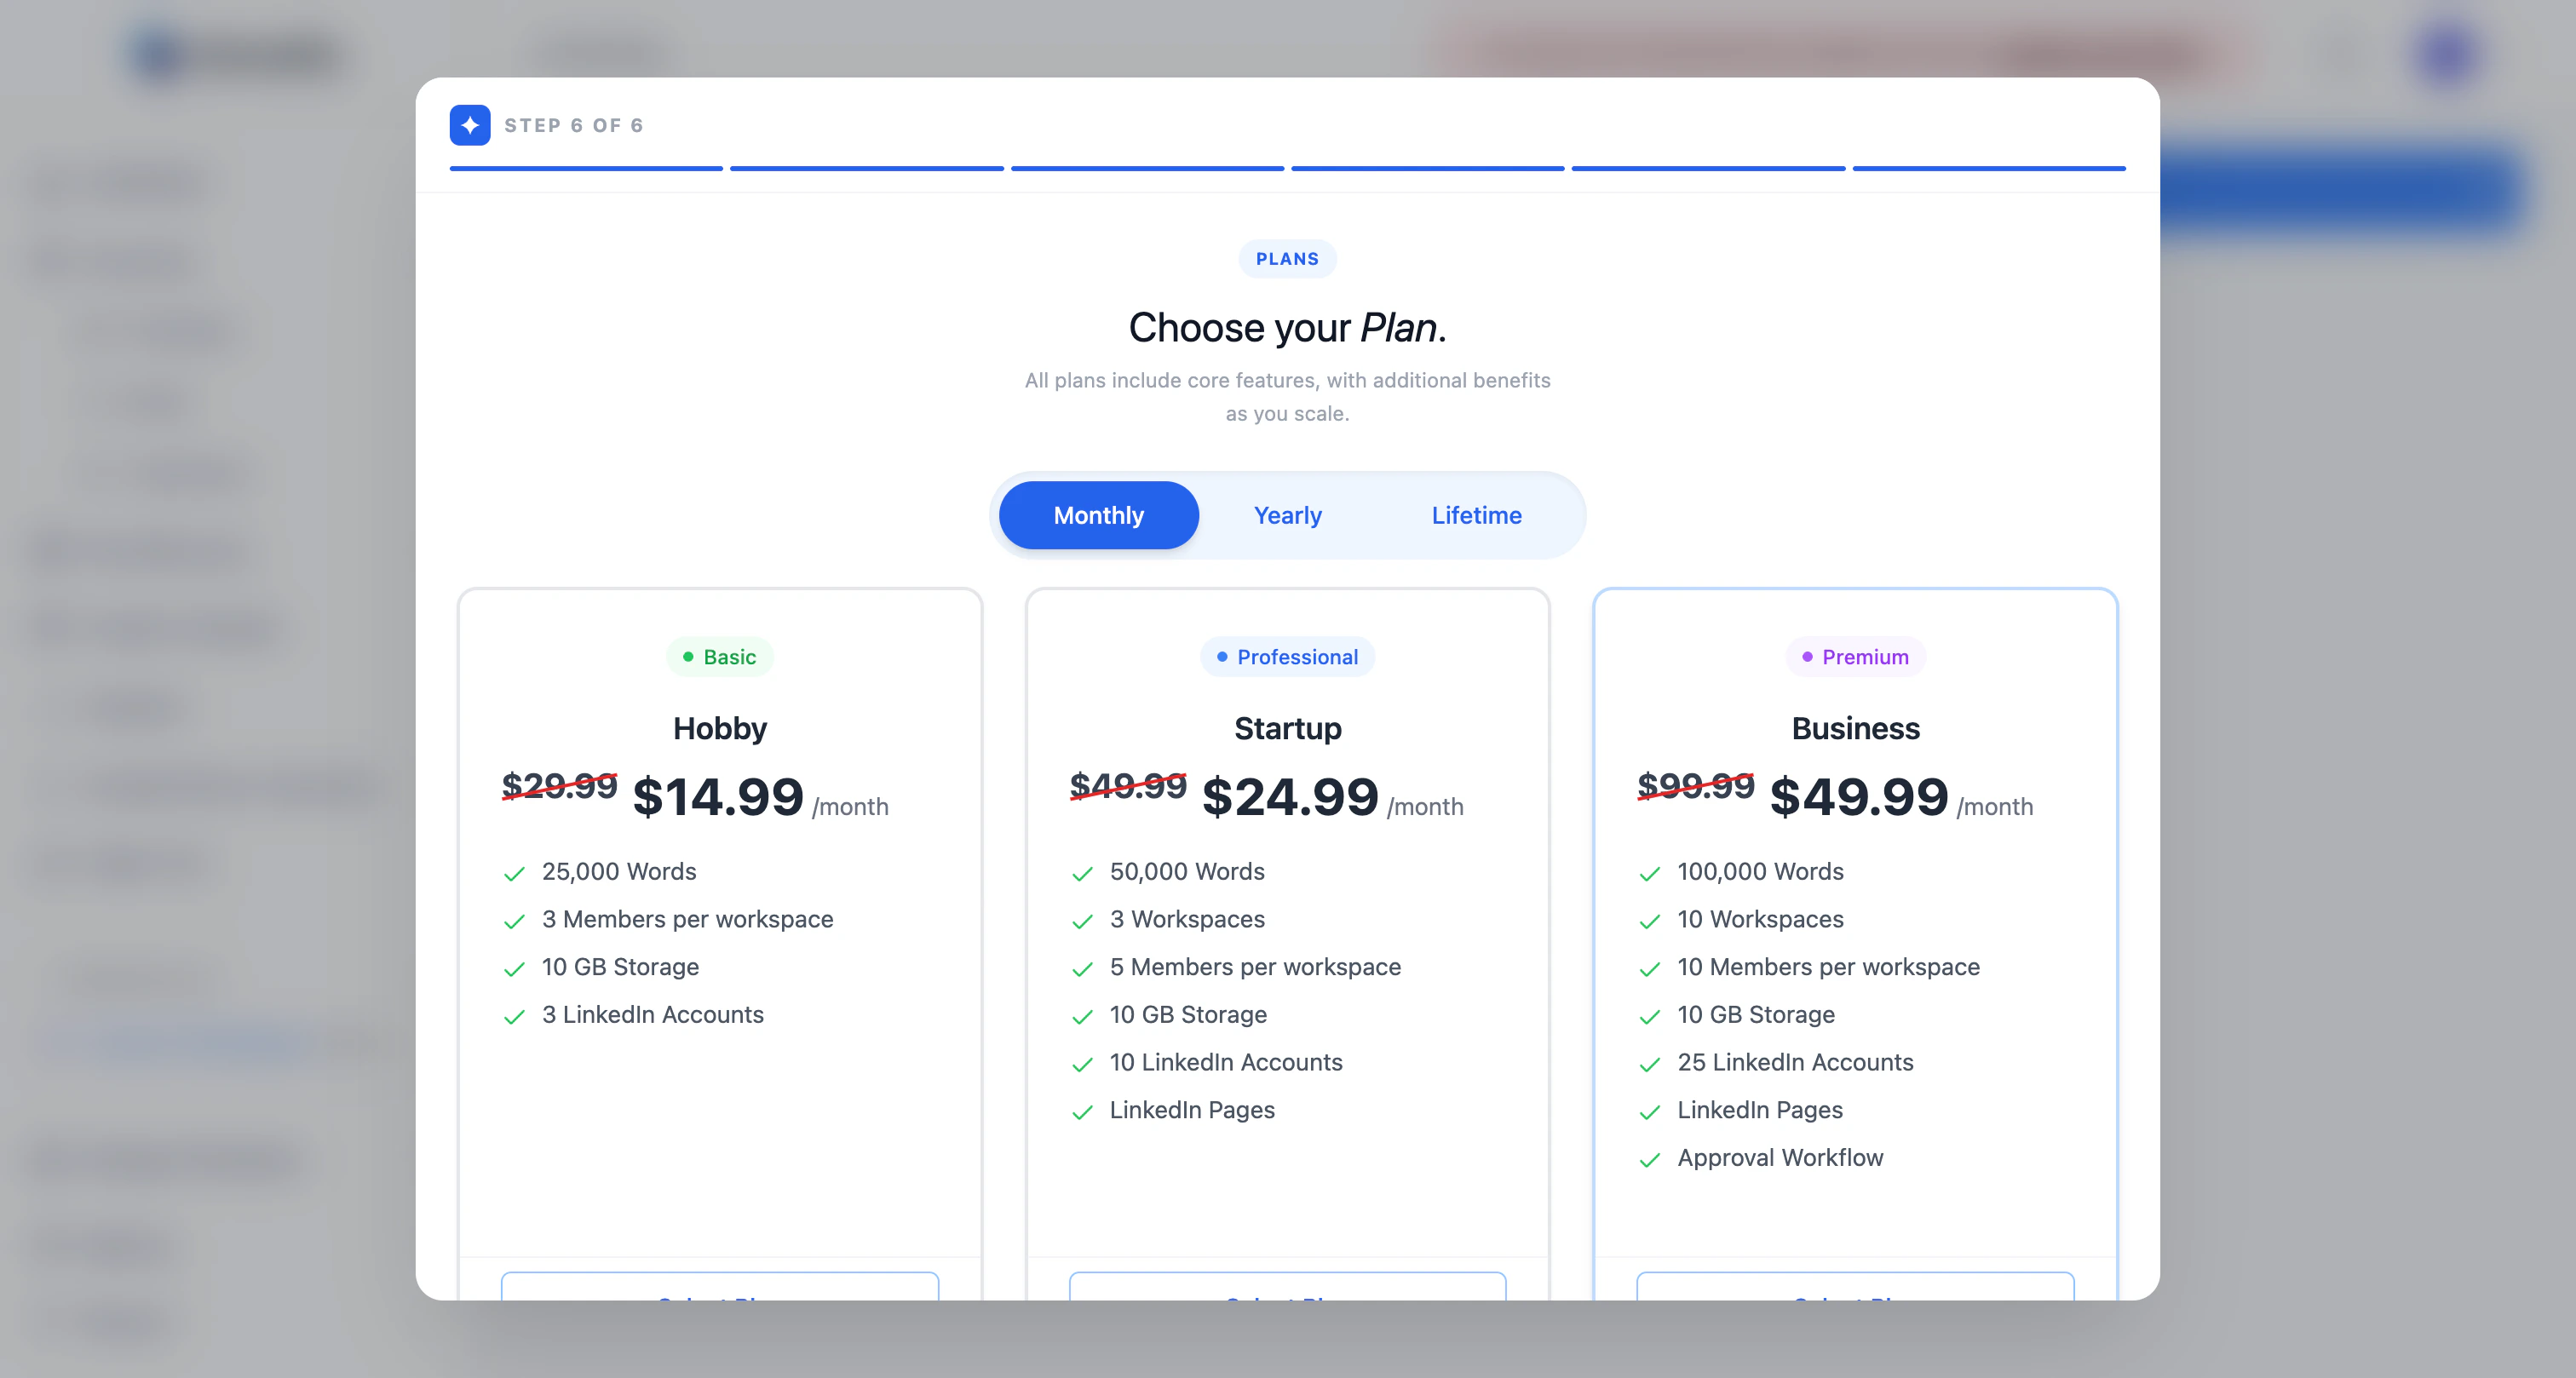 Pick a billing cycle (Monthly or Yearly) and a plan tier:
Solo creators. 25,000 AI words, 3 LinkedIn accounts, 10 GB storage.
Small teams. 50,000 words, 3 workspaces, 5 members each, LinkedIn Pages.
Growing teams. 100,000 words, 10 workspaces, 25 LinkedIn accounts, approval workflow.
Custom limits, whitelabeling, webhooks, advanced analytics. Contact sales.
Click **Select Plan** on the tier you want, then **Continue** to enter payment details.
Onboarding lets you finish without picking a plan, but creating carousels, generating posts, scheduling, and publishing all stay locked until you have an active subscription. See [Plans and limits](/billing/plans) for the full breakdown.
## You're done
You'll land on the **Dashboard**. From here:
Pick a template or generate one with AI.
Turn an idea, voice note, or article into a ready-to-publish post.
Queue your first post at a peak time for your timezone.
Pick a billing cycle (Monthly or Yearly) and a plan tier:
Solo creators. 25,000 AI words, 3 LinkedIn accounts, 10 GB storage.
Small teams. 50,000 words, 3 workspaces, 5 members each, LinkedIn Pages.
Growing teams. 100,000 words, 10 workspaces, 25 LinkedIn accounts, approval workflow.
Custom limits, whitelabeling, webhooks, advanced analytics. Contact sales.
Click **Select Plan** on the tier you want, then **Continue** to enter payment details.
Onboarding lets you finish without picking a plan, but creating carousels, generating posts, scheduling, and publishing all stay locked until you have an active subscription. See [Plans and limits](/billing/plans) for the full breakdown.
## You're done
You'll land on the **Dashboard**. From here:
Pick a template or generate one with AI.
Turn an idea, voice note, or article into a ready-to-publish post.
Queue your first post at a peak time for your timezone.