> ## Documentation Index
> Fetch the complete documentation index at: https://docs.carousify.com/llms.txt
> Use this file to discover all available pages before exploring further.
# Notion integration
> Schedule LinkedIn posts straight from a Notion database — copy our template or map your own columns.
The Notion integration lets you plan, draft, and schedule LinkedIn posts inside a Notion database. When a row's status hits your trigger value, Carousify reads the page body, schedules it for the date you set, and publishes it to the LinkedIn account you mapped — all without leaving Notion.
This is the cleanest setup for teams who already do their planning in Notion: writers draft in a row, an editor flips the status, and Carousify takes it from there.
Carousify uses Notion's official OAuth and only accesses the pages you explicitly select. We never read pages outside the database you connect.
## What Carousify can access
When you authorize the integration, Notion shows the exact permissions Carousify is requesting:
* **View pages you select** — read the database rows and post body text
* **Edit pages you select** — update the status column when a post moves to scheduled or published
* **Create new content within pages you select** — currently unused; reserved for future drafts-from-Carousify
* **View workspace users and their emails** — used to attribute who scheduled what
Carousify only sees the database (and rows inside it) you tick during the OAuth step. Pages outside that selection stay invisible to us.
## Before you start
You'll need:
* A Notion workspace where you have permission to add pages
* A connected LinkedIn account in Carousify — see [Connect your LinkedIn account](/getting-started/connect-linkedin)
* 5 minutes
## Step 1 — Open the Connect Notion modal
In Carousify, go to **Manage Workspace › Integrations** in the left sidebar and click **Connect** on the Notion card.
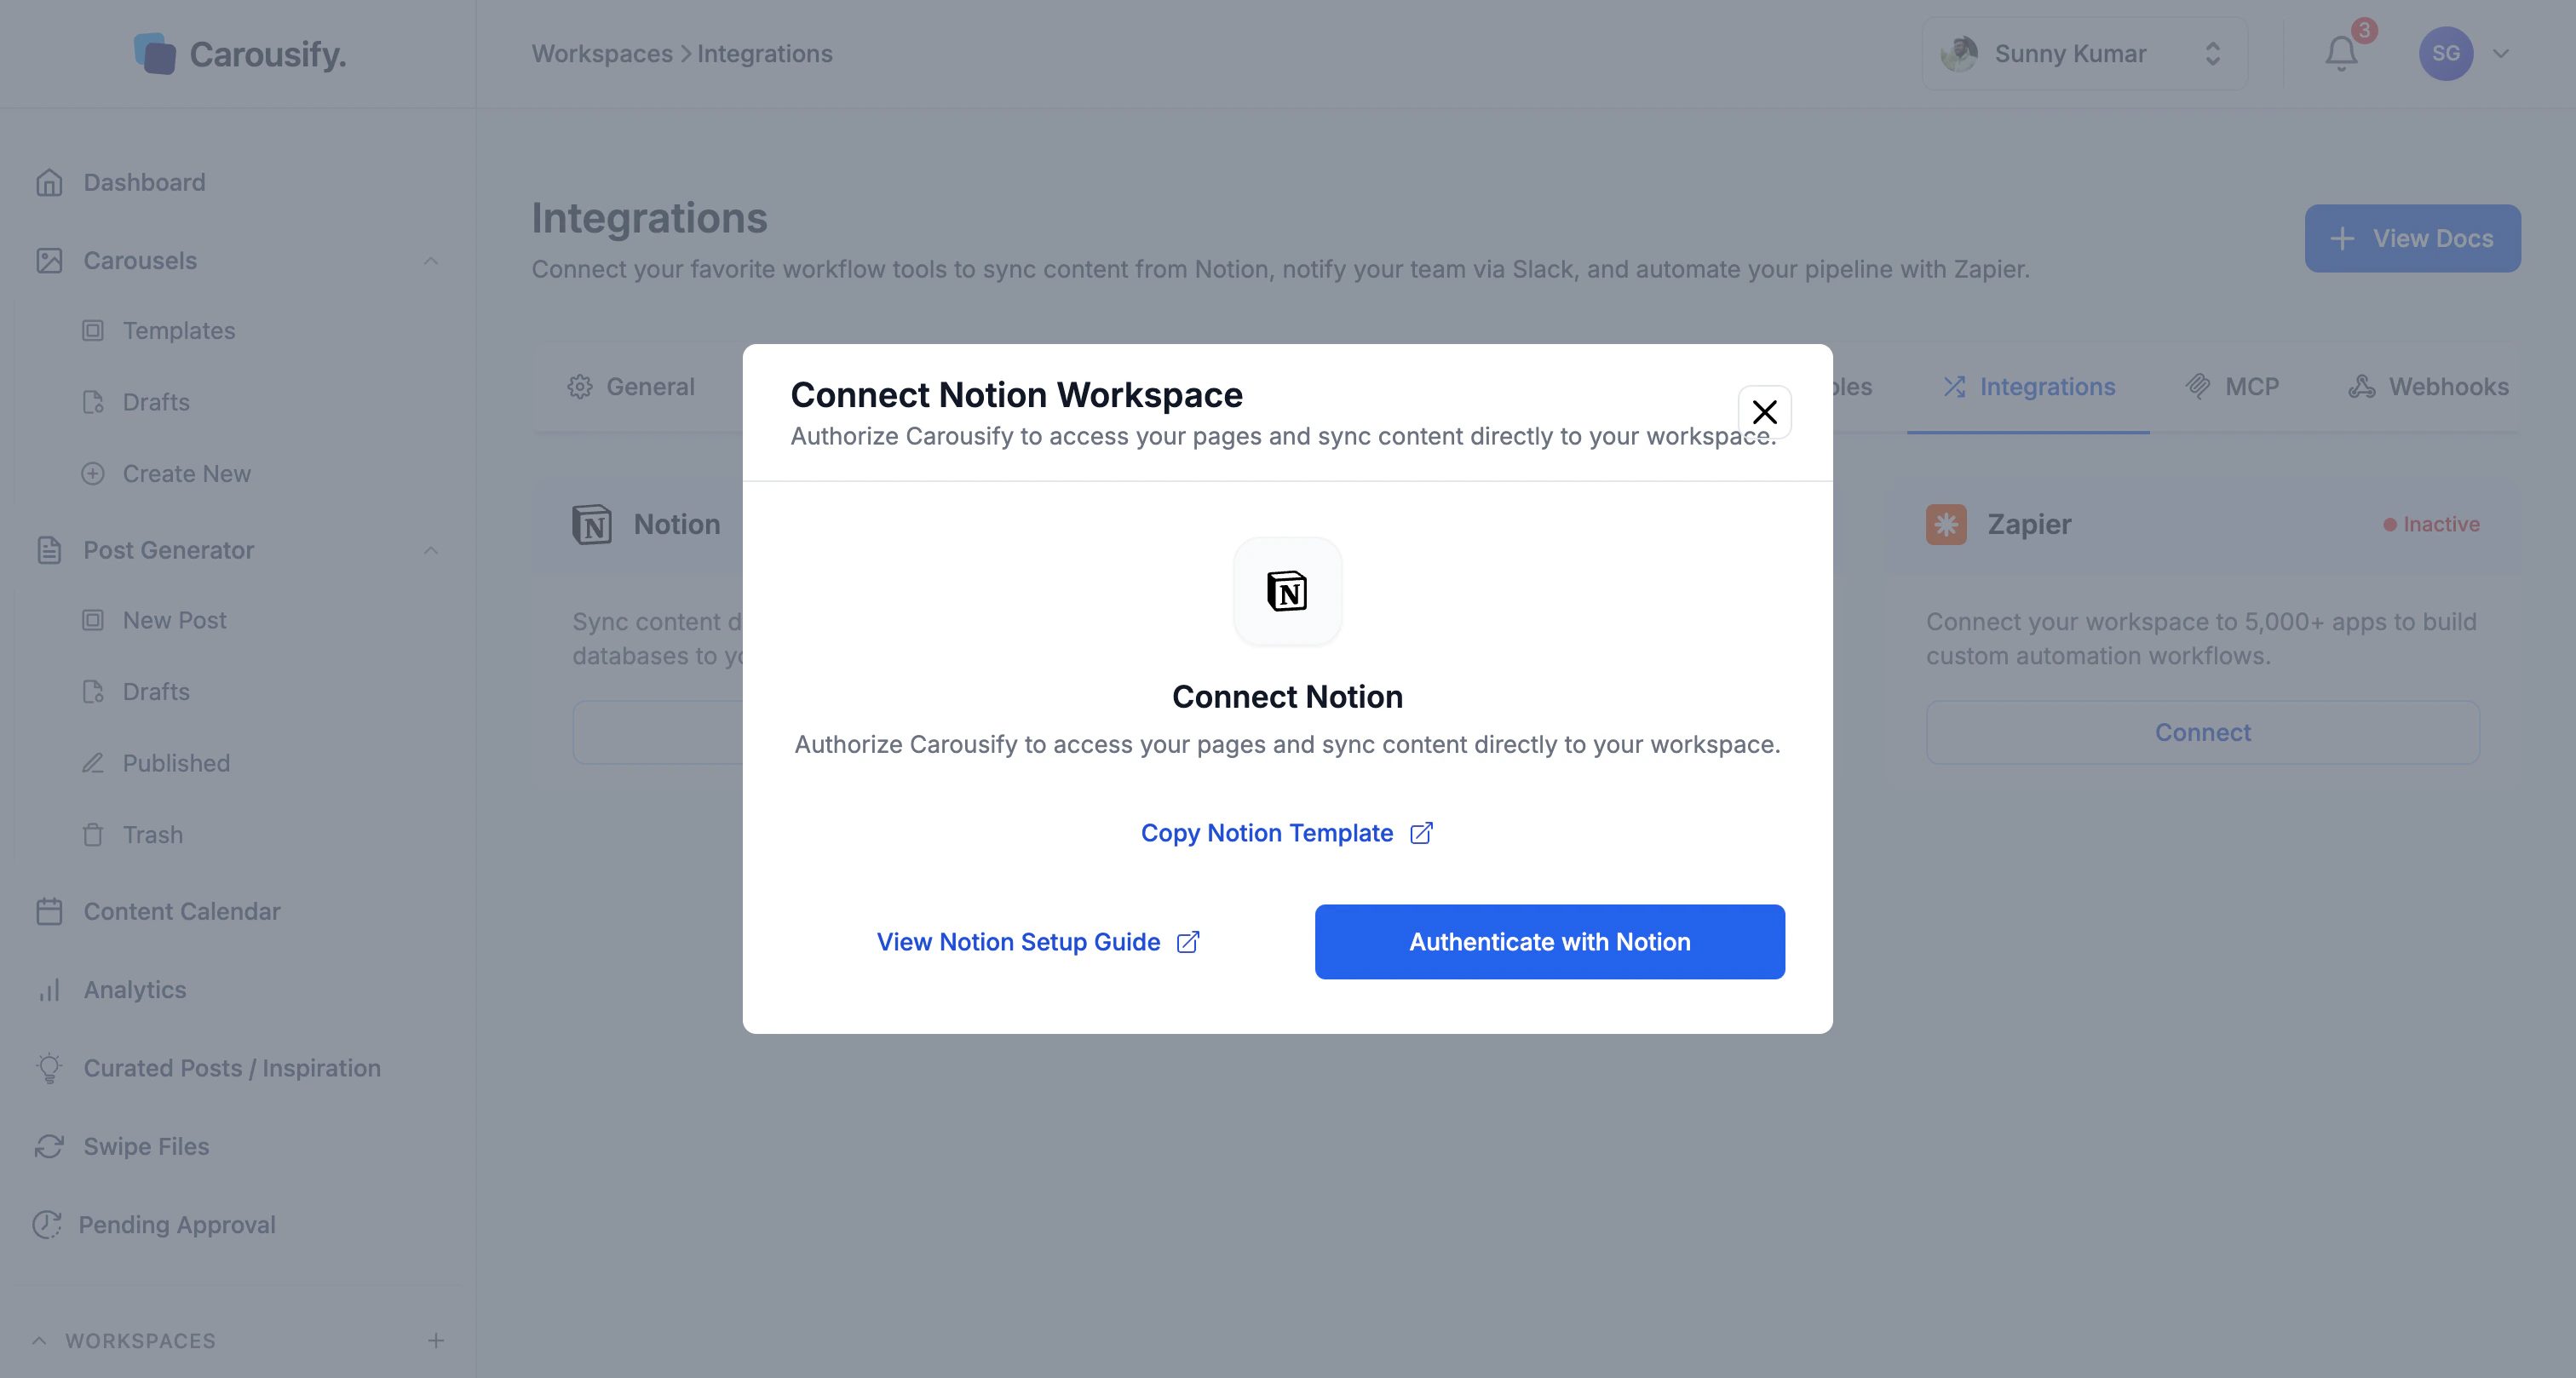 The modal has three actions:
| Button | What it does |
| ---------------------------- | -------------------------------------------------------------------------------------- |
| **Copy Notion Template** | Opens the Carousify-ready Notion template so you can duplicate it into your workspace. |
| **View Notion Setup Guide** | Opens this page. |
| **Authenticate with Notion** | Starts the Notion OAuth flow. |
If you already have a database you want to use, skip to [Step 4](#step-4-%E2%80%94-authenticate-with-notion). Otherwise start at Step 2.
## Step 2 — Copy the Notion template
Click **Copy Notion Template** in the Carousify modal — it opens the [Carousify x Notion template](https://lofty-limburger-811.notion.site/358853573c2d80afb3b1cf08d549b69c?v=358853573c2d80ad9ee3000c87b7a782) in a new tab. The template is a public, read-only Notion page with a database called **Carousify x Notion** that has every column Carousify needs.
The modal has three actions:
| Button | What it does |
| ---------------------------- | -------------------------------------------------------------------------------------- |
| **Copy Notion Template** | Opens the Carousify-ready Notion template so you can duplicate it into your workspace. |
| **View Notion Setup Guide** | Opens this page. |
| **Authenticate with Notion** | Starts the Notion OAuth flow. |
If you already have a database you want to use, skip to [Step 4](#step-4-%E2%80%94-authenticate-with-notion). Otherwise start at Step 2.
## Step 2 — Copy the Notion template
Click **Copy Notion Template** in the Carousify modal — it opens the [Carousify x Notion template](https://lofty-limburger-811.notion.site/358853573c2d80afb3b1cf08d549b69c?v=358853573c2d80ad9ee3000c87b7a782) in a new tab. The template is a public, read-only Notion page with a database called **Carousify x Notion** that has every column Carousify needs.
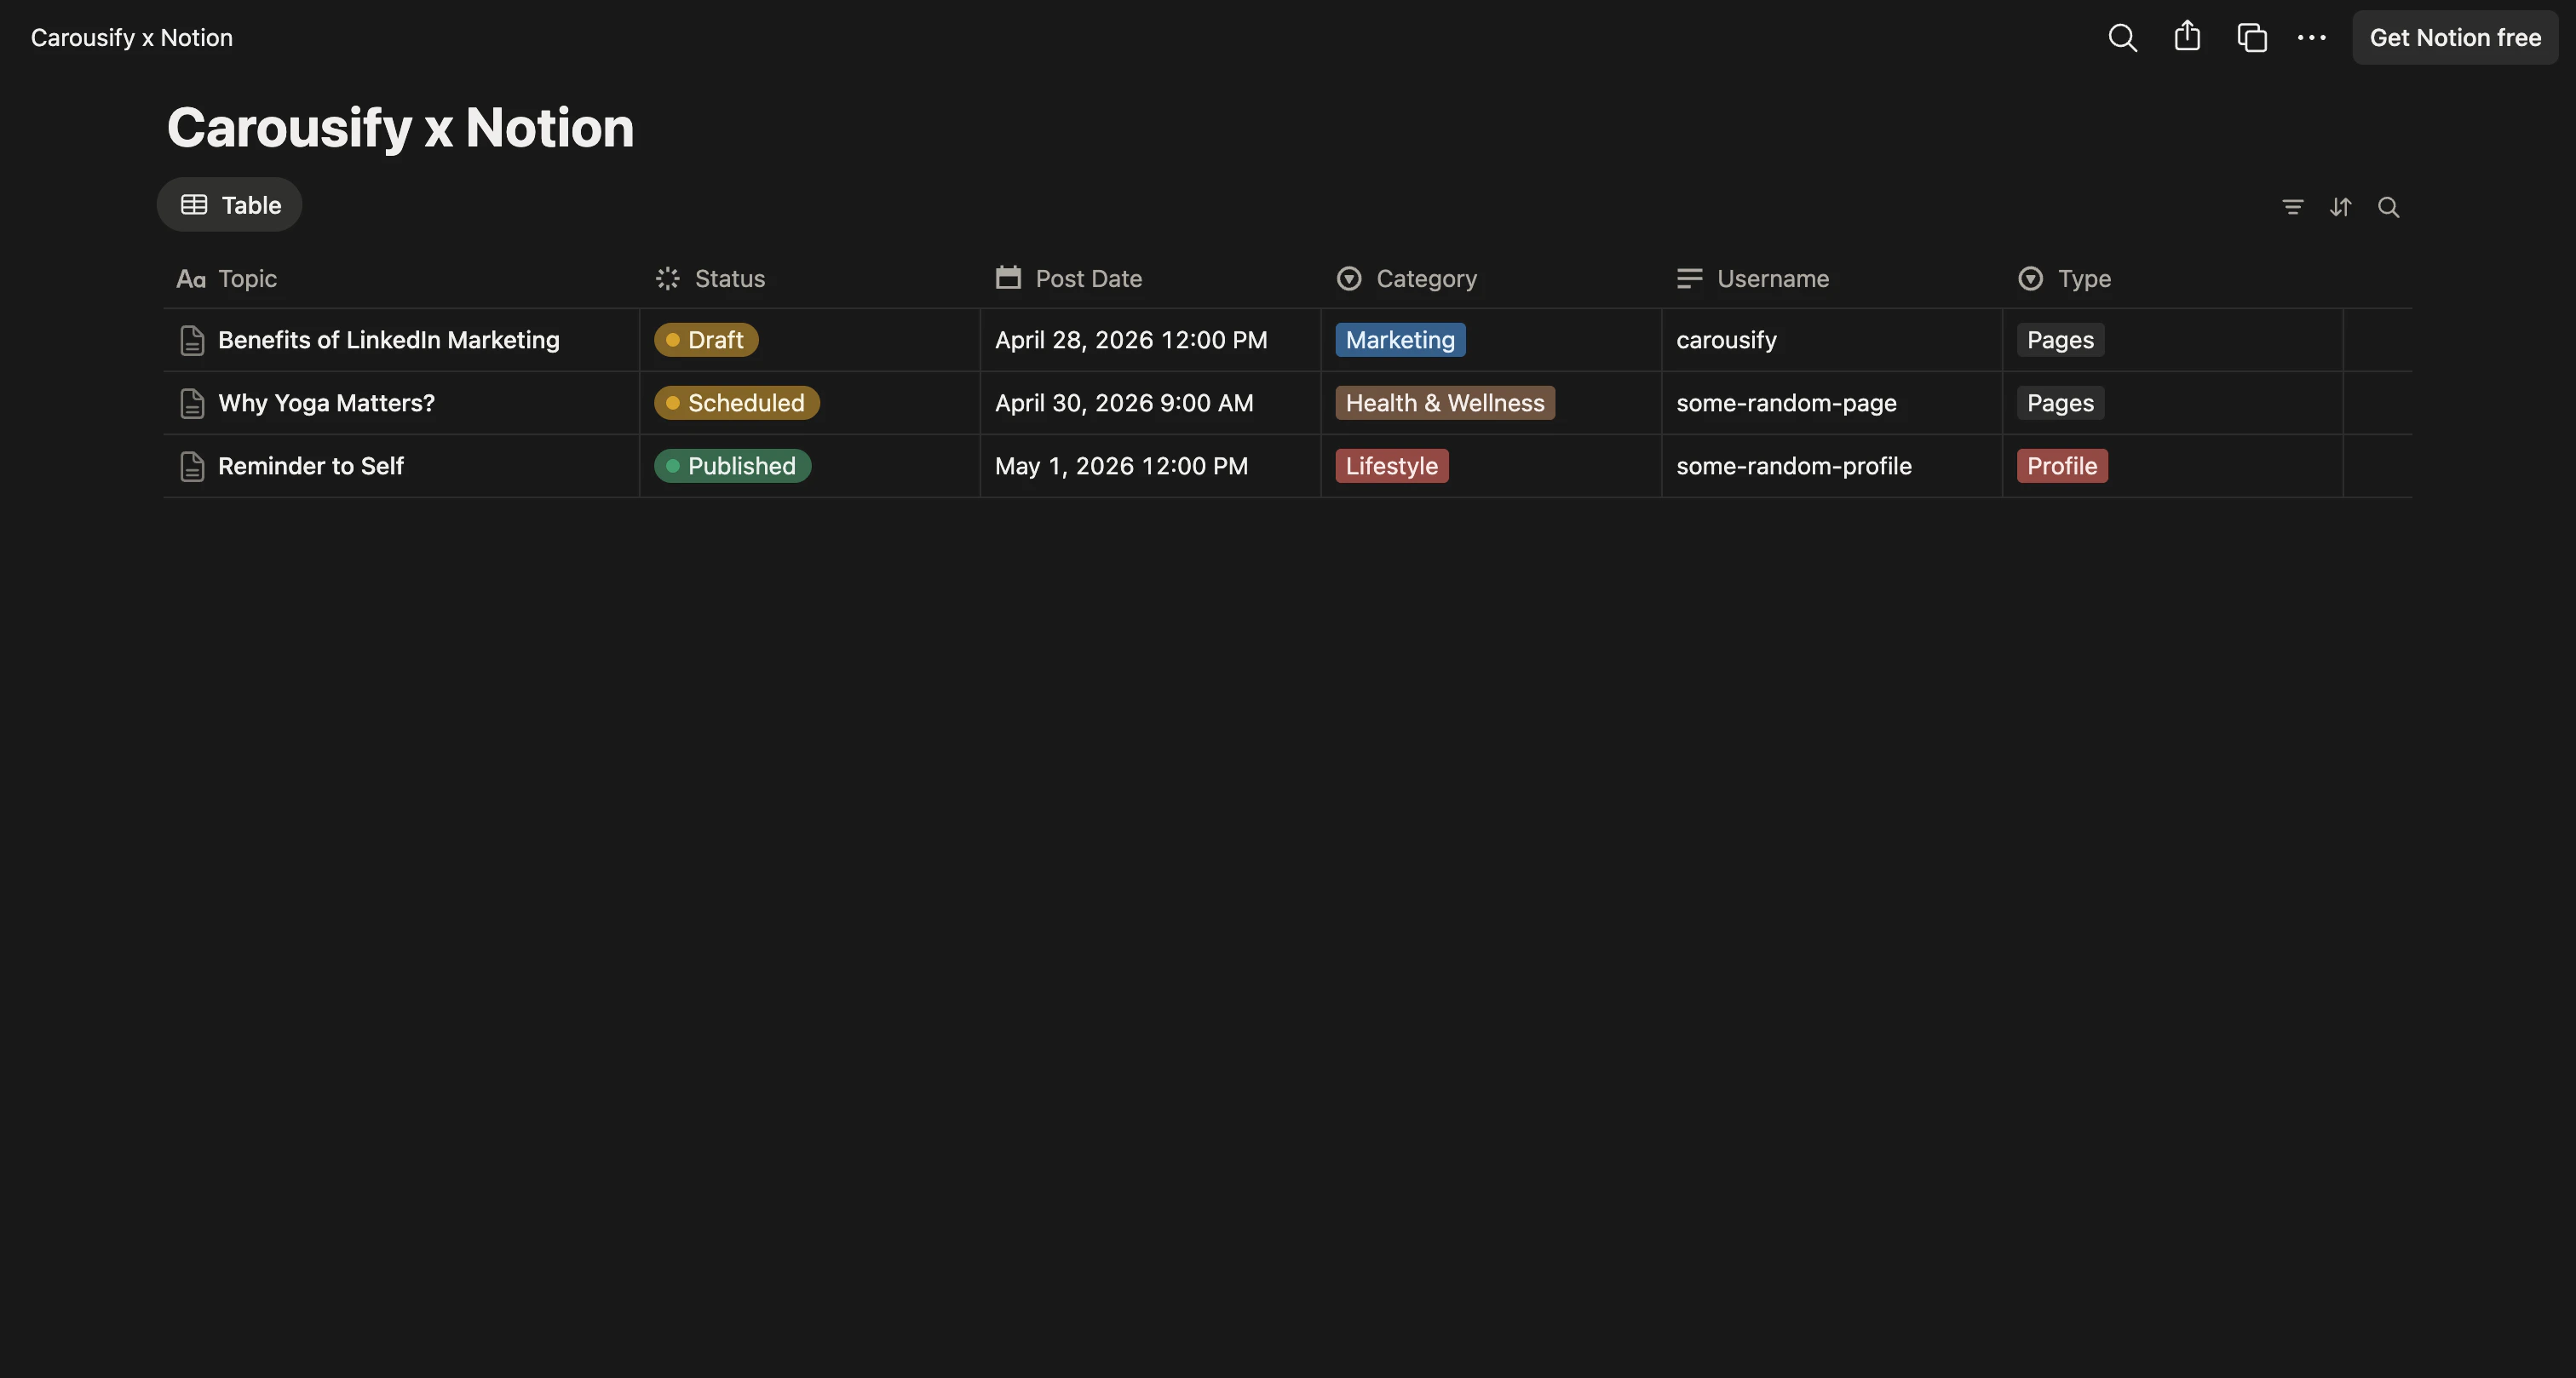 In the top-right corner of the Notion page, click the **Duplicate** icon (the square with an arrow, just to the left of the three-dot **More actions** menu).
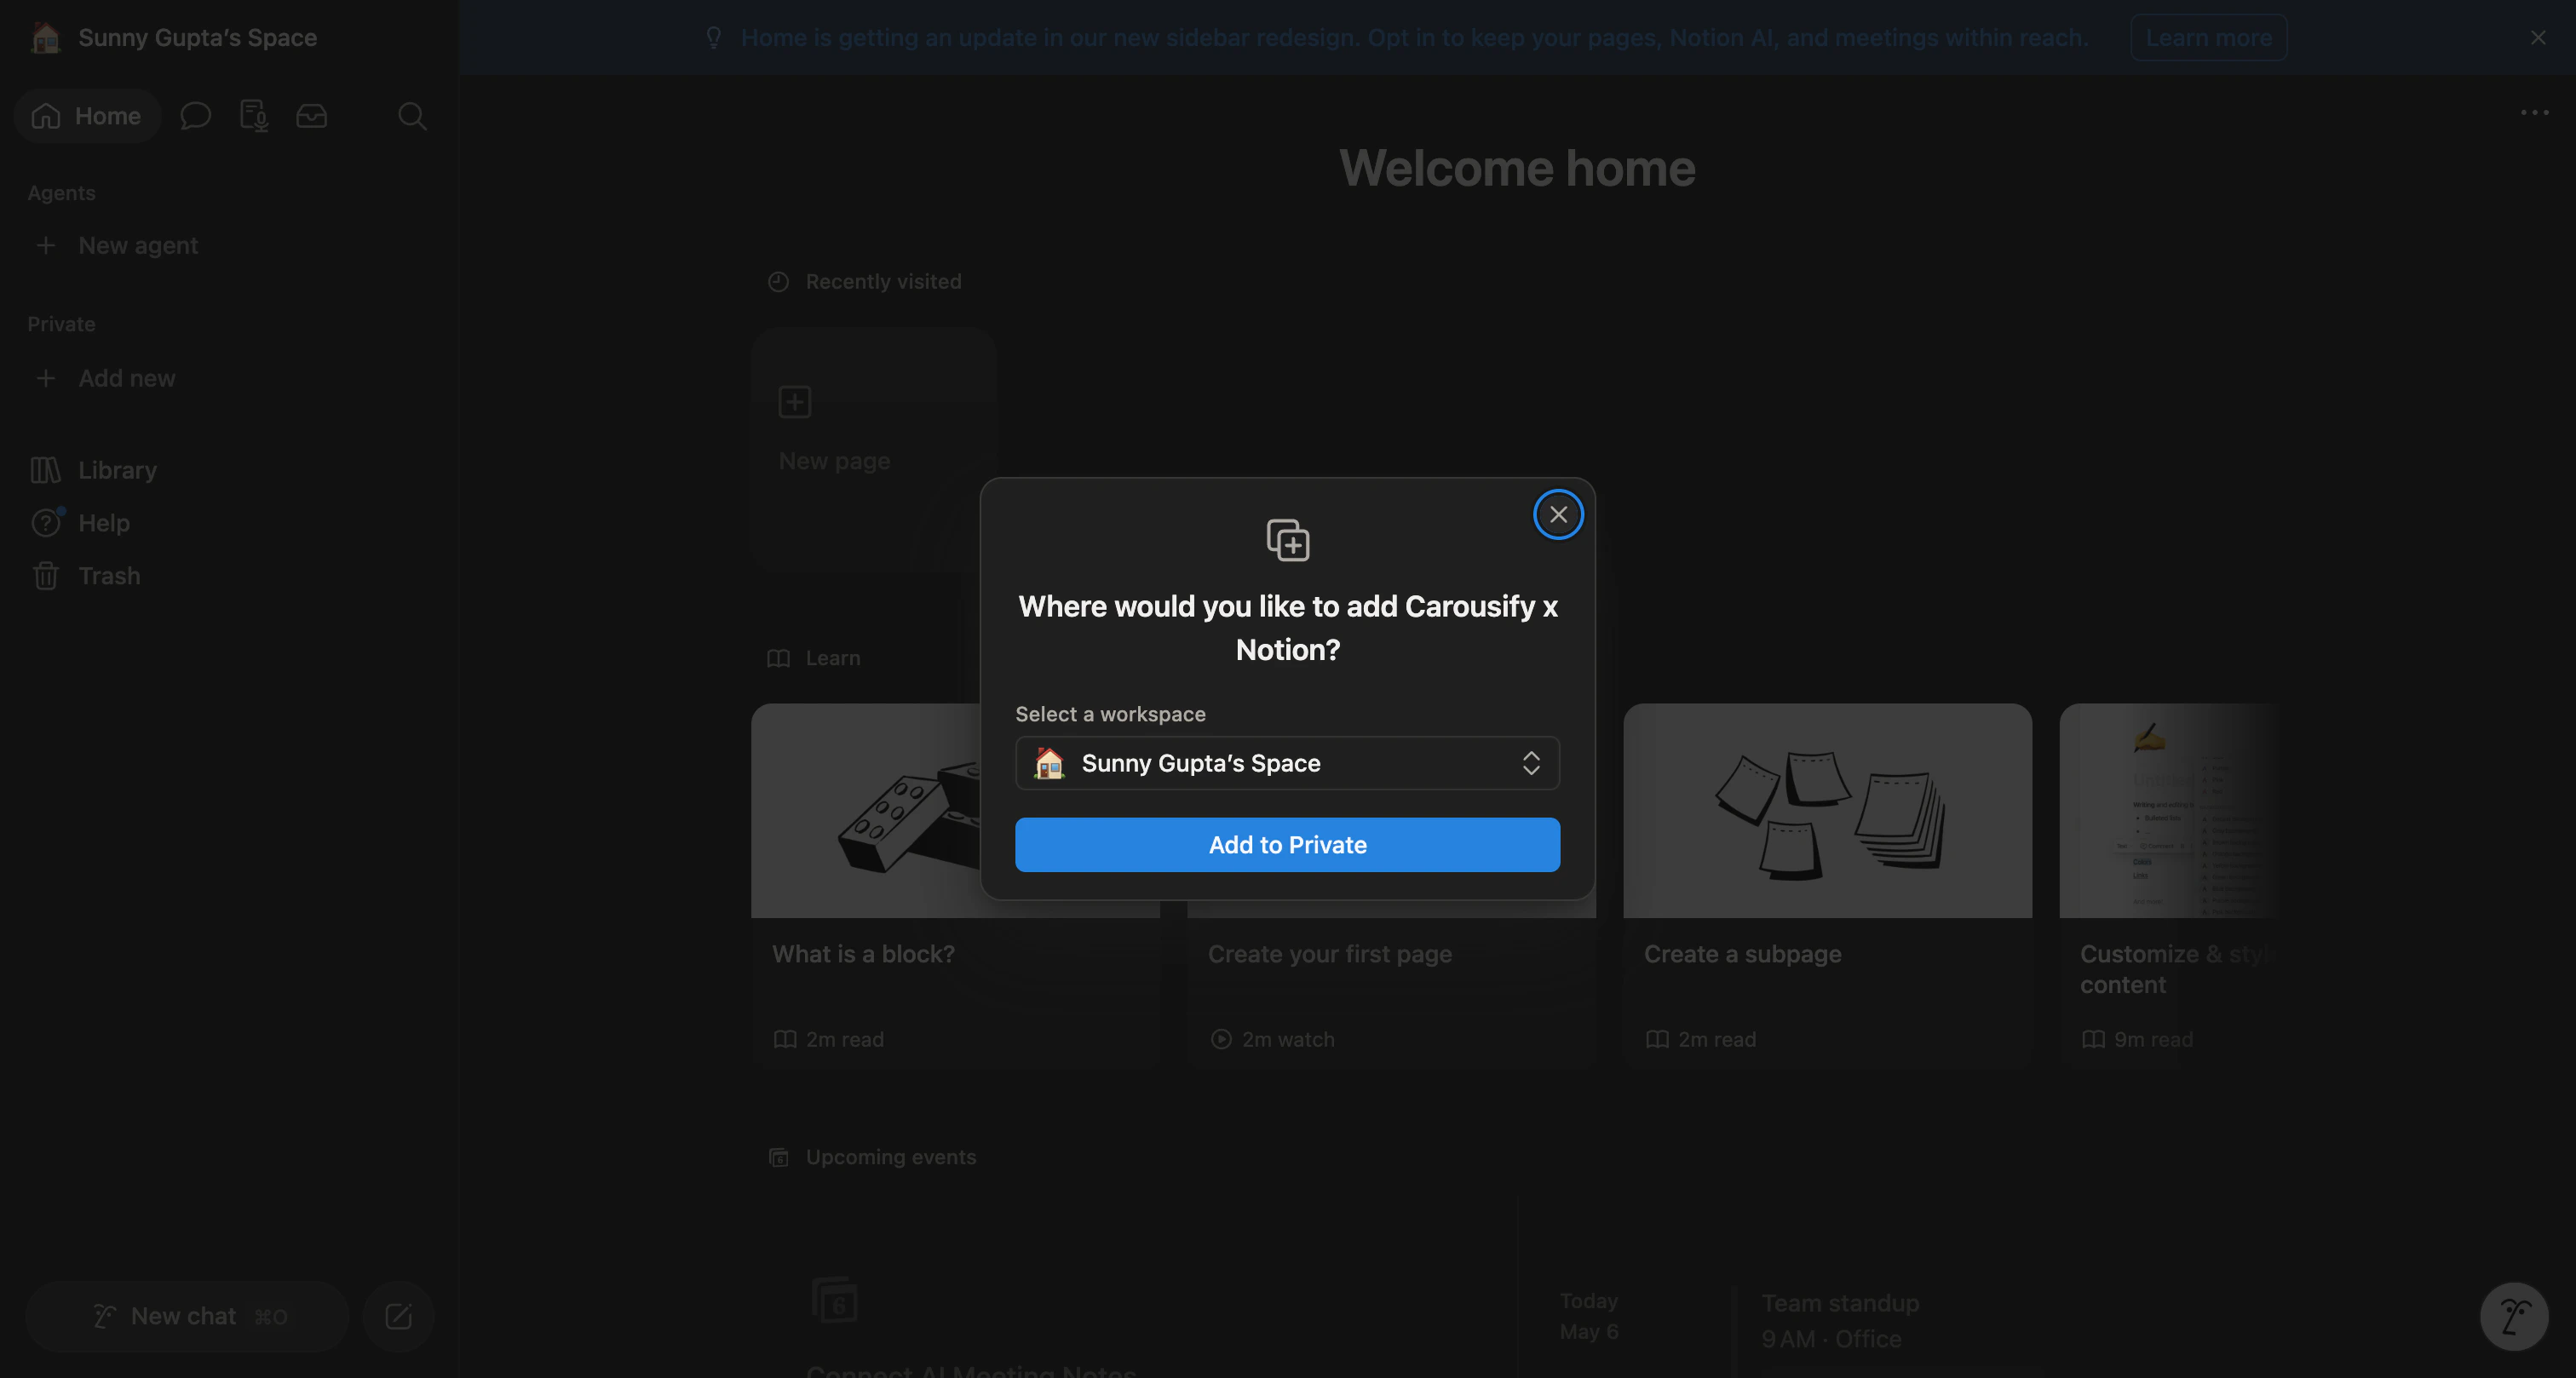 Notion opens a **Duplicate template** modal. Pick the Notion workspace you want to add it to, then click **Add to Private**.
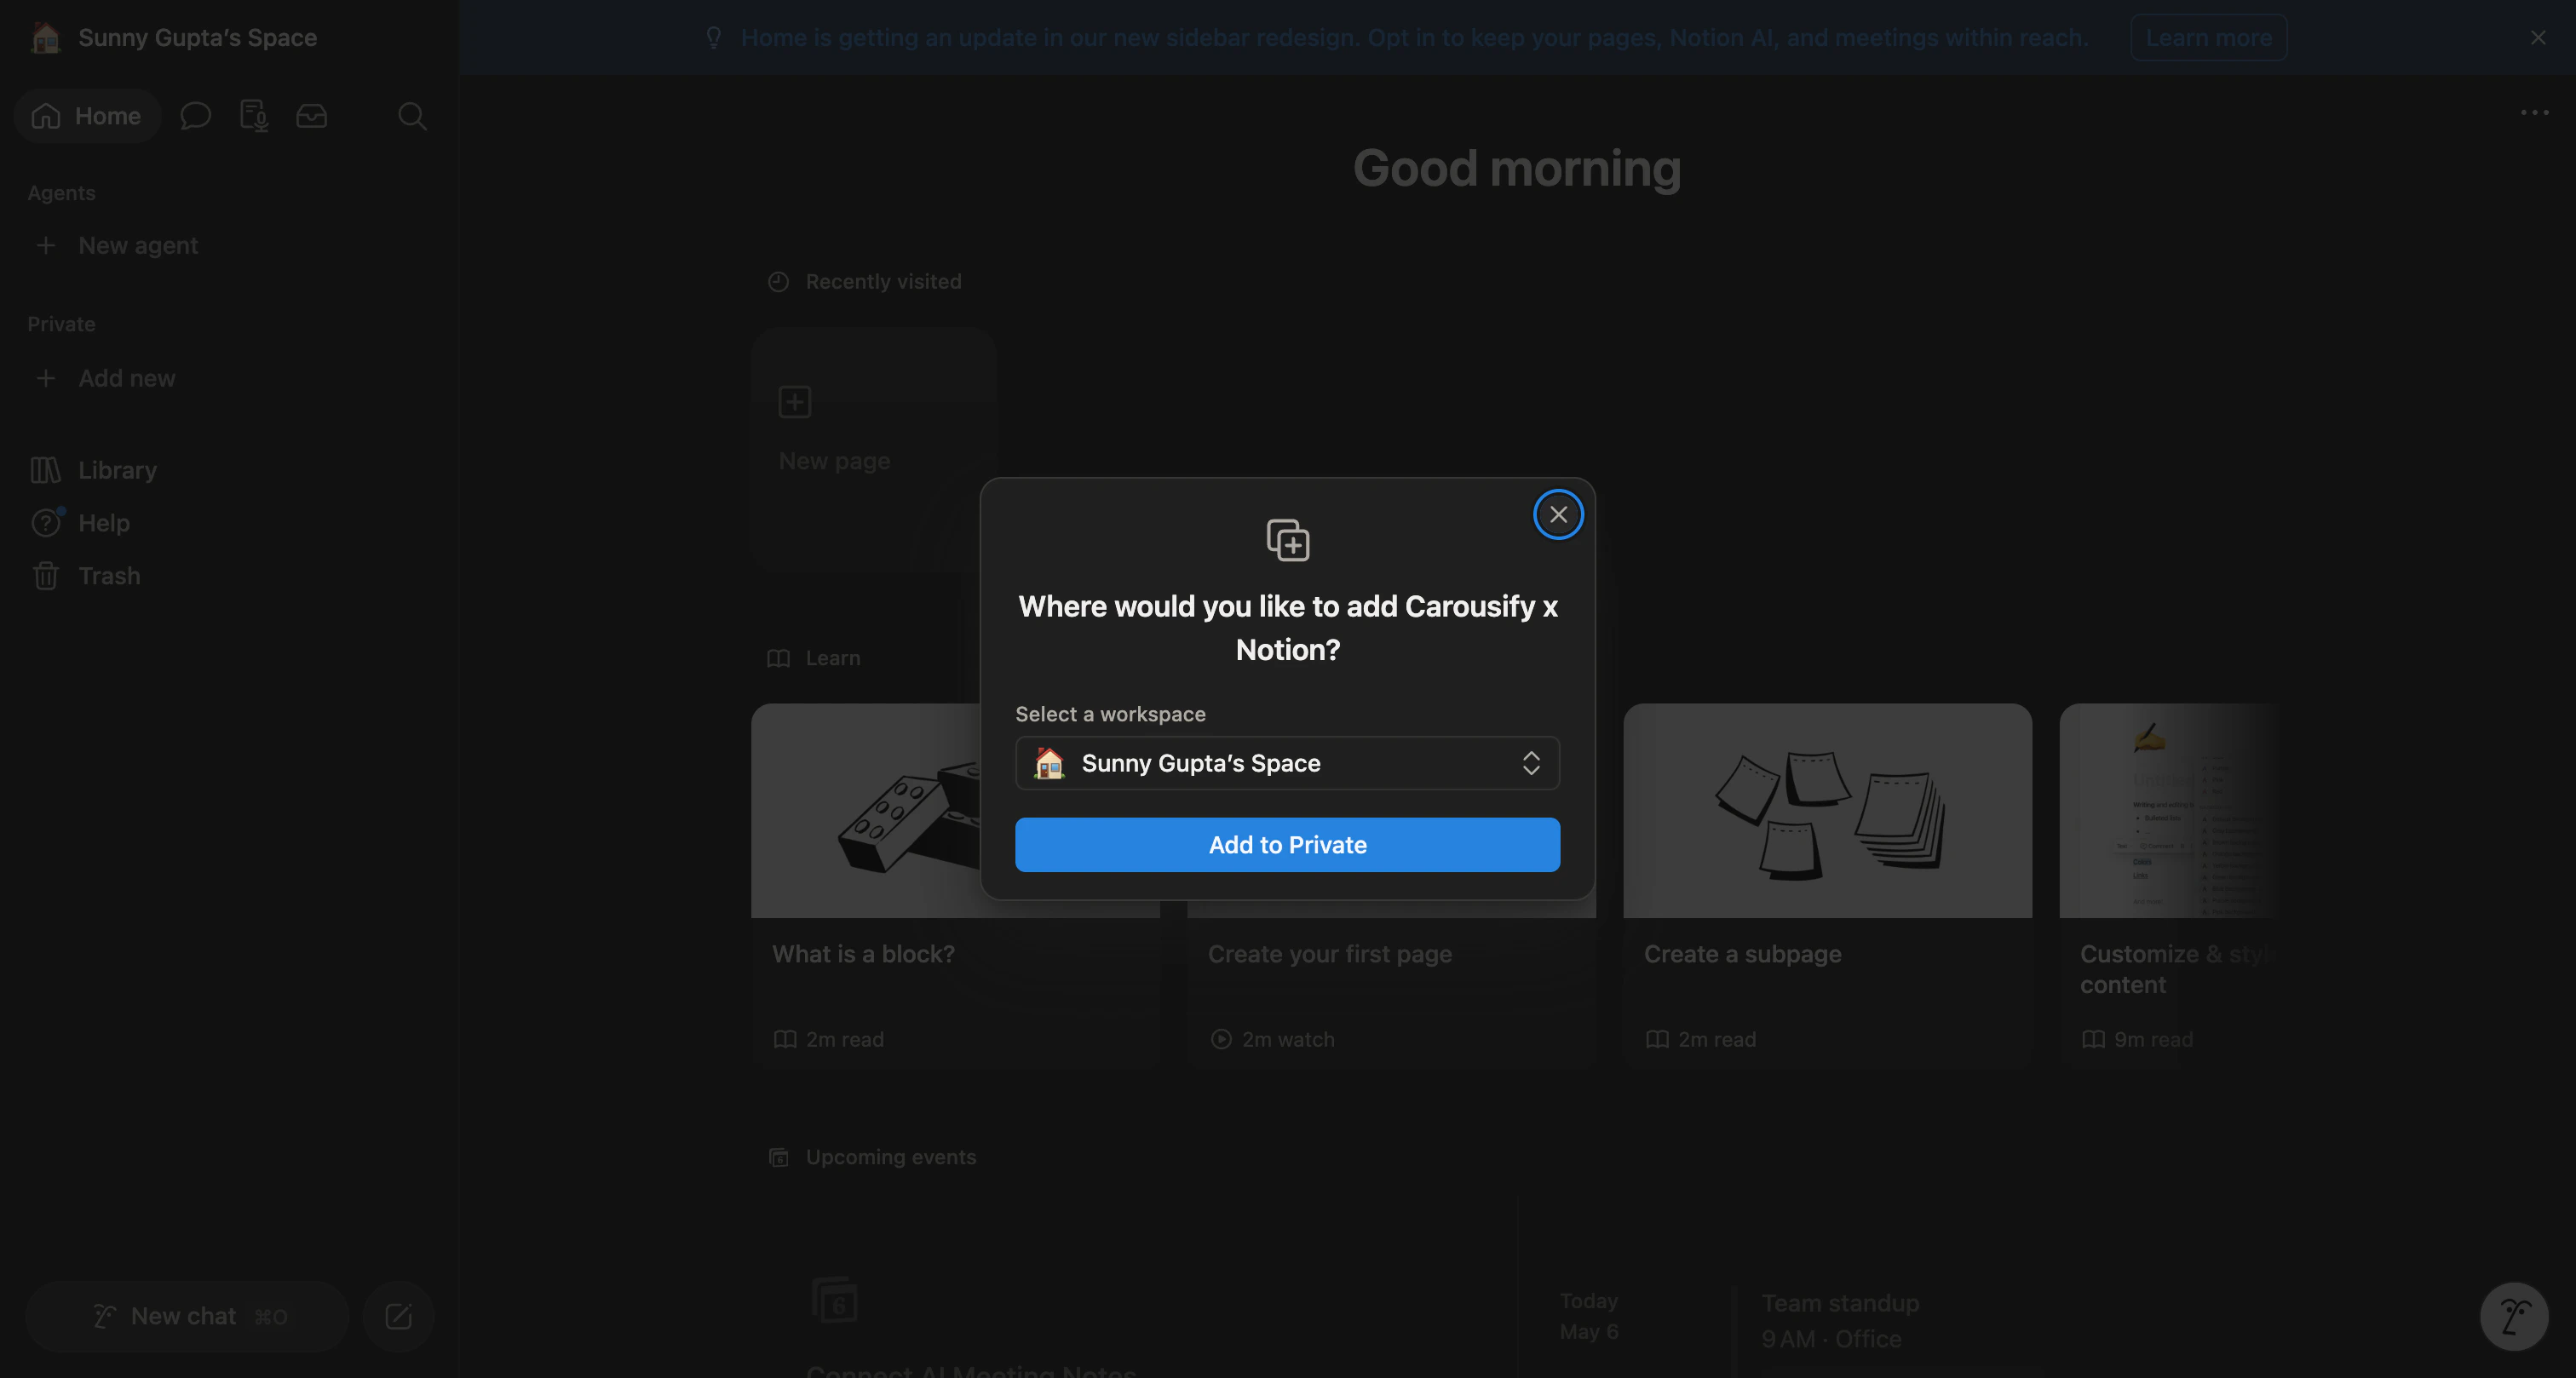 After a few seconds Notion shows a **Template is ready** toast and the **Carousify x Notion** database appears in the **Private** section of your sidebar.
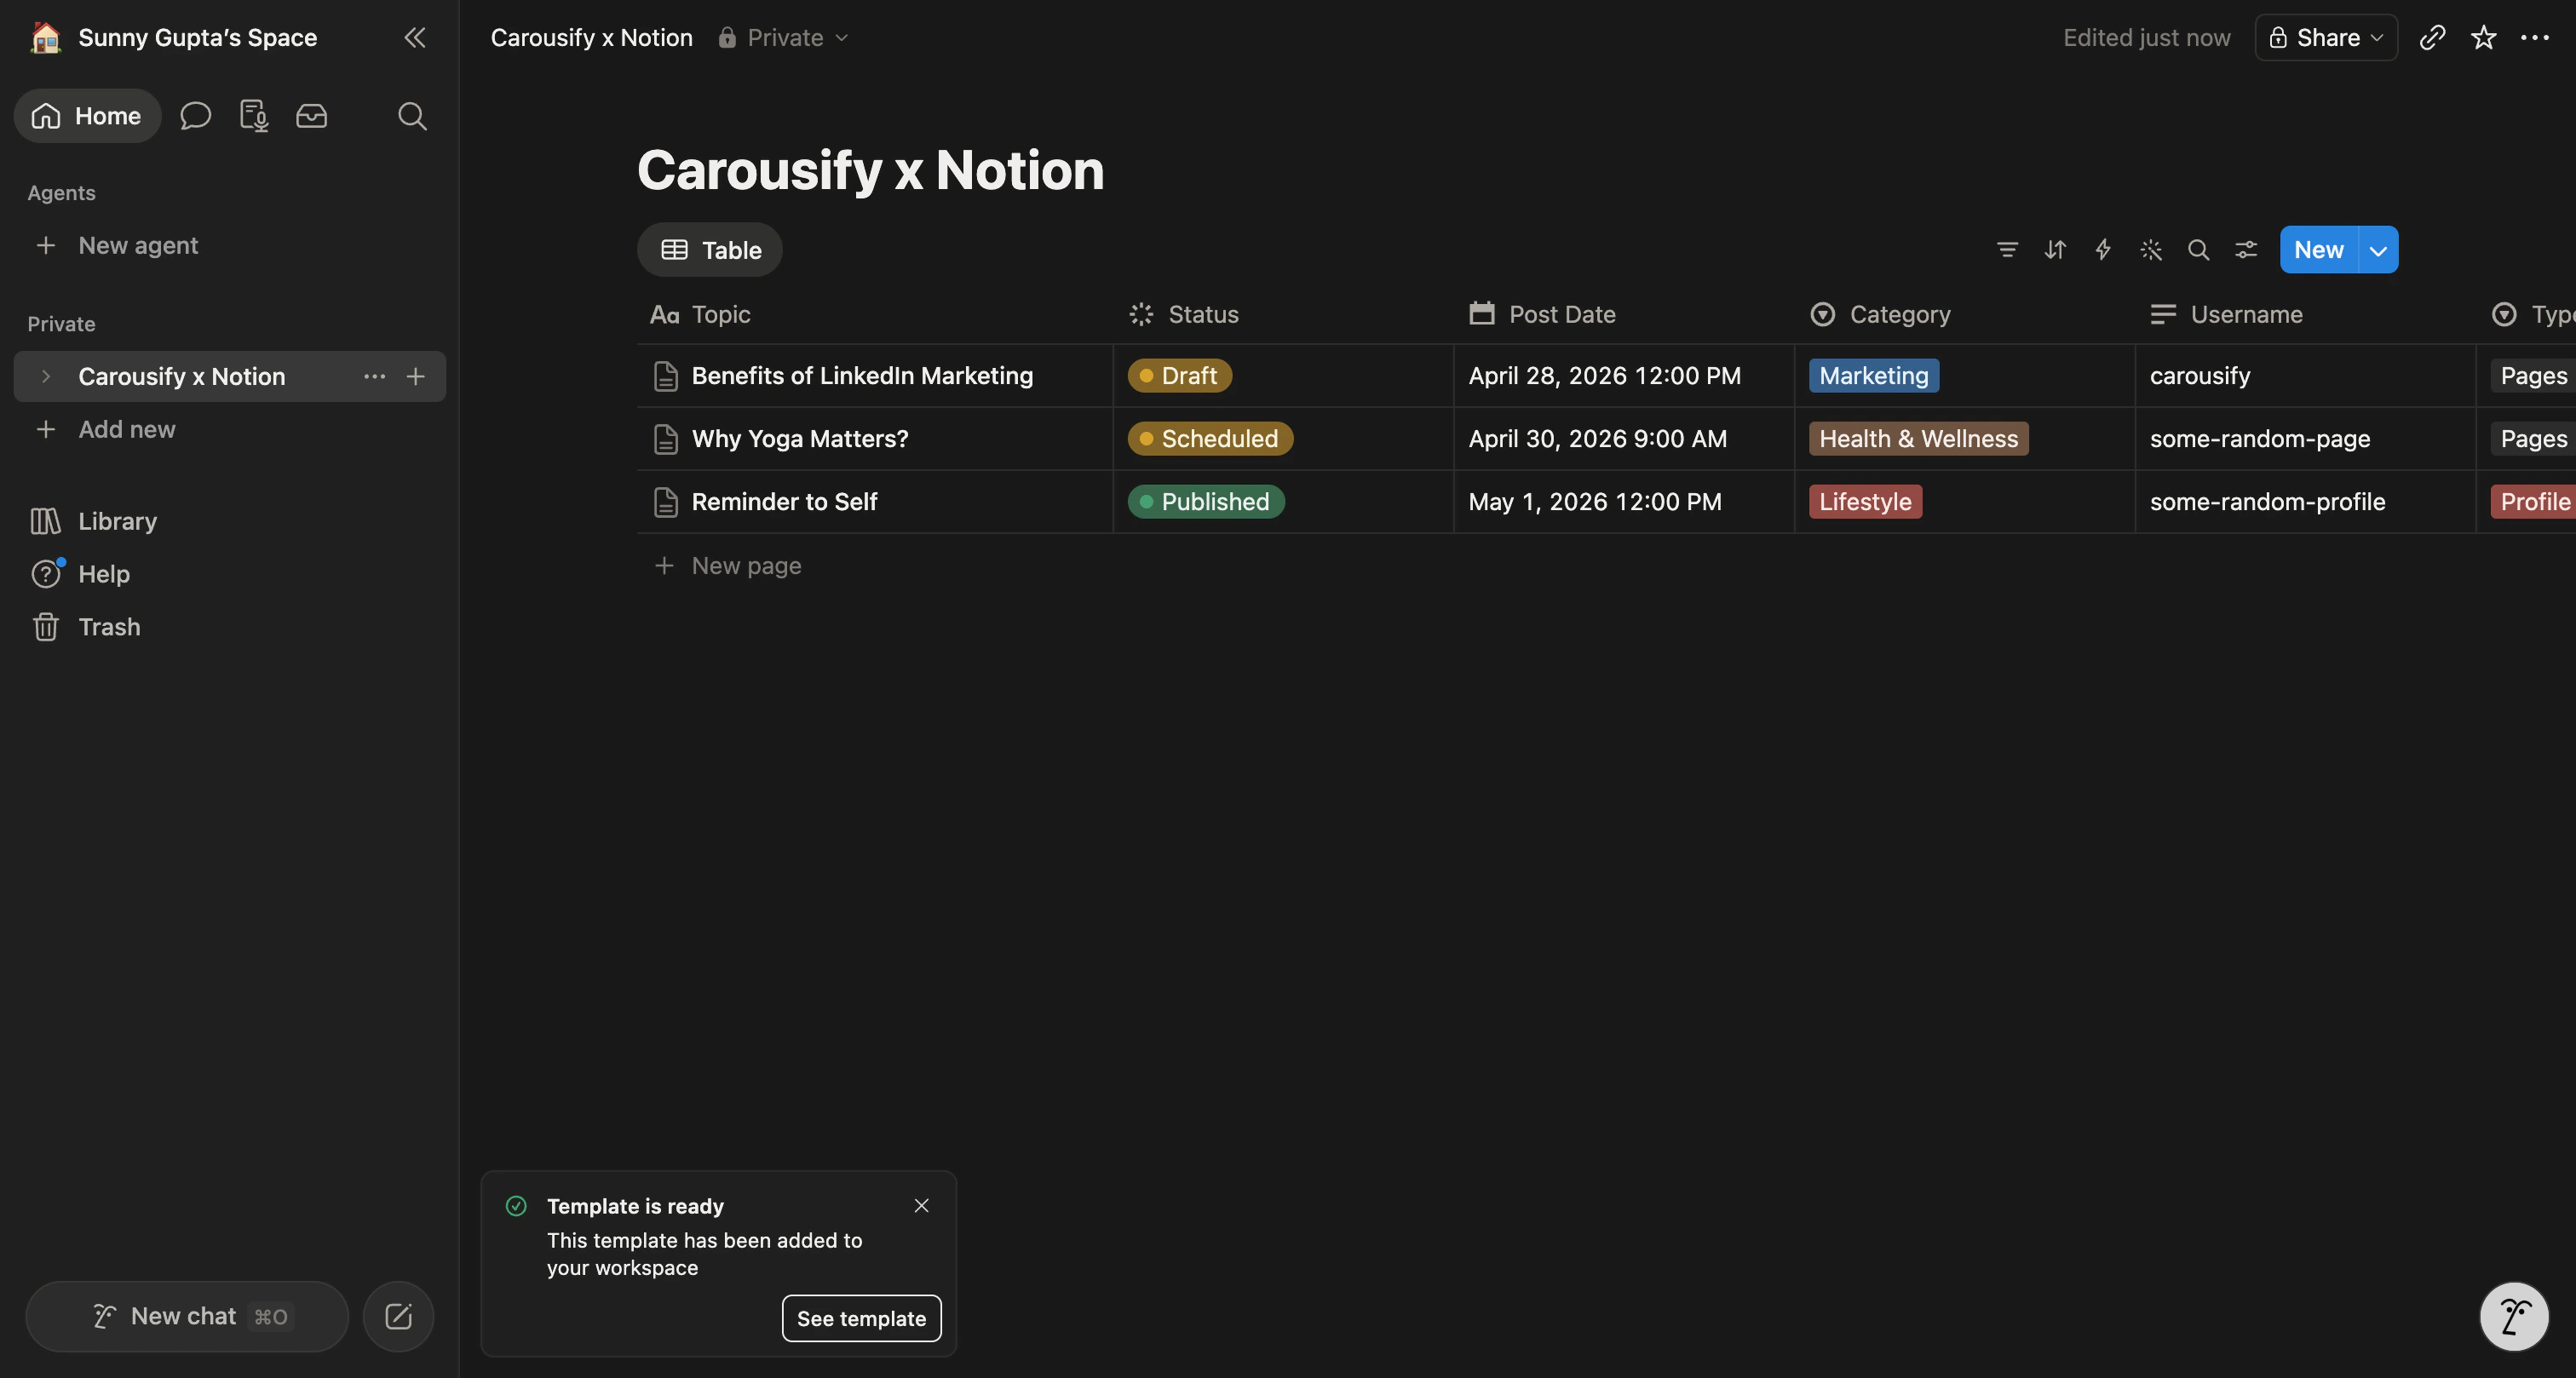 You can rename the database, add columns, change views, or move it into any folder. Carousify only cares about the columns you map in Step 5.
## Step 3 — Or use your own database
Don't want our template? Any Notion database works as long as it has these column types:
| Carousify field | Notion column type | What goes in it |
| --------------------- | ------------------------ | ------------------------------------------------------------------------------------------------------ |
| **Posting Date/Time** | Date (with time enabled) | When the post should publish, in your workspace timezone. |
| **Status** | Select | Drives the workflow — see [Status labels](#status-labels) below. |
| **Username** | Text | The LinkedIn vanity name (e.g. `carousify`) of the account or page to publish from. |
| **Type** | Select or Text | Either `profile` or `pages` — tells Carousify whether to post to a personal profile or a company page. |
The post **body** lives inside the Notion page itself (open the row to write it). Column names can be anything — you'll map them in Step 5.
## Step 4 — Authenticate with Notion
Back in Carousify, click **Authenticate with Notion** in the same modal. Notion opens its official **Connect with Carousify** screen showing the requested permissions.
You can rename the database, add columns, change views, or move it into any folder. Carousify only cares about the columns you map in Step 5.
## Step 3 — Or use your own database
Don't want our template? Any Notion database works as long as it has these column types:
| Carousify field | Notion column type | What goes in it |
| --------------------- | ------------------------ | ------------------------------------------------------------------------------------------------------ |
| **Posting Date/Time** | Date (with time enabled) | When the post should publish, in your workspace timezone. |
| **Status** | Select | Drives the workflow — see [Status labels](#status-labels) below. |
| **Username** | Text | The LinkedIn vanity name (e.g. `carousify`) of the account or page to publish from. |
| **Type** | Select or Text | Either `profile` or `pages` — tells Carousify whether to post to a personal profile or a company page. |
The post **body** lives inside the Notion page itself (open the row to write it). Column names can be anything — you'll map them in Step 5.
## Step 4 — Authenticate with Notion
Back in Carousify, click **Authenticate with Notion** in the same modal. Notion opens its official **Connect with Carousify** screen showing the requested permissions.
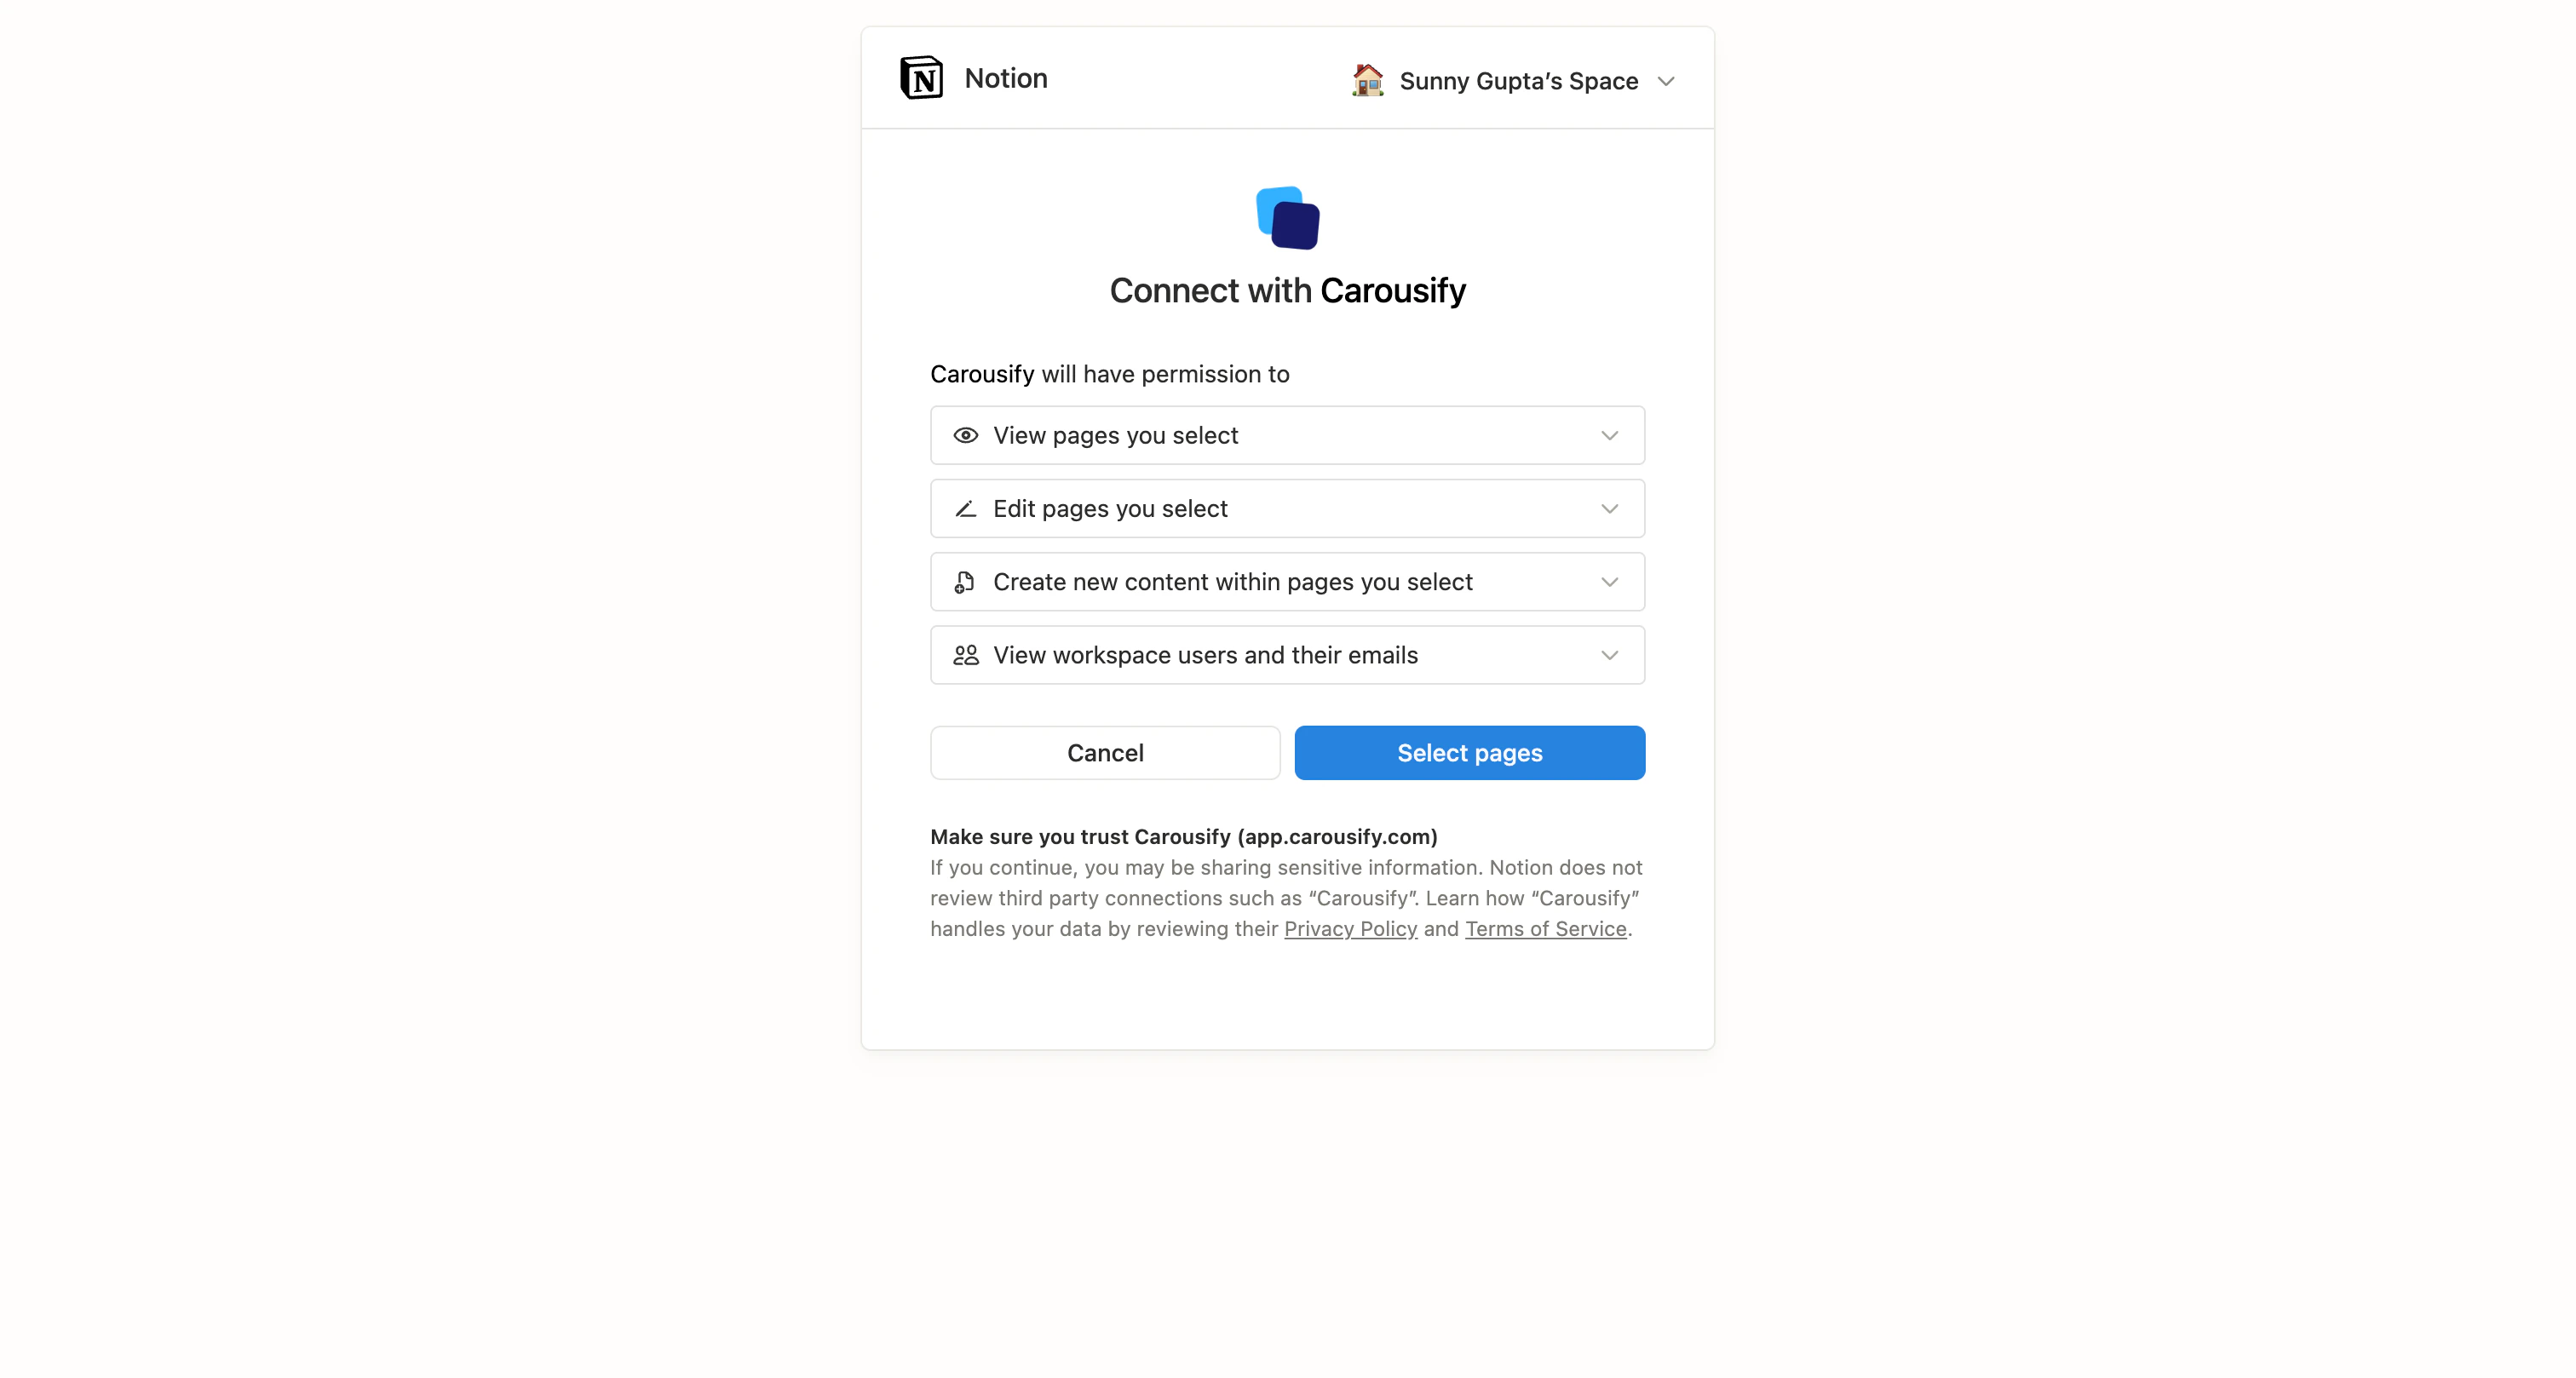 Click **Select pages**, then tick the database you want Carousify to read — **Carousify x Notion** if you used the template, or your own database if you built one.
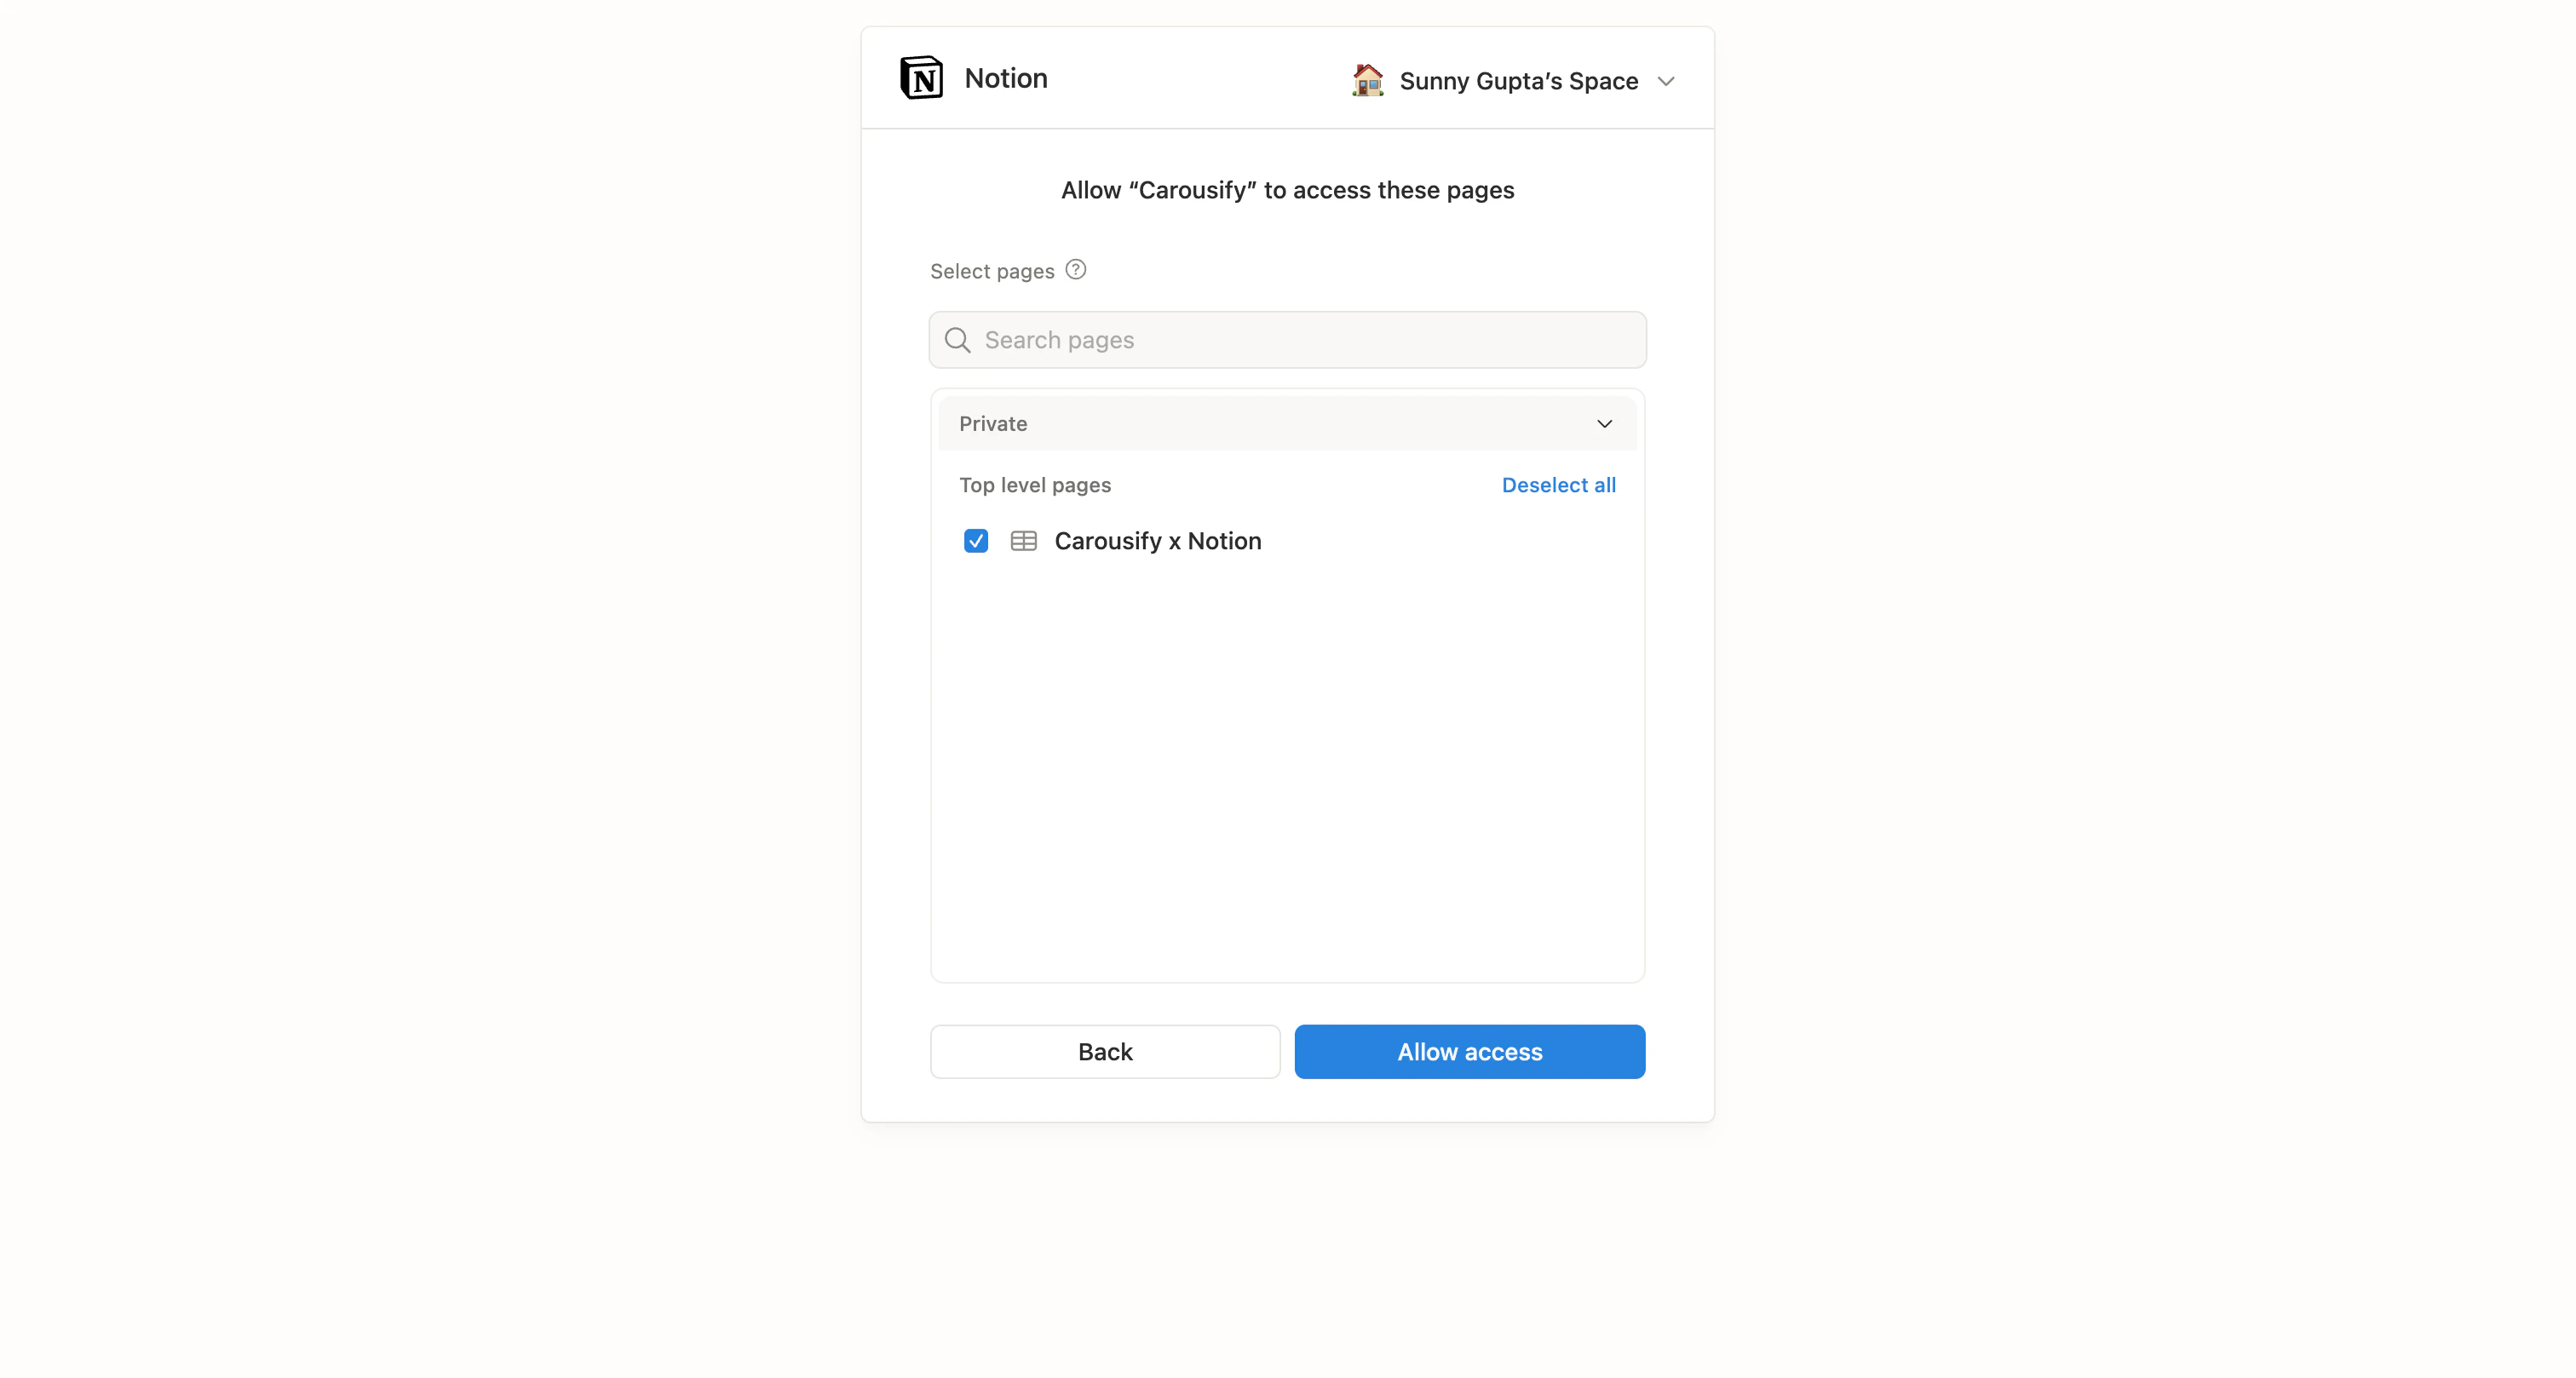 Click **Allow access**. Notion redirects you back to Carousify.
Only tick the database you actually want to publish from. Anything else you select gives Carousify read access it doesn't need.
## Step 5 — Pick the database
Carousify lands on the **Select Notion Database** screen with every database you authorized listed. Click the one you want to use — its tile shows a **Selected** badge.
Click **Allow access**. Notion redirects you back to Carousify.
Only tick the database you actually want to publish from. Anything else you select gives Carousify read access it doesn't need.
## Step 5 — Pick the database
Carousify lands on the **Select Notion Database** screen with every database you authorized listed. Click the one you want to use — its tile shows a **Selected** badge.
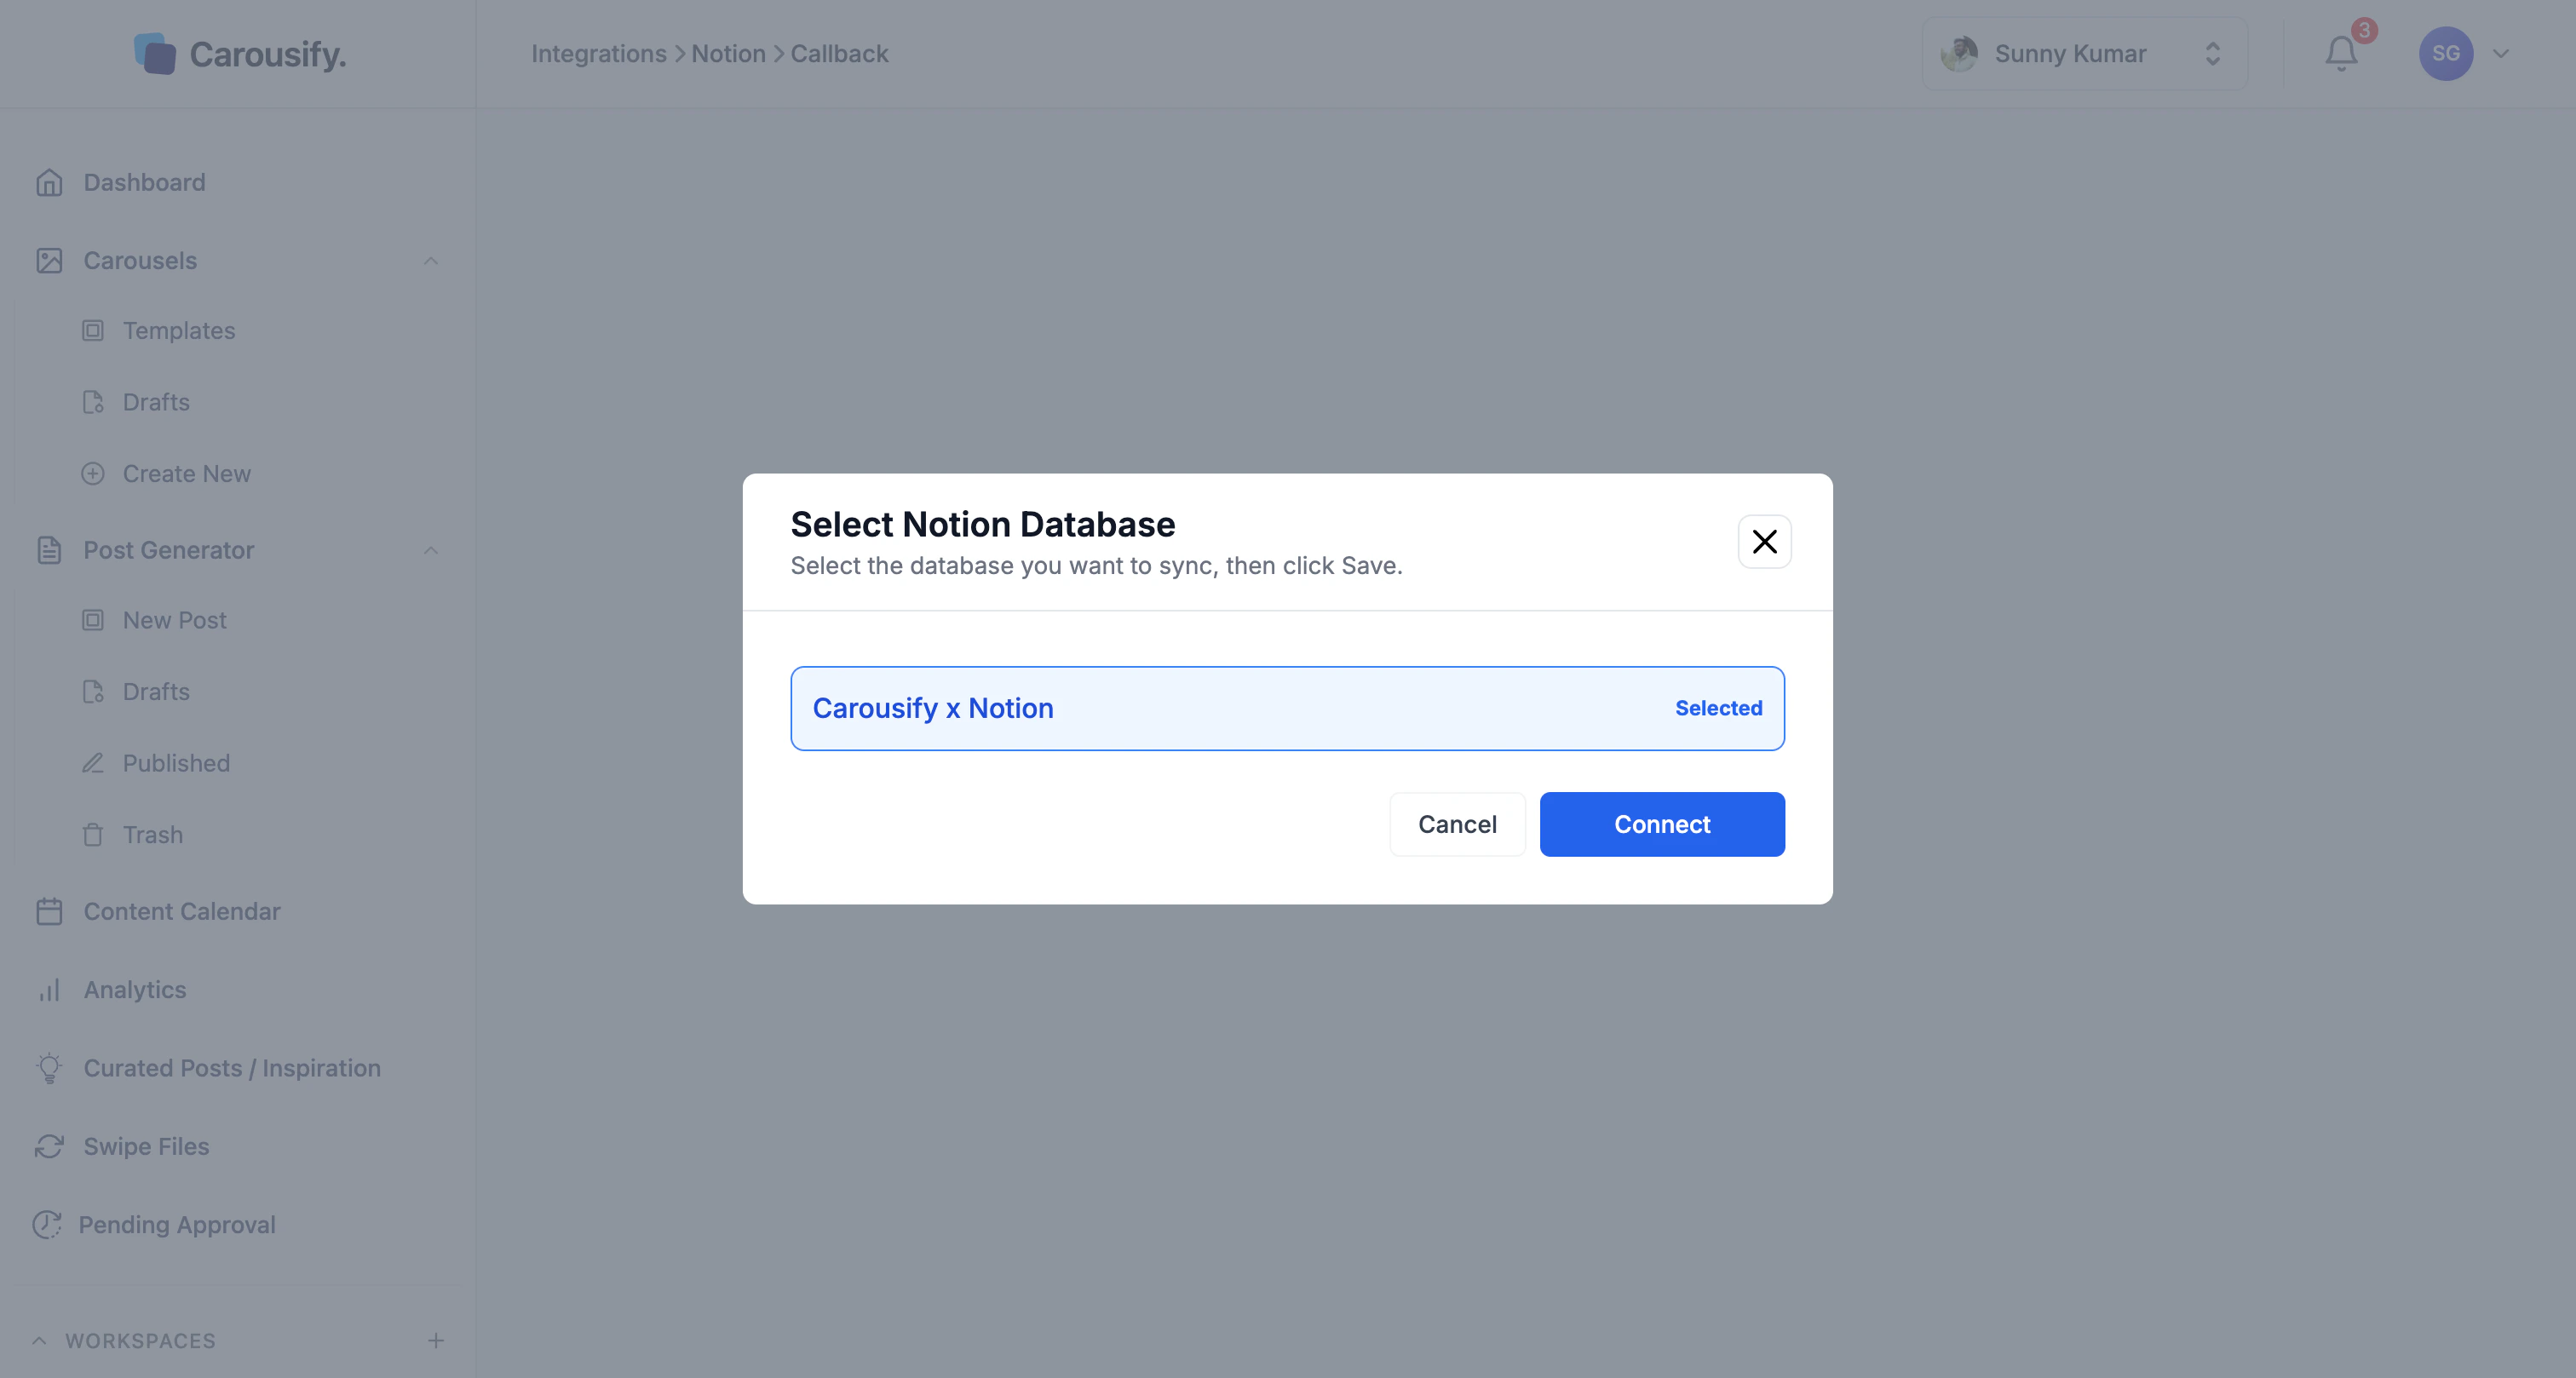 Click **Connect** to move on.
## Step 6 — Map columns and define statuses
The **Finalize Sync Logic** screen is where you tell Carousify which Notion column means what. If you're using our template, the values in the **Column Mapping** dropdowns line up 1-to-1 with the column names.
Click **Connect** to move on.
## Step 6 — Map columns and define statuses
The **Finalize Sync Logic** screen is where you tell Carousify which Notion column means what. If you're using our template, the values in the **Column Mapping** dropdowns line up 1-to-1 with the column names.
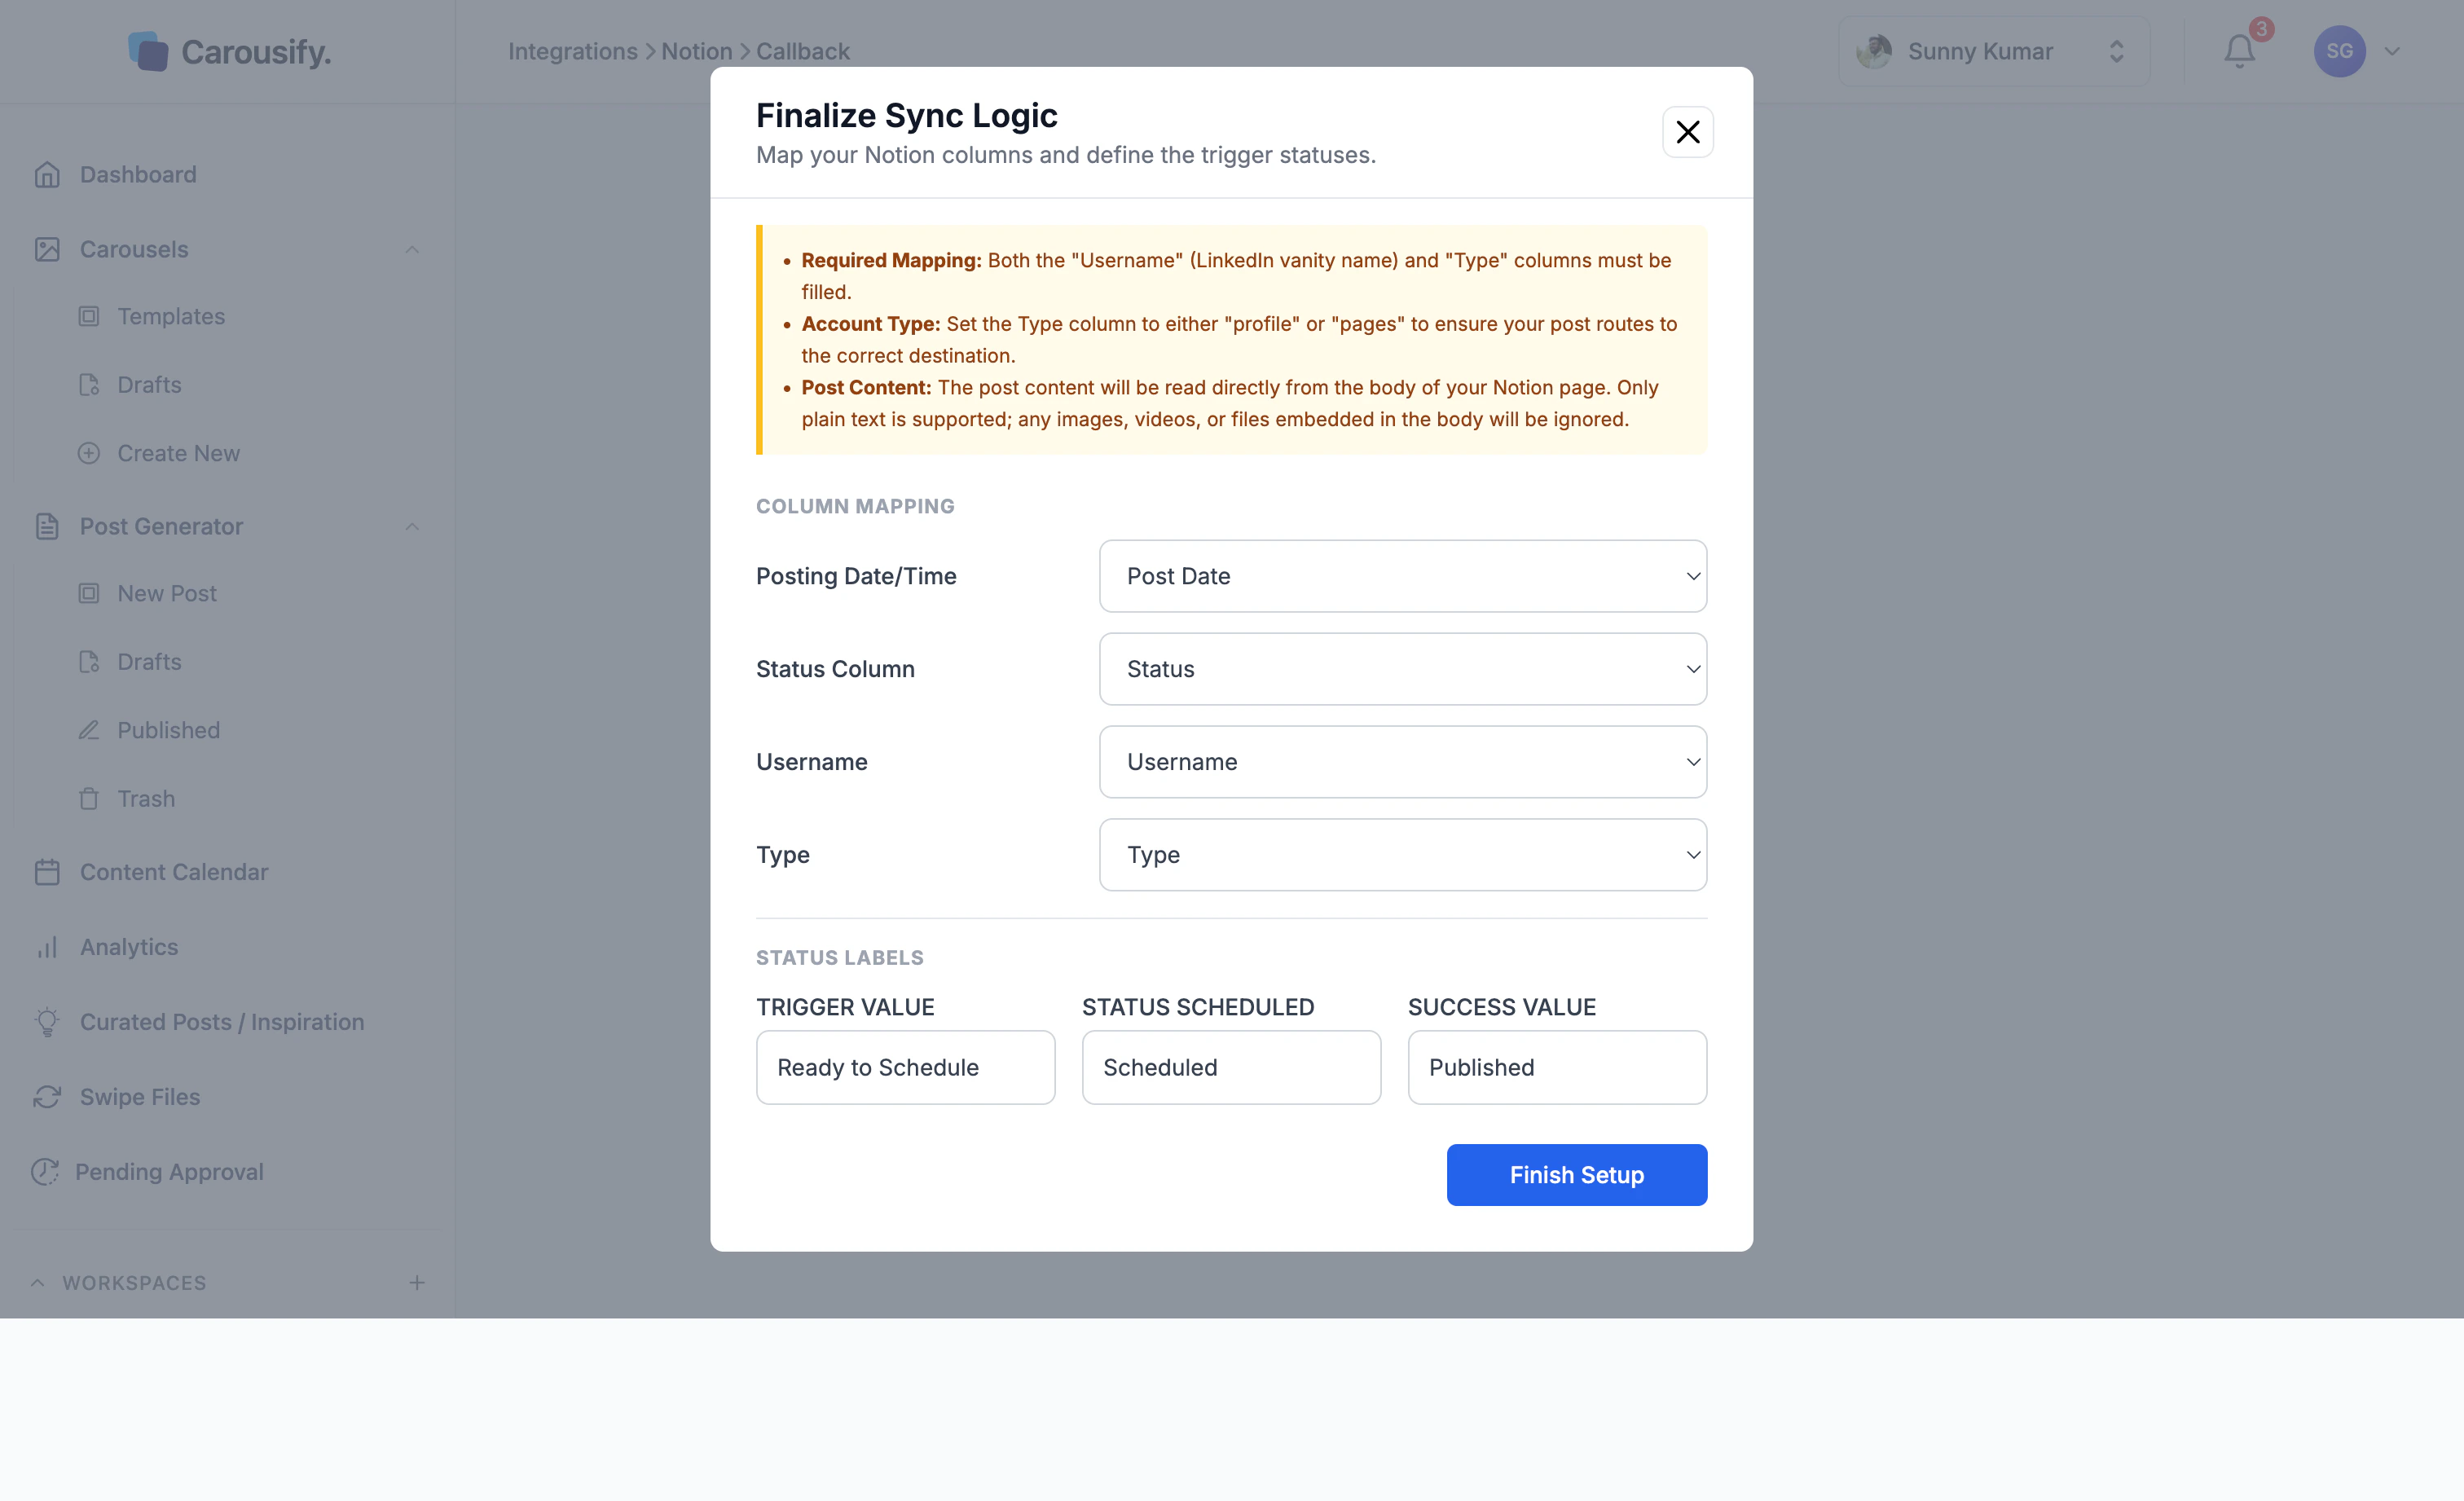 ### Column mapping
| Carousify field | Map to (template default) |
| --------------------- | ------------------------- |
| **Posting Date/Time** | `Post Date` |
| **Status Column** | `Status` |
| **Username** | `Username` |
| **Type** | `Type` |
If you built your own database, pick the matching columns from each dropdown.
### Status labels
This is the workflow contract — three string values that tell Carousify what your status column should say at each stage.
| Field | What it means | Suggested value |
| -------------------- | ----------------------------------------------------------------- | ------------------- |
| **Trigger value** | Carousify picks up the row only when **Status** equals this. | `Ready to Schedule` |
| **Status scheduled** | Carousify writes this back to the row once it's queued. | `Scheduled` |
| **Success value** | Carousify writes this back after the post publishes successfully. | `Published` |
You can use any string you want — they just need to match the options inside your Notion **Status** column exactly (case-sensitive). If your column has these as a **Select** type, make sure each value exists as an option.
**Required:** the **Username** and **Type** columns on every row you want to publish must be filled. **Username** is the LinkedIn vanity name — the bit after `linkedin.com/in/` for profiles or `linkedin.com/company/` for pages. **Type** must be exactly `profile` or `pages` (lowercase).
**Post content:** Carousify reads the post body straight from the body of the Notion page (open the row to edit it). Only plain text is supported — images, videos, and files embedded in the body are ignored.
Click **Finish Setup**. Carousify redirects you back to **Integrations** with Notion now showing as **Active**.
## How posts actually publish
Once the integration is live, here's the loop on every row:
Pick a row, fill in **Username**, **Type**, **Post Date**, write the body of the page, and change **Status** to the trigger value (e.g. `Ready to Schedule`).
Within a couple of minutes, Carousify pulls the row, parses the post body, and queues a scheduled post for the date and time in **Post Date**.
The **Status** column updates to your **Status scheduled** value (e.g. `Scheduled`). The row also appears in the Carousify [Content Calendar](/scheduling/calendar).
At **Post Date**, Carousify publishes via LinkedIn's official API.
The **Status** column flips to your **Success value** (e.g. `Published`). The post also shows up under [Published](https://app.carousify.com/published/) in Carousify.
If anything goes wrong (LinkedIn auth expired, body empty, timezone confusion, missing **Username**), Carousify leaves the row at the trigger value and surfaces the error in the [Activity Feed](https://app.carousify.com/dashboard/) on your dashboard.
Keep at least a **5-minute gap** between flipping the **Status** to your trigger value and the **Post Date**. Notion can take 2–3 minutes to fire its webhook to Carousify, and Carousify needs another minute or so to read the row and queue the post. If **Post Date** is too close to "now", the row may be picked up after its own scheduled time and silently miss the slot.
## Disconnect or reconnect
To disconnect Notion, go to **Manage Workspace › Integrations** and click the menu on the Notion card. Carousify revokes the Notion access token immediately and stops reading the database. The Notion data itself is untouched — your rows, statuses, and history stay where they are.
To reconnect later — or to point Carousify at a different database — run through the flow again. You'll go back through Notion's OAuth consent and the database picker.
Re-running OAuth is also how you grant access to a *different* page after the fact. Notion only shows pages you ticked during the original consent, so adding a new one means going back through **Allow access**.
## Troubleshooting
* **A row never picks up.** Check that **Status** matches your **Trigger value** exactly (case-sensitive), **Username** and **Type** are both filled, and **Post Date** is a Date column with time enabled.
* **Post won't schedule.** **Username** and **Type** have to match — a personal profile vanity name needs **Type** set to `profile`, and a company page vanity needs **Type** set to `pages`. Mixing them (e.g. a personal vanity with `pages`) means Carousify can't find a matching connected account and the post silently won't get scheduled.
* **My images aren't posting.** Carousify reads only plain text from the Notion page body today. To attach media, schedule from inside Carousify instead — see [Schedule a post](/scheduling/schedule-post).
* **The integration shows as Active but nothing syncs.** Open Notion, click the database name, and make sure the **Carousify** integration is still in the **Connections** list (top-right `…` menu › **Connections**). If it's gone, reconnect from Carousify.
## What's next
Schedule directly inside Carousify when you don't need Notion in the loop.
See every Notion-scheduled post alongside posts queued from Carousify itself.
Get pinged when a Notion-scheduled post publishes or fails.
Drive Carousify from Claude or VS Code when Notion isn't enough.
### Column mapping
| Carousify field | Map to (template default) |
| --------------------- | ------------------------- |
| **Posting Date/Time** | `Post Date` |
| **Status Column** | `Status` |
| **Username** | `Username` |
| **Type** | `Type` |
If you built your own database, pick the matching columns from each dropdown.
### Status labels
This is the workflow contract — three string values that tell Carousify what your status column should say at each stage.
| Field | What it means | Suggested value |
| -------------------- | ----------------------------------------------------------------- | ------------------- |
| **Trigger value** | Carousify picks up the row only when **Status** equals this. | `Ready to Schedule` |
| **Status scheduled** | Carousify writes this back to the row once it's queued. | `Scheduled` |
| **Success value** | Carousify writes this back after the post publishes successfully. | `Published` |
You can use any string you want — they just need to match the options inside your Notion **Status** column exactly (case-sensitive). If your column has these as a **Select** type, make sure each value exists as an option.
**Required:** the **Username** and **Type** columns on every row you want to publish must be filled. **Username** is the LinkedIn vanity name — the bit after `linkedin.com/in/` for profiles or `linkedin.com/company/` for pages. **Type** must be exactly `profile` or `pages` (lowercase).
**Post content:** Carousify reads the post body straight from the body of the Notion page (open the row to edit it). Only plain text is supported — images, videos, and files embedded in the body are ignored.
Click **Finish Setup**. Carousify redirects you back to **Integrations** with Notion now showing as **Active**.
## How posts actually publish
Once the integration is live, here's the loop on every row:
Pick a row, fill in **Username**, **Type**, **Post Date**, write the body of the page, and change **Status** to the trigger value (e.g. `Ready to Schedule`).
Within a couple of minutes, Carousify pulls the row, parses the post body, and queues a scheduled post for the date and time in **Post Date**.
The **Status** column updates to your **Status scheduled** value (e.g. `Scheduled`). The row also appears in the Carousify [Content Calendar](/scheduling/calendar).
At **Post Date**, Carousify publishes via LinkedIn's official API.
The **Status** column flips to your **Success value** (e.g. `Published`). The post also shows up under [Published](https://app.carousify.com/published/) in Carousify.
If anything goes wrong (LinkedIn auth expired, body empty, timezone confusion, missing **Username**), Carousify leaves the row at the trigger value and surfaces the error in the [Activity Feed](https://app.carousify.com/dashboard/) on your dashboard.
Keep at least a **5-minute gap** between flipping the **Status** to your trigger value and the **Post Date**. Notion can take 2–3 minutes to fire its webhook to Carousify, and Carousify needs another minute or so to read the row and queue the post. If **Post Date** is too close to "now", the row may be picked up after its own scheduled time and silently miss the slot.
## Disconnect or reconnect
To disconnect Notion, go to **Manage Workspace › Integrations** and click the menu on the Notion card. Carousify revokes the Notion access token immediately and stops reading the database. The Notion data itself is untouched — your rows, statuses, and history stay where they are.
To reconnect later — or to point Carousify at a different database — run through the flow again. You'll go back through Notion's OAuth consent and the database picker.
Re-running OAuth is also how you grant access to a *different* page after the fact. Notion only shows pages you ticked during the original consent, so adding a new one means going back through **Allow access**.
## Troubleshooting
* **A row never picks up.** Check that **Status** matches your **Trigger value** exactly (case-sensitive), **Username** and **Type** are both filled, and **Post Date** is a Date column with time enabled.
* **Post won't schedule.** **Username** and **Type** have to match — a personal profile vanity name needs **Type** set to `profile`, and a company page vanity needs **Type** set to `pages`. Mixing them (e.g. a personal vanity with `pages`) means Carousify can't find a matching connected account and the post silently won't get scheduled.
* **My images aren't posting.** Carousify reads only plain text from the Notion page body today. To attach media, schedule from inside Carousify instead — see [Schedule a post](/scheduling/schedule-post).
* **The integration shows as Active but nothing syncs.** Open Notion, click the database name, and make sure the **Carousify** integration is still in the **Connections** list (top-right `…` menu › **Connections**). If it's gone, reconnect from Carousify.
## What's next
Schedule directly inside Carousify when you don't need Notion in the loop.
See every Notion-scheduled post alongside posts queued from Carousify itself.
Get pinged when a Notion-scheduled post publishes or fails.
Drive Carousify from Claude or VS Code when Notion isn't enough.